Ok, I've worked on this since Christmas but I kept quiet since I wasn't sure I'd actually have the skill to take on this costume project.
However, by now I've managed to create something that is somewhat presentable though it's clearly still very early in this project and I'd like to show it to you - and maybe get a little input.
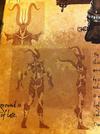
I had found the files for the horns and the shoulders on the net somewhere - unfortunately I had just saved them but not bookmarked the source so I do apologize - I have no idea who pulled those objs from the game. I'll give credit if someone speaks up!
However, they still needed unfolding - a task I had not done before myself.
That said... a shoutout to Zombiegrimm for unfolding the tons of Skyrim files. Man, doing this really taught me not to take things for granted and how much work you invest in them for the community!
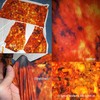
Now on with my project: I built the horns and shoulders pepakura model, papermachéd them with my usual technique and then it was time to heat up the Worbla!
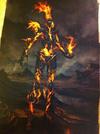
For this project I decided to make the best use of the texture of the material. While usually one spends a lot of time trying to get rid of the rough surface of Worbla for metal armor - this armor looked like it was made from solidified lava with parts still molten inbetween (I am really looking forward to painting this).
I did a few tests sculpting with the material and finally decided that the rough edges created by tearing half-heated Worbla gave the best effect if layered.
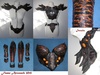
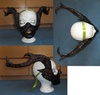
The first part I finished were the antlers

If you are somewhat familiar with the creature you'll realize that they are part of a mask-like structure. For that I bought a white-mask as a base - added some paper maché for stability (and also because the material of the cheap masks doesn't deal well with the heat, I melted the first one and had to start over) then I molded Worbla over it - and attached the horns.
Figuring out where to place attachments wasn't that easy and it took 2 or 3 tries but I finally came up with a placement that worked. It keeps the mask safely in place and allows free movement.
I will need to figure out how to *hide* them evetually for costume purposes, but for now I am really happy with the result:

Motion test - it remains securely in place, I can breath and yes there is enough room for padding across the nose - a mask with horns this size will need that!
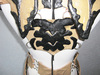
Next I moved on to the shoulders.
Again I used a pepakura base - but I realized early on that I needed to attach them more securely than straps, buckles and a D-ring would allow. On the other hand I like to be able to move freely so building collar-neck-shoulders as a joined piece as it looked in the reference wasn't an option either.
In the end I decided to compromise - I built a 2-part under-structure that lay comfortably across my shoulder and distributed the weight - and attached the massive part of the shoulders to that base. There is a slight issue with symmetry from the back - I stared and adjusted it several times from the front and when I was finally satisfied with the front view the back was slightly uneven - but that seems to be an issue I always have - I have no idea how some of you create perfectly symmetric armor.
This being a more organic approach to armor I can live with it but it still irks me.
The other issue I have is that I think I may have scaled them a little bit too wide but it's hard to tell on a dress form for the lack of arms at the side of the torso. Other than that I am quiet happy with the design and I hope this will work out. No neck structure part like in the reference though.

As you can see I haven't finished sculpting the texture all over the piece yet.
And I am still unsure if I want the spine part attached to it or not.
It looks nice from the back, but in the side view I don't like the curve and size of it. Any input on this?
However, by now I've managed to create something that is somewhat presentable though it's clearly still very early in this project and I'd like to show it to you - and maybe get a little input.
I had found the files for the horns and the shoulders on the net somewhere - unfortunately I had just saved them but not bookmarked the source so I do apologize - I have no idea who pulled those objs from the game. I'll give credit if someone speaks up!
However, they still needed unfolding - a task I had not done before myself.
That said... a shoutout to Zombiegrimm for unfolding the tons of Skyrim files. Man, doing this really taught me not to take things for granted and how much work you invest in them for the community!
Now on with my project: I built the horns and shoulders pepakura model, papermachéd them with my usual technique and then it was time to heat up the Worbla!
For this project I decided to make the best use of the texture of the material. While usually one spends a lot of time trying to get rid of the rough surface of Worbla for metal armor - this armor looked like it was made from solidified lava with parts still molten inbetween (I am really looking forward to painting this).
I did a few tests sculpting with the material and finally decided that the rough edges created by tearing half-heated Worbla gave the best effect if layered.
The first part I finished were the antlers
If you are somewhat familiar with the creature you'll realize that they are part of a mask-like structure. For that I bought a white-mask as a base - added some paper maché for stability (and also because the material of the cheap masks doesn't deal well with the heat, I melted the first one and had to start over) then I molded Worbla over it - and attached the horns.
Figuring out where to place attachments wasn't that easy and it took 2 or 3 tries but I finally came up with a placement that worked. It keeps the mask safely in place and allows free movement.
I will need to figure out how to *hide* them evetually for costume purposes, but for now I am really happy with the result:
Motion test - it remains securely in place, I can breath and yes there is enough room for padding across the nose - a mask with horns this size will need that!
Next I moved on to the shoulders.
Again I used a pepakura base - but I realized early on that I needed to attach them more securely than straps, buckles and a D-ring would allow. On the other hand I like to be able to move freely so building collar-neck-shoulders as a joined piece as it looked in the reference wasn't an option either.
In the end I decided to compromise - I built a 2-part under-structure that lay comfortably across my shoulder and distributed the weight - and attached the massive part of the shoulders to that base. There is a slight issue with symmetry from the back - I stared and adjusted it several times from the front and when I was finally satisfied with the front view the back was slightly uneven - but that seems to be an issue I always have - I have no idea how some of you create perfectly symmetric armor.
This being a more organic approach to armor I can live with it but it still irks me.
The other issue I have is that I think I may have scaled them a little bit too wide but it's hard to tell on a dress form for the lack of arms at the side of the torso. Other than that I am quiet happy with the design and I hope this will work out. No neck structure part like in the reference though.
As you can see I haven't finished sculpting the texture all over the piece yet.
And I am still unsure if I want the spine part attached to it or not.
It looks nice from the back, but in the side view I don't like the curve and size of it. Any input on this?
Attachments


Last edited by a moderator:
")