Reach UNSC Trooper WIP

Status
Not open for further replies.
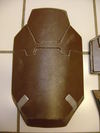
This is looking really great! I bet the foam is going to make armor much more comfy to wear! hehe

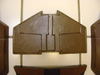
Now one thing I am curious to know since you didn't mention it is, what kind of paint did you use? The reason I ask is because I have seen threads where people are testing various paints and checking to see how they hold up when the foam is bent and checking for any signs of cracking or wrinkles. Have you encountered any such problems?

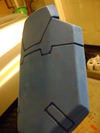
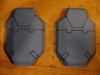
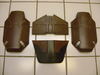
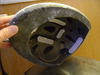
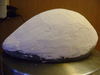
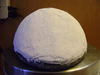
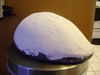
Hi HaloGoddess and thanks! When it comes to painting plastic or anything that can bend like foam or rubber, I tend to stick with the Krylon Fusion brand or just anything from Krylon because they can be used on a wide variety of surfaces from wood to even fabrics. So far, I've had good results with this project so I highly recommend using Krylon for your painting needs. And yes, foam rubber is much more comfortable to wear compared to a full ABS plastic armor (like my clonetrooper armor).
 
It seems that most people seem to be recommending the Krylon Fusion brand paint. :p Now another thing I am curious to know, did you lay down any sort of base coat or did you just go straight ahead and spray it with the color you wanted?Also, have you or are you going to use an over coat at all?
 
HaloGoddess, I usually brush on a couple of coats of Mod Podge first on stationary parts because the foam may absorb the paint, especially in areas that have been sanded. That's why I designed my chest piece to be worn without bending any parts, in the process of putting it on. Otherwise, the Mod Podge will crack and flake-off. After painting the parts and weathering, I would recommend protecting the finish with some clear coat especially if you used water slide transfer film for your decals. Hope this helps! :)

A little bit of an update on my progress. I was able to make a sketch of the bigger shoulder armor even though I have the pep files for the EOD shoulder plates; I am really no good nor have any patience in pepping them. LOL! So here are some pics. :D

DSC01302.jpg


Here are the shoulder armor cutout from 1" inch blue foam rubber with some details.
DSC01306.jpg


DSC01310.jpg


DSC01311.jpg
 

Attachments

  • DSC01302.jpg
    DSC01302.jpg
    34.3 KB · Views: 180
  • DSC01306.jpg
    DSC01306.jpg
    52.1 KB · Views: 181
  • DSC01310.jpg
    DSC01310.jpg
    40.5 KB · Views: 185
  • DSC01311.jpg
    DSC01311.jpg
    42.4 KB · Views: 180
I like that detail. Came out nice. Did you burn in the design or use a dremel to cut it?

Also, what is mod podge?? o_O Don't think I am too familiar with that. XD I really need to get me some of this foam stuff so that I can have a costume ready for the comic con that happens in my area! :D
 
I like that detail. Came out nice. Did you burn in the design or use a dremel to cut it?

Also, what is mod podge?? o_O Don't think I am too familiar with that. XD I really need to get me some of this foam stuff so that I can have a costume ready for the comic con that happens in my area! :D

Thanks glad you like that! I burned the lines in with soldering iron which I also use to cut the foam with a hot knife attachment. Mod Podge is a glue which also serves as a sealer that is used most often to seal or put together jigsaw puzzles. Also, to go back to your question about "base paint", some people use a primer first (helps to make the paint stick), then a silver under layer, then apply some liquid latex and in some cases here, yogurt or pudding for the "scratched or battle damaged" effect before spraying the top layer. What happens is that when the top layer dries, you can scratch or wipe off the liquid latex, yogurt or pudding to reveal the silver paint underneath which will give the scratched or battle damaged look. For me though, I will be applying the weathering/scratches topically by using the dry brush method.

You should try making something with foam because IMHO, it's easier than pepping and it's less time-consuming. If you know how to scale what you want to make, you can use my method of drawing the parts down on 24"x 24" inch poster board, then cut them out to be used as templates for the foam material. I used crazy glue instead of hot glue to assemble the parts together which is much cleaner and it bonds right away. This UNSC armor that I am making is what I will be wearing for the San Diego Comic Con 2011. So, I think I'll finish it ahead of time if not just in-time for SDCC 2011. So, far I have most of the body armor done except for the drop leg thigh attachments, helmet, pouch attachments, assault rifle and side arm.
 
wow, great job so far. ive liked the reach trooper look since the game came out, but i decided to try somthing safer for my first build.
 
hey man looks awesome i think pretty soon foam is gonna take over . i chest pep my chest i am not sure if it s to big just my thread and let me know what you think
 
Wow I'm really Impressed with this Build and how its coming along... and lol SDCC 2011 lets hope those servers to get the comic con tickets don't go down again :D I'll see you there with hopefully more marines using this foam technique.

Also i have a question I'm planning on reworking the suits i have and i wanna use ur poster board templates method to creat some Reach troopers of my own is that ok?
 
HaloGoddess, I usually brush on a couple of coats of Mod Podge first on stationary parts because the foam may absorb the paint, especially in areas that have been sanded. That's why I designed my chest piece to be worn without bending any parts, in the process of putting it on. Otherwise, the Mod Podge will crack and flake-off. After painting the parts and weathering, I would recommend protecting the finish with some clear coat especially if you used water slide transfer film for your decals. Hope this helps! :)

A little bit of an update on my progress. I was able to make a sketch of the bigger shoulder armor even though I have the pep files for the EOD shoulder plates; I am really no good nor have any patience in pepping them. LOL! So here are some pics. :D

DSC01302.jpg


Here are the shoulder armor cutout from 1" inch blue foam rubber with some details.
DSC01306.jpg


DSC01310.jpg


DSC01311.jpg
did you sand the edges to have the rounded edges
 

Attachments

  • DSC01311.jpg
    DSC01311.jpg
    42.4 KB · Views: 190
  • DSC01310.jpg
    DSC01310.jpg
    40.5 KB · Views: 195
  • DSC01306.jpg
    DSC01306.jpg
    52.1 KB · Views: 188
  • DSC01302.jpg
    DSC01302.jpg
    34.3 KB · Views: 195
Wow I'm really Impressed with this Build and how its coming along... and lol SDCC 2011 lets hope those servers to get the comic con tickets don't go down again :D I'll see you there with hopefully more marines using this foam technique.

Also i have a question I'm planning on reworking the suits i have and i wanna use ur poster board templates method to creat some Reach troopers of my own is that ok?

Thanks rvalera! Yeah, go ahead use the same method. I'm more of a "hands-on" kinda person when it comes to crafting. I've tried doing the pepakura method but the scaling always comes out wrong and I end up wasting so much time and paper. Good luck and let me know if I can help in any way!

very nice looks like foam is the way to go ;)

Thanks reachforit! Personally, I prefer this method because it is easier for me than pepping the armor.

Hey thx for checking out my odst wip. and nice progress!! and how do you make yours look like that?

Thanks iownjuu! I used a heat gun to bend the curves into the foam and used a long serrated bread knife to cut the angled edges. Then I sand the rough parts and edges where it's supposed to have a softer or curved edge. To add the detail lines, I sketch the lines down on the piece then I used my soldering iron with the soldering tip and a metal ruler to burn the lines in. I then brush a coat of sealer using matte Mod Podge before applying the paint.

UPDATE:

I painted the shoulder armor along with the upper and lower ab plates. The base paint is brown, then I misted it with Krylon X-Metals and Krylon Silver Metallic to give it that metallic look. Some detail was added using dry brushing method for scratches and bare metal wear.

x-metal.png


DSC01321.jpg


DSC01322.jpg


DSC01323.jpg


I also bought a $16 dollar bicycle helmet so I can start working on sculpting the Reach UNSC trooper helmet. What I did was strip the outer shell and straps off then cut the back part out. The helmet is shaped the opposite of the Reach UNSC trooper helmet meaning the front looks like the back and vice versa. So, I used the back of the bike helmet as the front of the UNSC helmet and I filled-in the recessed areas and holes with masking tape before filling them in with bondo. After the bondo has cured, I sanded it a little then I topped it with MH ready patch for a more accurate shape and smoother finish. MH ready patch is easier to sand compared to bondo but it's brittle and chalky and can break off easily but after sanding it to the desired shape and smoothness, spraying it with primer or paint strengthens the MH ready patch to a bondo like result. I will be sanding the helmet later and adding the back and sides using a piece of ABS sheet then add the details in later. I plan to pep the sides (ears) of the UNSC trooper helmet and resin, fiberglass and attach it to the helmet.

DSC01316.jpg


DSC01318.jpg


DSC01324.jpg


DSC01325.jpg


DSC01326.jpg


DSC01327.jpg
 

Attachments

  • DSC01321.jpg
    DSC01321.jpg
    62.9 KB · Views: 193
  • DSC01322.jpg
    DSC01322.jpg
    89.1 KB · Views: 181
  • DSC01316.jpg
    DSC01316.jpg
    45.1 KB · Views: 201
  • DSC01318.jpg
    DSC01318.jpg
    103.3 KB · Views: 199
  • DSC01323.jpg
    DSC01323.jpg
    85.5 KB · Views: 178
  • DSC01327.jpg
    DSC01327.jpg
    59.8 KB · Views: 179
  • DSC01326.jpg
    DSC01326.jpg
    53.7 KB · Views: 192
  • DSC01325.jpg
    DSC01325.jpg
    54.8 KB · Views: 192
  • DSC01324.jpg
    DSC01324.jpg
    56.8 KB · Views: 187
Your foam build on the torso made me want to build a USNC Trooper. I already made the torso blueprints on paper, I'm going to make it out if foam later. I also like how your making the helmet.
 
Wow thumbs up, every time I see this build I am amazed at your scratch building skills. I plan to try the foam method after thanksgiving holidays settle down so I can get to my build (this build has convinced me that foam is easier, safer, and less time consuming than traditional building methods.:)
 
That's incredible for a scratch build. I don't know if I'll ever understand how some people do this kind of stuff out of foam but I hope I do someday! Great job!
 
Thanks for nice comments guys and Happy Thanksgiving to all of you!:)

did you sand the edges to have the rounded edges

I did sand the edges, first with a 60 grit to get the rough surfaces, then a 100 grit for smoother surface but still textured like it's metallic.

cool biuld. what helmet style are you using? open mouth or closed (mp).

Thanks! I will be using the open mouth but I do like the closed style as well. Maybe my version 2 will be closed like the picture below.

HaloReach_-_MarineUniform-1.jpg
 

Attachments

  • HaloReach_-_MarineUniform-1.jpg
    HaloReach_-_MarineUniform-1.jpg
    56.6 KB · Views: 175
Status
Not open for further replies.
Back
Top