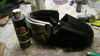
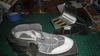
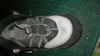
as promised here is the boot conversion..

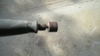
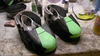
i started off by removing the toe area of the boot.
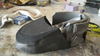
i have only glued the heel of the shoe to the foam to allow for the shoe to move within the boot when walking.

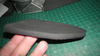
i rounded the square toe out to make it look more like the front of a boot.

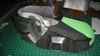
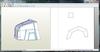
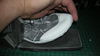
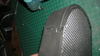
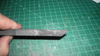
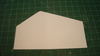
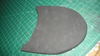
i then made a template for the sides of the boot..


if you notice the angel i put in the center of the boot area. this allows for the boot to bend while walking. picture of this later in post.
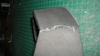
after cutting the sides for the toe i glued them on each side. i forgot to take a picture of this and i am sorry but you can see it as i move along. i then measured and made a template for the toe and cut it from the foam.. after cutting it from the foam i beveled the edge that was going to be joined to the side piece to be able to get a smooth joint.

after beveling the edge i took a heat gun to the foam to put a bend in it to be able to make the bend around the toe easier.

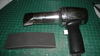
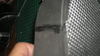
after gluing the toe on i figured this was a good time to show how i start to smooth the joint.

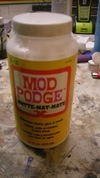
i first put a bead of hot glue into the joint just enough to fill the gaps in the joints to just above the surface. i let the glue set all the way and then using the edge of the hot glue gun tip i begin to melt the hot glue bead back down to level with the foam. keep a paper towel near by to be able to wipe excess glue from the tip of the glue gun that way you prevent buildup on the gun which will transfer to the piece. this may take some practice but it can be done where the joint becomes invisible and in hard spots i will use flexible putty after mod podge because the flexible putty will not stick to the hot glue.


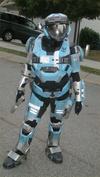
now that i have the sides on i reinforced the foam from the inside to ensure solid joints that will not come apart later.. i laid a piece of foam on the top of the toe area and traced the pattern of the top of the foot and cut it out of foam.

hit the top of the boot with the heat gun and put a little bit of a curve around the edges and glued it to the top of the boot.

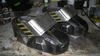
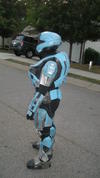
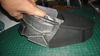
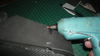
with the angles in the sides allowing for the boot to flex while walking here is how it looks when flexed.

i started off by removing the toe area of the boot.
i have only glued the heel of the shoe to the foam to allow for the shoe to move within the boot when walking.
i rounded the square toe out to make it look more like the front of a boot.
i then made a template for the sides of the boot..
if you notice the angel i put in the center of the boot area. this allows for the boot to bend while walking. picture of this later in post.
after cutting the sides for the toe i glued them on each side. i forgot to take a picture of this and i am sorry but you can see it as i move along. i then measured and made a template for the toe and cut it from the foam.. after cutting it from the foam i beveled the edge that was going to be joined to the side piece to be able to get a smooth joint.
after beveling the edge i took a heat gun to the foam to put a bend in it to be able to make the bend around the toe easier.
after gluing the toe on i figured this was a good time to show how i start to smooth the joint.
i first put a bead of hot glue into the joint just enough to fill the gaps in the joints to just above the surface. i let the glue set all the way and then using the edge of the hot glue gun tip i begin to melt the hot glue bead back down to level with the foam. keep a paper towel near by to be able to wipe excess glue from the tip of the glue gun that way you prevent buildup on the gun which will transfer to the piece. this may take some practice but it can be done where the joint becomes invisible and in hard spots i will use flexible putty after mod podge because the flexible putty will not stick to the hot glue.
now that i have the sides on i reinforced the foam from the inside to ensure solid joints that will not come apart later.. i laid a piece of foam on the top of the toe area and traced the pattern of the top of the foot and cut it out of foam.
hit the top of the boot with the heat gun and put a little bit of a curve around the edges and glued it to the top of the boot.
with the angles in the sides allowing for the boot to flex while walking here is how it looks when flexed.
Attachments
-
 DSCN2737.jpg28.7 KB · Views: 297
 -
 DSCN2738.jpg19.2 KB · Views: 278
 -
 DSCN2739.jpg22.7 KB · Views: 352
 -
 DSCN2746.jpg28.7 KB · Views: 282
 -
 DSCN2745.jpg18.3 KB · Views: 281
 -
 DSCN2743.jpg25.6 KB · Views: 290
 -
 DSCN2742.jpg24.9 KB · Views: 267
 -
 DSCN2741.jpg19 KB · Views: 307
 -
 DSCN2740.jpg13.9 KB · Views: 293
 -
 DSCN2755.jpg26.6 KB · Views: 267
 -
 DSCN2753.jpg21.7 KB · Views: 275
 -
 DSCN2751.jpg23.8 KB · Views: 278
 -
 DSCN2750.jpg22.1 KB · Views: 287
 -
 DSCN2748.jpg20.2 KB · Views: 290