WIP: My very own ODST helmet!

Status
Not open for further replies.

Abaris

Jr Member
Hi all again. As a new year project I'm building an ODST (base/Rookie version) helmet. It'll take all the year because I'm at home rarely, I'm actually getting a degree out of town, really far.

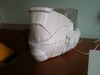
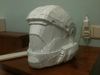
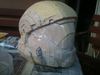
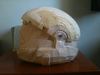
What I have right now is the base of the helmet made with pepakura, also resined/rondoed and with a little bondo plus sanding on it. The pepakura base I've used is the one modeled and unfolded by Kirrou over the 405th. It's awesome and the most accurate one too. It's not fullsize because I'm a bit shorter. I'm 5' 8" while an ODST should be around 6' or so. Not a really big diference but I want to do it accurate for my size, I don't want to look a booble head.

I won't work on it until april or so, so... here are some WIP pics for you (at least I love WIP pics in threads :p)

IMG_0078.jpg


IMG_0085.jpg


IMG_0089.jpg


IMG_0091.jpg


IMG_0096.jpg


IMG_0098.jpg


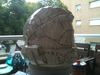
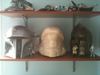
And one for "fun" and also reference on size. MR Fett Copy <--> ODST Helmet <--> Cast of a Screen Used 300's Helmet

IMG_0099.jpg
 

Attachments

  • IMG_0078.jpg
    IMG_0078.jpg
    60.1 KB · Views: 240
  • IMG_0085.jpg
    IMG_0085.jpg
    65.9 KB · Views: 241
  • IMG_0089.jpg
    IMG_0089.jpg
    99.4 KB · Views: 252
  • IMG_0091.jpg
    IMG_0091.jpg
    82.2 KB · Views: 239
  • IMG_0096.jpg
    IMG_0096.jpg
    62.7 KB · Views: 258
  • IMG_0098.jpg
    IMG_0098.jpg
    64.3 KB · Views: 246
  • IMG_0099.jpg
    IMG_0099.jpg
    111.2 KB · Views: 247
So.... Can I have it? That looks really good, in every picture. A really good job if you ask me, can't wait for you to finish it so I can see the end results.
 
Great start!

always nice to see another ODST jumping into hell :p

Keep working and show us what got....

Cujo3131
 
Thank you very much for the comments! BTW, it's the Kirrou model. IMO the most accurate one avaiable, but it's just my opinion...
 
Thank you very much for the comments! BTW, it's the Kirrou model. IMO the most accurate one avaiable, but it's just my opinion...

Your helmet is looking great. Can't wait to see this beast completed. I'm using this model for my daughters helm too. I love the look of the Kirrou model.
 
I do not know why I didn't post that my Kirou helmet was broken, I found it on the floor with a big hole so I smashed it even harder... After a few months I started again, this time using a LD (but smooth) ODST helmet, the one I smoothed from the gamerip file. Here it's the file if someone wants to give it a try (unfolded for A4 paper):

http://www.4shared.com/file/Y3taR4Sb/ODST_rookie_helmet_Smooth.html?

I built the pepakura helmet (this time I've hardened it with ONE outter coat of fiberglass resin, TWO coats of Rondo (resin+bondo mix) and TWO coats of Fiberglass (with resin of course)), this way I'm sure it won't break if it falls, at least not that much.

I'm going for a mix between the Legacy Effects (We Are ODST spot) ODST helmet and the Reach game helmet, so it'll have a "real" look but it'll still be accurate to the game. I'll post pics as soon as I have something to show.

So... here are the progress on the new helmet. It has taken to me 1 week and 2.2 pounds of Bondo to get the dome symmetrical, all I need to do to the dome is to add a Bondo raised strip at the center of the dome and carving some lines at the sides of the dome. I have the back and the sides also filled and sanded, what I need to do next is to use another ton of Bondo at the mouth zone and add the ears, and then I'll start adding details with plastic strips and more Bondo, then the finishing stage of the surface with wall plaster and wet sanding. I hope to have this done by the end of this month but from theory to reality... you know. Here are the pics:

img0099ym.jpg


img0110ay.jpg


img0113ru.jpg


img0117ws.jpg
 
Odst is my favorite!!!! scince your going for the less detail pep file i believe it should be much easier. im looking forward to seeing your progress good luck!
 
I do not know why I didn't post that my Kirou helmet was broken, I found it on the floor with a big hole so I smashed it even harder... After a few months I started again, this time using a LD (but smooth) ODST helmet, the one I smoothed from the gamerip file. Here it's the file if someone wants to give it a try (unfolded for A4 paper):

http://www.4shared.com/file/Y3taR4Sb/ODST_rookie_helmet_Smooth.html?

I built the pepakura helmet (this time I've hardened it with ONE outter coat of fiberglass resin, TWO coats of Rondo (resin+bondo mix) and TWO coats of Fiberglass (with resin of course)), this way I'm sure it won't break if it falls, at least not that much.

I'm going for a mix between the Legacy Effects (We Are ODST spot) ODST helmet and the Reach game helmet, so it'll have a "real" look but it'll still be accurate to the game. I'll post pics as soon as I have something to show.

So... here are the progress on the new helmet. It has taken to me 1 week and 2.2 pounds of Bondo to get the dome symmetrical, all I need to do to the dome is to add a Bondo raised strip at the center of the dome and carving some lines at the sides of the dome. I have the back and the sides also filled and sanded, what I need to do next is to use another ton of Bondo at the mouth zone and add the ears, and then I'll start adding details with plastic strips and more Bondo, then the finishing stage of the surface with wall plaster and wet sanding. I hope to have this done by the end of this month but from theory to reality... you know. Here are the pics:

img0099ym.jpg


img0110ay.jpg


img0113ru.jpg


img0117ws.jpg

You´re a very talented guy!

What did happen with this WIP? Also where do you live? I´m from Málaga, maybe where closer than we imagine :p

And last question, I promise, are you building something these days? :D

See you!
 
Here are two more pics. I've add the top strip (ala WETA/Legacy FX) and I've filled and sanded all the helmet. Next step, smooth the helmet with wall plaster (I've sanded it very rough) and add the details like grooves, and others with plastic sheets. BTW, the pencil lines are roughly made to have "the look" for the pics.

img0130bi.jpg


img0132xa.jpg


BTW Zabana, I'm KaanE, you know me over the RPF ;) And yes, that's a Mexican hat... I don't know why the **** do I have one of those. LoL.

Yep, I remember you :p

Any Coronita that match that hat :p?
 
The funny story of the "Coronita", which is called Coronita only in Spain, Corona all over the world. And nope, I do not have one :D
 
I know Hugh Holder has alot of the WETA type of stuff and upgrades like Dutch's UA variant,

Anyway your going to have to get an awesome paintjob for that thing. Something that willmake your friends be all like *_*
What you could do is use some nice car paint, and then use some clearcoats to give it that polished metal look.
 
Thank you very much guys! I'm actually filling the rough sanding marks with some wall filler (the water based one), it's easy to sand but it dried really slow... I hope to have the dome primered today, then I'll carve the lines (a proccess I learnt from Torsoboy, you must check his thread). I'll post some pics tomorrow (I hope so).

I'm going to mould it so it's not gonna be "my helmet". About the paintjob, still far away from that... Hehe, anyway I have some experiencie with Boba Fett helmets but I think I'm gonna use Spray paint this time instead of airbrush. My favourite spray paint is the Dupli-Color ones, the RAL ones they made are top notch. I have also been using their primer for almost 4 years, it works perfectly.
 
Here are some new pics. The first is a "pre-primer" one after I had sanded the wall plaster (white spots) this makes it to have a smoother surface and to correct grooves because of the sanding. I still need to do the classic steps: primer > sand > primer > sand > primer > sand > ... Until it has a smooth surface, and then I'll add the detail grooves. I also have to correct a little spot to make it symmetrical, but that's a easy fix. Here are the pics, BTW, I've just primered the dome, which is still unfinished.

img0134fq.jpg


img0135g.jpg


img0136i.jpg
 
I´ll recomend you to use a filler instead a primer, duplicolor has one, it´s name is Spritz-Spachtel in spanish it´s something like aparejo, I only found it in dupli-color´s brand (spray) or in a can to be sprayed by airbrush gun ;)
 
Status
Not open for further replies.
Back
Top