Greetings fine members!
(First of all, english is NOT my native language. So I'm sorry if you find some stupid grammar mistakes, I do my very best to come up with refined english writing.)
This thread will contain my second and "real" project since my first one was a complete mess, I was not a member of this forum at the time and I just rushed into it, totally underestimating the level of difficulty of doing this. Well, at least I can say that I learned a lot and I put my hasty attitude aside and eventually submitted to my noob status. The learning part has been great so far and I've given myself lots of pacepalms the moment I began to finally understand the finer methods of building props. I'm currently being mentored in the Bondo section as well, which has given me greater insides on that part.
The reason I just completely started over was not only because I wasn't satisfied and I simply failed, also because I waited about ten months to pick up te project that was in Low Def and I just wasn't able to get the feel for it anymore when I looked at it. It was that bad! LOL
So, let's take a look to my previous failure, shall we? Maybe this can also be educational if there are others out there that are also struggling with a sense of arrogance towards these projects, like a was AT FIRST") . And I'm quite sure there are enough rushing noobs, so here goes!
. And I'm quite sure there are enough rushing noobs, so here goes!

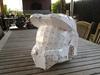
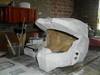
This was the first pep I ever did, using the normal detailed parts I found in de Pepakura File Index. I did look up my information on the net (not forums), where I stumbled up on Pepakura. I was able to find many tutorial videos and info through Squidoo, Youtube or just plain old Googling for key words.

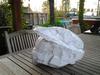
Another look at the pepped model, I was quite happy with the outcome. I felt kind of lonely doing this, it absorbed lots of time and I just wanted to be able to show off without a lot of work. Made it in two days without much attention, DESPICABLE ME!

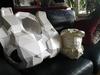
THAT CHESTPIECE, right? So busy folding and "getting it done" I didn't even think of looking for scaling tutorials. Well, this one went straight in the trash and I searched the net to finally find the Halo goddess tutorial. (HALLELUJA) This was my first contact with the forum, didn't even think of exploring it..D'oh! The Helmet had several coats of resin, I literally SOAKED it! This is SO WRONG, always take it step by step, applying small parts of the helmet at a time and letting it dry so it stays in shape.

At last I got the scaling for the chest right, and was about as far as the upper body goes. I was still working extremely fast, adding SICK amounts of resin on my poor pieces. But who cares, they were Low D, LOL. I used fiberglass to strenghten the helmet, which was a MESS. Try applying fiberglass with three gallons of resin at the speed of light, that was me. If I look back at it now, I feel like I was a toddler fingerpainting..

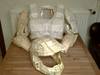
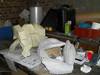
Well, this is embarrassing.. The "technique" I used to apply the filler was simply smearing LARGE amounts on it with my hands, as I found that it covers all areas nicely. I thought I could sand it down and keep the detail, but I was just blown away by how much I had screwed up when I got to sanding.

And this is it, my garbage can. Pieces lost their shape, broke down due to poor glueing and handling, CHAOS. The biggest facepalm ever was served when I realized I shouldn't have cut my chestpiece when it was not fully hardened on the inside, it did not fit anymore. I decided it was time for my to stop doing what I was doing and admit that I had to learn a lot, THEN work a lot. But anyhow, there probably couldn't have been a better lesson for me then my own project kicking me in the nuts, so that's a good thing! This joke took me about three weeks to pull off last holidays.


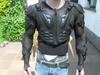
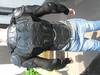
But here's something I'll defenitly keep for the next project: the upper body undersuit! I think it looks awesom, found it online for like forty dollars, from China of course. It's supposed to be protective gear for crossmotorcycling, but since it's very weak/cheap stuff for that purpose I find it to be the best alternative for an upper body undersuit.
Well, that's that. I know I messed up last year, and I was quite sad, after all this was my dream. I needed a lot of Ben and Jerry's to get out of that depression! LOL But then I thought: "Hey, what about that 405th website?", so I finally became a member. As I said, facepalms have been coming and going eversince, I hate myself for doing what I did last year and I hope that some other noobs can learn someting from this. Main advice: KEEP KALM AND WORK SLOWLY.
But hey, I have a new project I'm working on as well. Using HD parts instead of LD, I can also feel that my mind and heart are at the right place now on this second project. I love this so much!

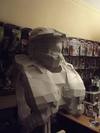
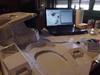
So here's what I've been doing last week! Helmet almost pepped and starting on the chestpiece, I love my working place (This is also something I did not have before on my first project, it's important to have your own space!)

And here's where I am now, I'm still going to shorten the lower "arms" of the piece so it's more thight.
Okay, that's it for today! If you want to leave me comments, feel free to do that! If you want to hate me for doing what I did last year, please do, I haven't forgiven myself yet anyways.
Cheers,
Kadet
(First of all, english is NOT my native language. So I'm sorry if you find some stupid grammar mistakes, I do my very best to come up with refined english writing.)
This thread will contain my second and "real" project since my first one was a complete mess, I was not a member of this forum at the time and I just rushed into it, totally underestimating the level of difficulty of doing this. Well, at least I can say that I learned a lot and I put my hasty attitude aside and eventually submitted to my noob status. The learning part has been great so far and I've given myself lots of pacepalms the moment I began to finally understand the finer methods of building props. I'm currently being mentored in the Bondo section as well, which has given me greater insides on that part.
The reason I just completely started over was not only because I wasn't satisfied and I simply failed, also because I waited about ten months to pick up te project that was in Low Def and I just wasn't able to get the feel for it anymore when I looked at it. It was that bad! LOL
So, let's take a look to my previous failure, shall we? Maybe this can also be educational if there are others out there that are also struggling with a sense of arrogance towards these projects, like a was AT FIRST
. And I'm quite sure there are enough rushing noobs, so here goes!
This was the first pep I ever did, using the normal detailed parts I found in de Pepakura File Index. I did look up my information on the net (not forums), where I stumbled up on Pepakura. I was able to find many tutorial videos and info through Squidoo, Youtube or just plain old Googling for key words.

Another look at the pepped model, I was quite happy with the outcome. I felt kind of lonely doing this, it absorbed lots of time and I just wanted to be able to show off without a lot of work. Made it in two days without much attention, DESPICABLE ME!

THAT CHESTPIECE, right? So busy folding and "getting it done" I didn't even think of looking for scaling tutorials. Well, this one went straight in the trash and I searched the net to finally find the Halo goddess tutorial. (HALLELUJA) This was my first contact with the forum, didn't even think of exploring it..D'oh! The Helmet had several coats of resin, I literally SOAKED it! This is SO WRONG, always take it step by step, applying small parts of the helmet at a time and letting it dry so it stays in shape.

At last I got the scaling for the chest right, and was about as far as the upper body goes. I was still working extremely fast, adding SICK amounts of resin on my poor pieces. But who cares, they were Low D, LOL. I used fiberglass to strenghten the helmet, which was a MESS. Try applying fiberglass with three gallons of resin at the speed of light, that was me. If I look back at it now, I feel like I was a toddler fingerpainting..

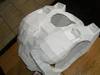
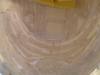
Well, this is embarrassing.. The "technique" I used to apply the filler was simply smearing LARGE amounts on it with my hands, as I found that it covers all areas nicely. I thought I could sand it down and keep the detail, but I was just blown away by how much I had screwed up when I got to sanding.

And this is it, my garbage can. Pieces lost their shape, broke down due to poor glueing and handling, CHAOS. The biggest facepalm ever was served when I realized I shouldn't have cut my chestpiece when it was not fully hardened on the inside, it did not fit anymore. I decided it was time for my to stop doing what I was doing and admit that I had to learn a lot, THEN work a lot. But anyhow, there probably couldn't have been a better lesson for me then my own project kicking me in the nuts, so that's a good thing! This joke took me about three weeks to pull off last holidays.


But here's something I'll defenitly keep for the next project: the upper body undersuit! I think it looks awesom, found it online for like forty dollars, from China of course. It's supposed to be protective gear for crossmotorcycling, but since it's very weak/cheap stuff for that purpose I find it to be the best alternative for an upper body undersuit.
Well, that's that. I know I messed up last year, and I was quite sad, after all this was my dream. I needed a lot of Ben and Jerry's to get out of that depression! LOL But then I thought: "Hey, what about that 405th website?", so I finally became a member. As I said, facepalms have been coming and going eversince, I hate myself for doing what I did last year and I hope that some other noobs can learn someting from this. Main advice: KEEP KALM AND WORK SLOWLY.
But hey, I have a new project I'm working on as well
. Using HD parts instead of LD, I can also feel that my mind and heart are at the right place now on this second project. I love this so much! 
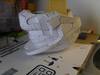
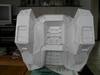
So here's what I've been doing last week! Helmet almost pepped and starting on the chestpiece, I love my working place
(This is also something I did not have before on my first project, it's important to have your own space!)
And here's where I am now, I'm still going to shorten the lower "arms" of the piece so it's more thight.
Okay, that's it for today! If you want to leave me comments, feel free to do that! If you want to hate me for doing what I did last year, please do, I haven't forgiven myself yet anyways.
Cheers,
Kadet
Attachments
-
 Helm1_zps74395cc7.jpg113.6 KB · Views: 329
 -
 Helm12_zps97c558c2.jpg115.3 KB · Views: 307
 -
 Helmenborst1_zpscf605978.jpg85.7 KB · Views: 330
 -
 bovenstuk1_zpsf0e2cc11.jpg61.7 KB · Views: 311
 -
 SDC12915_zpsc81addeb.jpg81.5 KB · Views: 315
 -
 heleboel1_zps5465f3d7.jpg68.9 KB · Views: 312
 -
 SDC12921_zps5b44e00d.jpg158.9 KB · Views: 322
 -
 DSCF15182_zps10a85b59.jpg69.8 KB · Views: 298
 -
 DSCF1518_zpsffd124e9.jpg58.4 KB · Views: 311
 -
 SDC12923_zps57baa71f.jpg126.4 KB · Views: 312