First build, foam ODST Armor.

Status
Not open for further replies.

DoctorFang

New Member
WIP, pic heavy.
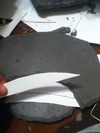
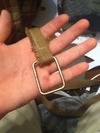
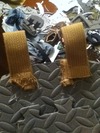
So i started on a suit of ODST armor made of EVA foam late in February. i worked on and off for a while and thought i had it done, but realized it was actually pretty bad, and still needed tons of work.:( so i shoved it in my closet and forgot all about it. I pulled it out midsummer, and adjusted a couple of things, but wasn't satisfied. Now recently, I bought another pack of foam mats, and another (seemingly) endless amount of hot glue, and got down to work building a new suit over the old one.:D

*edit, finished suit!*
1F86DE56-F56F-4E51-A7AE-3650345A1194-1215-000000A6351C4951_zpse568ed13.jpg


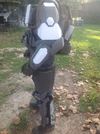
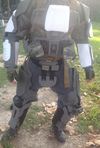
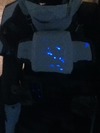
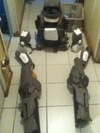
Here is the First suit:
E0FC5075-FEF4-43E6-8E45-0C8CF7859729-79665-0000302D7920F5F5_zpscadad22e.jpg

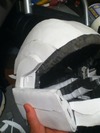
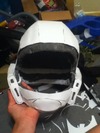
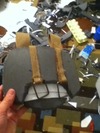
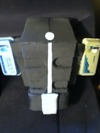
I have since made a lot of progress. Here's my do-over:
E04A9947-BDD7-46EA-B9D0-50DE1E39C5BC-79665-0000302CE86F28CD_zpsc5f46946.jpg

0A166A5F-B44E-418E-A55E-EE1721151FDF-79665-0000302F23CCCA8B_zps7d058990.jpg
Any critiques, tips, or ideas are more than welcome. And I'm sorry for the grainy and blurry photos, they were taken with an ipod touch :p
 

Attachments

  • 1F86DE56-F56F-4E51-A7AE-3650345A1194-1215-000000A6351C4951_zpse568ed13.jpg
    1F86DE56-F56F-4E51-A7AE-3650345A1194-1215-000000A6351C4951_zpse568ed13.jpg
    182.7 KB · Views: 5,585
  • E0FC5075-FEF4-43E6-8E45-0C8CF7859729-79665-0000302D7920F5F5_zpscadad22e.jpg
    E0FC5075-FEF4-43E6-8E45-0C8CF7859729-79665-0000302D7920F5F5_zpscadad22e.jpg
    198.8 KB · Views: 415
  • E04A9947-BDD7-46EA-B9D0-50DE1E39C5BC-79665-0000302CE86F28CD_zpsc5f46946.jpg
    E04A9947-BDD7-46EA-B9D0-50DE1E39C5BC-79665-0000302CE86F28CD_zpsc5f46946.jpg
    222.9 KB · Views: 305
  • 0A166A5F-B44E-418E-A55E-EE1721151FDF-79665-0000302F23CCCA8B_zps7d058990.jpg
    0A166A5F-B44E-418E-A55E-EE1721151FDF-79665-0000302F23CCCA8B_zps7d058990.jpg
    199 KB · Views: 254
Your do over looks a lot better mate. Especially around the arms! Id love to see a few more clearer photos. I have done similar things with parts of my suit to hide joins and get clean edges etc so don't worry too much about it. Its a massive learning curve I agree though, I have used well over 200 sticks of 11.2mm by 100mm glue sticks for my suit so far.

One thing I found when using glue sticks to stick large 2mm foam sheets, it left a slightly bumpy finish. So for the thighs, I used Evo-Stik multi purpose impact spray adhesive which worked a treat. I then put hot melt glue around the edges to ensure a durable bond. The glue requires heat to set so if you use a hair dryer it is a very very quick bond indeed.

Keep going, looking forward to this being completed.
 
Thanks bro, and I must say, your carter build is very impressive indeed. Once my ODST is finished, painted, and weathered, I'm hoping it will be as good as some of the pepped jobs I've seen(pep always looks a bit more realistic to me) so I can wear it to events and costume parties. My main problem areas are the rucksack, and the helmet. I'm pretty sure the helmet will always look a little malformed, lol.
 
Heres a sideshot:
01313758-C60A-4533-A6D5-CAB7B1D141E4-80750-0000313E88E5F2F8_zps26f596a4.jpg
Ive got quite a bit of foamies work to do, but here's a full body pic:
C3AD24E8-E26A-4CFC-88AF-93614348044C-80750-0000313EAE560322_zps952a8c81.jpg
95B12DF1-7C0E-444B-A8B1-0CDC2C91EB34-80750-0000313E606DC9A3_zps07fe1ab2.jpg
I Built this a long time ago, and ig I rushed through it. Tons of Fun Foam it is!
D53A5C88-711C-4AA7-8955-3498DA68024E-79665-000030308549816D_zps268febcd.jpg
Ive still got the small details, and the middle bump to do on the upper arm guards, but they're almost done,
07d984c8-abd3-4425-87fe-d6f9e8525239_zpsec67519d.jpg
 

Attachments

  • 01313758-C60A-4533-A6D5-CAB7B1D141E4-80750-0000313E88E5F2F8_zps26f596a4.jpg
    01313758-C60A-4533-A6D5-CAB7B1D141E4-80750-0000313E88E5F2F8_zps26f596a4.jpg
    191.4 KB · Views: 283
  • C3AD24E8-E26A-4CFC-88AF-93614348044C-80750-0000313EAE560322_zps952a8c81.jpg
    C3AD24E8-E26A-4CFC-88AF-93614348044C-80750-0000313EAE560322_zps952a8c81.jpg
    136.3 KB · Views: 304
  • D53A5C88-711C-4AA7-8955-3498DA68024E-79665-000030308549816D_zps268febcd.jpg
    D53A5C88-711C-4AA7-8955-3498DA68024E-79665-000030308549816D_zps268febcd.jpg
    14 KB · Views: 263
  • 95B12DF1-7C0E-444B-A8B1-0CDC2C91EB34-80750-0000313E606DC9A3_zps07fe1ab2.jpg
    95B12DF1-7C0E-444B-A8B1-0CDC2C91EB34-80750-0000313E606DC9A3_zps07fe1ab2.jpg
    135.1 KB · Views: 284
  • 07d984c8-abd3-4425-87fe-d6f9e8525239_zpsec67519d.jpg
    07d984c8-abd3-4425-87fe-d6f9e8525239_zpsec67519d.jpg
    323.6 KB · Views: 259
Thanks bro, and I must say, your carter build is very impressive indeed. Once my ODST is finished, painted, and weathered, I'm hoping it will be as good as some of the pepped jobs I've seen(pep always looks a bit more realistic to me) so I can wear it to events and costume parties. My main problem areas are the rucksack, and the helmet. I'm pretty sure the helmet will always look a little malformed, lol.

Thank man, a lot of time has gone into the suit as you can imagine. plus burns and glue!

The arms are coming along nicely. Once you are happy with them, you can fill the gaps with silicon and then paint over it I believe Alex plus did this and advised someone doing an odst build and the results were good.

http://www.405th.com/showthread.php/37829-ODST-Foam-Scratch-Build/page3,.

if you are building a helmet out of foam, it might be worth using something like a 7mm foam to get that base right. Its not as rigid as other thicker foams so things turn out pretty symmetrical. My helmet is made of foam as well and I was really please with the results. I had nightmares that it would be distorted but the thinner foam I think saved it for me.

other tip I would give is that if you are covering areas with 2mm foam and the joints aren't quite flush, I tend to use a dremel to sand them to make them flush and then stick a 2mm foam detail piece on top.

for the ruck sack, to give it some volume, stick in some scrunched up newspaper (light) that will then give you a nice shape to work with and you can start adding further detail.
 
So... After school and my duties around my place, I spent most of the day on the helmet. I did quite a bit of fiddling around, tons of re-shaping, and here's what I can up with:
115DD504-DD90-46A8-AED3-9C8325361F5D-81946-000031DA1C47D048_zps7f499a1f.jpg

And then some fine detail stuff for the "ears"
5D178AA7-A387-42E0-96AC-DCE90BA190EA-81946-000031DA33D34E3E_zpsd78c8fd3.jpg

So this is finally looking decent, lol.
 

Attachments

  • 5D178AA7-A387-42E0-96AC-DCE90BA190EA-81946-000031DA33D34E3E_zpsd78c8fd3.jpg
    5D178AA7-A387-42E0-96AC-DCE90BA190EA-81946-000031DA33D34E3E_zpsd78c8fd3.jpg
    167.7 KB · Views: 240
  • 115DD504-DD90-46A8-AED3-9C8325361F5D-81946-000031DA1C47D048_zps7f499a1f.jpg
    115DD504-DD90-46A8-AED3-9C8325361F5D-81946-000031DA1C47D048_zps7f499a1f.jpg
    144.9 KB · Views: 272
That is one fine looking ODST costume you've got there, I was torn between doing an ODST and a spartan myself. Perhaps this will be my next project...

Anyway keep up the good work with your build, it's lookin really sweet so far :) Any ideas for the colour scheme?
 
That is one fine looking ODST costume you've got there, I was torn between doing an ODST and a spartan myself. Perhaps this will be my next project...

Anyway keep up the good work with your build, it's lookin really sweet so far :) Any ideas for the colour scheme?

Thanks man! Btw, I've been keeping up with your cardboard halo IV spartan, it's looking pretty nice. And for the color, probably gunmetal grey with light olive chest, lowers shoulders, and details (the green that is on the shoulderstraps). I've pretty much finished everything, so I just have to get around to primer and paint.
 
Nice build. If you are worried about the helmet distorting, try using a heat gun on it. Just heat up pieces, and you can push/mold things into place, then let it cool. Might take a few attempts, but it is good for fine tuning already built pieces.
 
Nice build. If you are worried about the helmet distorting, try using a heat gun on it. Just heat up pieces, and you can push/mold things into place, then let it cool. Might take a few attempts, but it is good for fine tuning already built pieces.

Yeah, I used the heat method and its now looking a lot more symmetrical, if you know what I'm saying. :) . And I can't wait to see how your odst foam build turns out man, it's looking really really good. Are you planning on wearing it to any cons once you're done?
 
10E2984F-433C-4CFE-8F1A-712C2085A471-201-0000000DB09D43E9_zps538358fa.jpg

Got the butt-plate done yesterday, it was extremely easy, just a couple layers of EVA, and then fun foam for the vents/ridges.
816410E1-977F-4339-B44A-332D3AE4129F-86728-0000352ECBB5DEA1_zps90dcdcdd.jpg

Then I took my rings and webbed belt, and then used my mediocre sewing skills to make the straps.
FF83B68A-E9E1-49A8-A8A4-3E945093287C-86728-0000352ED8196BC5_zpsc0d9dd0c.jpg

My amazing (sarcasm) job of attaching the belt loops.
BDF1415B-7052-465A-88B0-796E08305907-201-0000000DC2639D76_zps07903751.jpg

And this was the finished product.
 

Attachments

  • 10E2984F-433C-4CFE-8F1A-712C2085A471-201-0000000DB09D43E9_zps538358fa.jpg
    10E2984F-433C-4CFE-8F1A-712C2085A471-201-0000000DB09D43E9_zps538358fa.jpg
    158.5 KB · Views: 255
  • 816410E1-977F-4339-B44A-332D3AE4129F-86728-0000352ECBB5DEA1_zps90dcdcdd.jpg
    816410E1-977F-4339-B44A-332D3AE4129F-86728-0000352ECBB5DEA1_zps90dcdcdd.jpg
    182.4 KB · Views: 234
  • FF83B68A-E9E1-49A8-A8A4-3E945093287C-86728-0000352ED8196BC5_zpsc0d9dd0c.jpg
    FF83B68A-E9E1-49A8-A8A4-3E945093287C-86728-0000352ED8196BC5_zpsc0d9dd0c.jpg
    217.3 KB · Views: 272
  • BDF1415B-7052-465A-88B0-796E08305907-201-0000000DC2639D76_zps07903751.jpg
    BDF1415B-7052-465A-88B0-796E08305907-201-0000000DC2639D76_zps07903751.jpg
    185.6 KB · Views: 266
Thought I'd stop by here after seeing your plasti dip thread, and man, this suit's shaping up nicely :D . Always loved the look of the ODST suit, perhaps I'll get around to making it one day. Anyway, awesome work here, it'll look even better when it's done
 
Thought I'd stop by here after seeing your plasti dip thread, and man, this suit's shaping up nicely :D . Always loved the look of the ODST suit, perhaps I'll get around to making it one day. Anyway, awesome work here, it'll look even better when it's done

Thanks bro! ive been trying to keep tabs on your halo four scratch build, looks pretty good i must say. espescially for a lot of the peices being cardboard-based! If you do go the ODST route one of these days, I certainly recommend finding or even purchasing the foam files. This has taken far longer than it ever should have, and a lot of material has been wasted on trial and error. But it really has been fun.
 
So, I was racking my brain, trying to figure out the weapons I wanted to make. I now am on a serious shortage of material, since I promised myself that i am done buying things for this project (apart from paint and such). I have never really liked the "socom" version of the magnum that they use in odst, it's just so long, yet underpowered. So I decided that if buck can have an AR instead of an SMG, I can carry a standard magnum.i really love the short bulky look, and it's my main in-game weapon anyway. I whipped this together really fast because I have a costume party coming up soon, and I just need something to carry.
856C5021-71E3-4127-BFA3-D36E5EDC1016-10705-000007AFFC7D050A_zps0cc00223.jpg

Hopefully it will look better after paint.
 

Attachments

  • 856C5021-71E3-4127-BFA3-D36E5EDC1016-10705-000007AFFC7D050A_zps0cc00223.jpg
    856C5021-71E3-4127-BFA3-D36E5EDC1016-10705-000007AFFC7D050A_zps0cc00223.jpg
    14 KB · Views: 263
Update time! So the build is now completely done, I've built every piece that I wanted, I've done every last tedious bit of foamies work, all that is left is paint. That should happen sometime this weekend. Now, for little add ons, and things that make the suit look authentic... I was stuck. Then I realized the first time I'm gonna use it will be at a nighttime festival. So I was trying to figure how to make authentic, glowing covenant blood spatter on the armor and weapons. I think I have it figured out.
7E577D07-B475-4326-B3C7-5885F356E3C6-12875-000009384A802505_zps61fe000b.jpg

01DCB8C5-E230-4150-AF0E-221B2BA10284-12875-00000938718D1AFC_zpsc8720433.jpg

All it took was cutting open a couple of glow bracelets, (accidentally splattering some walls in the process) and splashing it on. This could be used for lots of different effects, like the stereotypical green glow alien or monster blood.
EFC559AC-9301-44E5-990C-F0544A3D4388-12875-00000938878D7B7F_zps7617193d.jpg

I also finished the backpack. Ik it's not perfect, that about as close as I could get it from looking at pics, because no one seems to have measurements and patterns for it.
E9F53DC6-7582-454E-B8B0-62E8458EAE82-12904-0000093A335424C1_zps86bb9e76.jpg
 

Attachments

  • 7E577D07-B475-4326-B3C7-5885F356E3C6-12875-000009384A802505_zps61fe000b.jpg
    7E577D07-B475-4326-B3C7-5885F356E3C6-12875-000009384A802505_zps61fe000b.jpg
    169.6 KB · Views: 252
  • EFC559AC-9301-44E5-990C-F0544A3D4388-12875-00000938878D7B7F_zps7617193d.jpg
    EFC559AC-9301-44E5-990C-F0544A3D4388-12875-00000938878D7B7F_zps7617193d.jpg
    90.1 KB · Views: 264
  • 01DCB8C5-E230-4150-AF0E-221B2BA10284-12875-00000938718D1AFC_zpsc8720433.jpg
    01DCB8C5-E230-4150-AF0E-221B2BA10284-12875-00000938718D1AFC_zpsc8720433.jpg
    108 KB · Views: 233
  • E9F53DC6-7582-454E-B8B0-62E8458EAE82-12904-0000093A335424C1_zps86bb9e76.jpg
    E9F53DC6-7582-454E-B8B0-62E8458EAE82-12904-0000093A335424C1_zps86bb9e76.jpg
    135.1 KB · Views: 260
I know you're trying to use things found around your house to build this, but egg cartons? You probably could have done without them and still have a decently convincing backpack.
 
I know you're trying to use things found around your house to build this, but egg cartons? You probably could have done without them and still have a decently convincing backpack.

The egg cartons happened to be the right width, and had the perfect curvature to them. They have Eva foam inserts on the inside for structural strength, and it will all be painted over. At the end of the day, foam is foam is foam. I don't think it matters if it was something else previously. At least not for my build.
 
Status
Not open for further replies.
Back
Top