yeah, that doesnt seem likely... the paint job and technique looked similar to me.haha no I dont think so, unless he came over here from florida
this was over here in QLD australia
You are using an out of date browser. It may not display this or other websites correctly.
You should upgrade or use an alternative browser.
You should upgrade or use an alternative browser.
Glitch's Caboose Build!
- Thread starter Glitch
- Start date
- Status
- Not open for further replies.
I would actually like to try to form the visor, whereabouts in QLD are you?
sucks to hear it doesn't work well on your EVA visor and thats very sad to hear your team is now halved, D:
I'm In Gatton at the moment but we're about to move to our new house in Grantham. The vacformer does work for my EVA visors but I'm having to press in the detail around the eyes by hand so I'm still perfecting it, I will get there with them. There's no way I'll be ready by Brisbane anyway.
We could always be a scary fleet of Tex's, like season (think it was 10?)
Anyway, keep up the good work
I've been a 501st member for 2 years or so now, and built a lot of armour as you can see!
I love finding other 501st members on here! I've just got my TD though, you've got an awesome collection.
Caboose is looking awesome. Brings back memories looking through this thread. Keep it up!
Update:
Thanks man!
It is always good to find other members haha
finally able to work on him again, handed in my accursed assignment yesterday so i'm free at last!
Today I bogged the forearms, shins, and a thigh
sanded the shin and half repainted, but ran out of paint (hate it when that happens)
So lots of bogging and sanding to go!
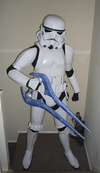
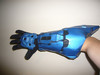
but for those hungrily awaiting pictures, here is my energy sword!
not too bad huh?

I'm off to spend a few days with the family up in noosa tomorrow so no more updates until friday or next weekend,
but there will be updates!
I love finding other 501st members on here! I've just got my TD though, you've got an awesome collection.
Caboose is looking awesome. Brings back memories looking through this thread. Keep it up!
Thanks man!
It is always good to find other members haha
finally able to work on him again, handed in my accursed assignment yesterday so i'm free at last!
Today I bogged the forearms, shins, and a thigh
sanded the shin and half repainted, but ran out of paint (hate it when that happens)
So lots of bogging and sanding to go!
but for those hungrily awaiting pictures, here is my energy sword!
not too bad huh?
I'm off to spend a few days with the family up in noosa tomorrow so no more updates until friday or next weekend,
but there will be updates!
Attachments
Update:
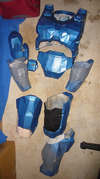
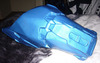
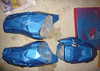
I got to sanding and painting this afternoon, here are all the bits I'm going back over and bogging

Isn't that metallic shine so beautiful?
I've already sanded my first layer of bog on the forearms and the shin as you can see, and the other shin is complete now (except for some detailing, weathering and strapping up)
I'd have the other shin and that belt box complete too but if you look close you can see a few air bubbles thanks to the fibre glass not liking corners very much, but they will be filled and sanded and painted next!
still lots of bogging and sanding to do on the forearms, thighs (already started one) and then the bicep, butt and finally chest and back!
I'm also considering cutting out the black inner parts on the thighs and using foam instead, the under suit I'm going to make will have foam details so i think it'd fit in a lot better with the rest of the suit, but that's what i'm gonna work on after I finish all this bogging and sanding!
More updates soon, helping the lady move and got a job interview but I'm suuuuuure I'll have time
Next weekend is Dreamworld, our biggest 501st troop of the year in QLD, every year on may the 4th there's over 120 of us at Dreamworld, so stay tuned for pics from that!
I got to sanding and painting this afternoon, here are all the bits I'm going back over and bogging
Isn't that metallic shine so beautiful?
I've already sanded my first layer of bog on the forearms and the shin as you can see, and the other shin is complete now (except for some detailing, weathering and strapping up)
I'd have the other shin and that belt box complete too but if you look close you can see a few air bubbles thanks to the fibre glass not liking corners very much, but they will be filled and sanded and painted next!
still lots of bogging and sanding to do on the forearms, thighs (already started one) and then the bicep, butt and finally chest and back!
I'm also considering cutting out the black inner parts on the thighs and using foam instead, the under suit I'm going to make will have foam details so i think it'd fit in a lot better with the rest of the suit, but that's what i'm gonna work on after I finish all this bogging and sanding!
More updates soon, helping the lady move and got a job interview but I'm suuuuuure I'll have time
Next weekend is Dreamworld, our biggest 501st troop of the year in QLD, every year on may the 4th there's over 120 of us at Dreamworld, so stay tuned for pics from that!
Attachments
Update:
Thankyou!
It is great to find other aussies on here!
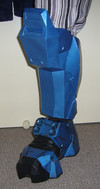
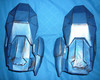
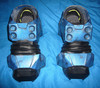
Here's a photo of the shin with some padding in, to give you an idea of how I am very slowly, but surely getting there!

I need to find a good way to keep it in place around the ankle, these parts although appropriate in height, aren't appropriate for my skinny legs.
I'm thinking of integrating my undersuit around the ankle area too to solve this, but I guess I'll work it out later :S
Yay! Another Aussie ^_^ (I'm MMCC Sandhawk Clan down in Victoria)
This build is amazing! I can't wait to see the finished result!
Thankyou!
It is great to find other aussies on here!
Here's a photo of the shin with some padding in, to give you an idea of how I am very slowly, but surely getting there!
I need to find a good way to keep it in place around the ankle, these parts although appropriate in height, aren't appropriate for my skinny legs.
I'm thinking of integrating my undersuit around the ankle area too to solve this, but I guess I'll work it out later :S
Attachments
Update:
So after the most busy damn weekend ever (may the 4th be with you)
I got around to finishing the files for Striker Eureka
http://www.mediafire.com/download/9ood9ksc483z5k1/Striker_Eureka_PDO_Files_-_By_Glitch_5092.zip
Which my Guinea pig Dumontrudisel has been building here -
http://www.therpf.com/f24/building-jaeger-striker-eureka-pic-heavy-209868/
After my troop tomorrow night at EB Games Helensvale I'm back to finishing this project, and then onto Tex, Striker, an Advanced Recon Force trooper and a Shadow clone!
(If only I were paid for this )
So after the most busy damn weekend ever (may the 4th be with you)
I got around to finishing the files for Striker Eureka
http://www.mediafire.com/download/9ood9ksc483z5k1/Striker_Eureka_PDO_Files_-_By_Glitch_5092.zip
Which my Guinea pig Dumontrudisel has been building here -
http://www.therpf.com/f24/building-jaeger-striker-eureka-pic-heavy-209868/
After my troop tomorrow night at EB Games Helensvale I'm back to finishing this project, and then onto Tex, Striker, an Advanced Recon Force trooper and a Shadow clone!
(If only I were paid for this
)Fender 159
New Member
Oh sweet! I've always wanted to have a clone trooper costume...
How do you guys even build those? It's clearly not foam, and it looks too clean to be made out of pep.
How do you guys even build those? It's clearly not foam, and it looks too clean to be made out of pep.
Oh sweet! I've always wanted to have a clone trooper costume...
How do you guys even build those? It's clearly not foam, and it looks too clean to be made out of pep.
They are usually vacuum molded plastic. Then trim, glue, assemble, paint (if necessary). I'm no expert on clones, but there are multiple TK kits and they're made of a heavy plastic.
Update:
My clones are vac formed ABS kits, just like my TK, except all the seams on clones have to be bogged and sanded. The helmets are resin casts from makers over on the 501st,
all the clones are based off of one kit with interchangeable painted parts, so it's not really as many as it looks
anyway been a while since i've had an update, so here's a mini-one to show you whats been happening
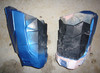
I finished re-bogging, sanding and painting the butt plate and the right forearm,
Here's my forearm in comparison to an older picture of the forearms before bogging,


significant difference in appearance? I think so!
Just the thighs, chest/back and left forearm to sand and paint now,
also picked up a bunch of LED's for the armour and the helmet!
Oh sweet! I've always wanted to have a clone trooper costume...
How do you guys even build those? It's clearly not foam, and it looks too clean to be made out of pep.
My clones are vac formed ABS kits, just like my TK, except all the seams on clones have to be bogged and sanded. The helmets are resin casts from makers over on the 501st,
all the clones are based off of one kit with interchangeable painted parts, so it's not really as many as it looks
anyway been a while since i've had an update, so here's a mini-one to show you whats been happening
I finished re-bogging, sanding and painting the butt plate and the right forearm,
Here's my forearm in comparison to an older picture of the forearms before bogging,
significant difference in appearance? I think so!
Just the thighs, chest/back and left forearm to sand and paint now,
also picked up a bunch of LED's for the armour and the helmet!
Attachments
Update:
Haha thankyou, now here it is again with padding and all the black details painted!

Lookin great
I still cant get over that awesome color lol
Haha thankyou, now here it is again with padding and all the black details painted!
Attachments
Update:
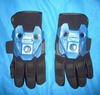
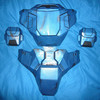
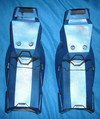
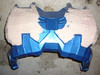
So its been a while since I've put a big update up on here, so here's where all my bits and pieces are currently at:
SHOULDERS

FOREARMS

HAND PLATES

AB PLATE

CODPIECE

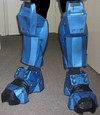
SHINS

BOOTS

And here are my unfinished parts
CHEST

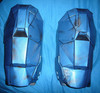
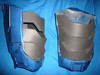
THIGHS

And ofcourse my helmet isnt finished due to the difficulty of shaping a visor,
I'm going to replace the black inner parts of the thigh pieces with foam too, which will make it much more comfortable and be a lot easier than bogging and sanding my pepped inner parts,
Other than that, I just have some strapping to do when the chest and thighs are done, and the armour will be complete!
after that i'll make a fancy undersuit too!
-more updates on the chest/back, cod and thigh parts soon
So its been a while since I've put a big update up on here, so here's where all my bits and pieces are currently at:
SHOULDERS
FOREARMS
HAND PLATES
AB PLATE
CODPIECE
SHINS
BOOTS
And here are my unfinished parts
CHEST
THIGHS
And ofcourse my helmet isnt finished due to the difficulty of shaping a visor,
I'm going to replace the black inner parts of the thigh pieces with foam too, which will make it much more comfortable and be a lot easier than bogging and sanding my pepped inner parts,
Other than that, I just have some strapping to do when the chest and thighs are done, and the armour will be complete!
after that i'll make a fancy undersuit too!
-more updates on the chest/back, cod and thigh parts soon
Attachments
-
 14282139095_eaeeabb5cc_z.jpg151.1 KB · Views: 167
 -
 14302329673_38a4d26f80_z.jpg211.7 KB · Views: 159
 -
 14281669864_f8956247db_z.jpg156.2 KB · Views: 173
 -
 14095531000_3ce6e0c1b8_z.jpg161.6 KB · Views: 159
 -
 14095529540_1744d4bd1f_z.jpg94.6 KB · Views: 168
 -
 14095578577_29d168f36a_z.jpg157.7 KB · Views: 151
 -
 14259032356_c634eeccc0_z.jpg160.7 KB · Views: 168
 -
 14302326843_59b758a58c_z.jpg118.4 KB · Views: 157
 -
 14095527100_2ded683234_z.jpg129.2 KB · Views: 234
Update:
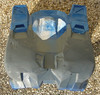
Here's what the chest looks like today, it needs some more rondoing on the inside of the back and chest, then its onto finishing up the bog work on the front.
I'll be adding pictures of my complete thigh pieces to this post a bit later when I've finished them.
edit* - mostly finished thigh pieces! just gotta replace the inside parts that i removed with foam parts and strap them up!
CHEST/BACK and THIGHS
Attachments
Update:
Completed my foam replacement pieces for the inner thighs!
I used the heat gun to seal the foam, then bend it before hot gluing them in.
not a bad result for a first time effort with the EVA mats!
Annoyingly I ran out of hot glue on the last piece of the right thigh, just one more stick agh!
next up is sealing them with a couple watered down coats of bitkote and painting them black.
(http://www.bunnings.com.au/ormonoid-4l-bitkote-3-waterproofing-compound_p0964767)
Attachments
- Status
- Not open for further replies.