Props Brute Spiker Kit Project (Pic Heavy)

Status
Not open for further replies.

Revenant1988

Active Member
Hello guys!

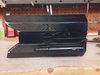
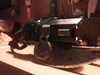
I recently acquired a pretty sweet Halo 3 Brute Spiker kit made by Smick6 (I picked it up from Sean Bradley who had to part with it, which I'm sure was very hard).

I don't know Smick, his profile here indicates that he hasn't been active in a while but I still wanted to share the detailing work I did on this with the community here and maybe pass along some stuff I tried out.

Without further adieu, here is the start to finish timeline.
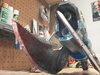
Brute Spike Rifle


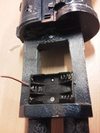
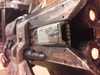
When I got the kit from Sean, most of the flaw fixing had been done already (I'm not sure if by him, or by Smick, but they did a great job) so other than a few small areas to fill and sanding it was ready for primer pretty quickly.

fvxYzBel.jpg

RrV8XYwl.jpg


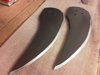
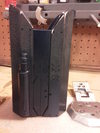
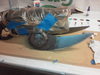
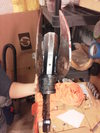
The blades I gave a lot of attention to. While the main model was mostly sanded up to 600 grit, for the blades I went all the way up to 1600 grit. They came out very, very smooth.

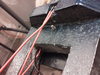
I wanted this replica to tell a bit more of a story- I didn't want it to look pristine like it had just come from the Brute Factory. I wanted it to look like it had been used frequently over a somewhat short period. I decided the Brute that used this Spiker fired or shot it a lot more than he stabbed people with it. This would mean discoloration on the metal on the front of the gun from excess heat due to being fired so much, with lighter wear on the blades.


But before I got ahead of myself with the details, I had to scale back and figure out more about the base colors of how this thing should look.

I started by searching out reference images of the Halo 3 Spiker this kit was based on

spiker_thumb.jpg


03-17-44_weapon-brute-spiker-type-25-carbine_original.jpg


I didn't really like the way it looked in Halo 3. I know it sounds stupid, but almost every set of armor or weapon I see has blue lights in it.

So I started to look at the Halo Reach version of the rifle

HaloReach-SpikeRifle-Side.png


Spikerifle.png


Bingo.

The Reach version isn't as blue, shows more wear, and has orange lights, so I took it and ran :D


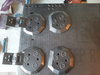
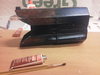
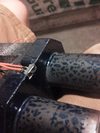
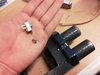
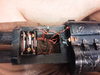
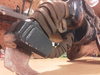
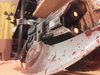
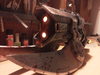
The next step was drilling out the indicator lights. I grabbed my dremel and a small bit kit I have for it and began going to town. I got a feeling this is what it's like to be a dentist haha

RTLED4Xl.jpg

6g6IKJql.jpg

CTMPSCgl.jpg


After these holes were drilled, I started to tackle how to get the base color down.

I struggled a lot with this step. The Halo 3 and Reach version of the Spiker are both a shade of Blue. I don't know what kind of blue you'd call it, it's not bright, but it's not navy so I just called it medium blue.

With every prop I work on, I get a little better at painting from learning after all the mistakes I made on the last one :rolleyes

So this time I made sure to get several shades and practice practice practice.

Initially, I tried finding a blue that exactly matched the in game shade. That was a failure. So I came to the conclusion that I'd have to blend a few colors to get the one I wanted.

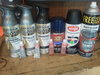
After some trial and error on random scraps and cardboard, I had my colors:

acqiav6l.jpg

(Hammered black and Ford Royal Blue)

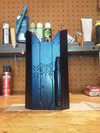
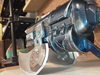
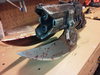
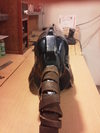
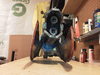
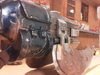
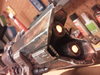
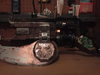
First, I gave the handle and barrel sections a new coat of flat black primer. Once that was dry, I sprayed a thick, liberal coat of Hammered black. I used hammered paint to simulate wear a little better (this also paid of HANDSOMELY for me in the middle of the project).

AKFxvbhl.jpg

For some people, that thick bubbly paint would mean more agony inducing sanding, but I wanted it to look like this.

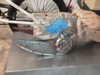
After that layer had dried, I very gently misted (from a few feet back) a thin layer of the Royal Blue Ford paint (from Auto Zone). My hope was that the black base would stop the blue from being so glittery and I think I nailed it.

zeB7zwRl.jpg

pPeIRzfl.jpg

fvxYzBel.jpg


RrV8XYwl.jpg


spiker_thumb.jpg


03-17-44_weapon-brute-spiker-type-25-carbine_original.jpg


HaloReach-SpikeRifle-Side.png


Spikerifle.png


RTLED4Xl.jpg


6g6IKJql.jpg


CTMPSCgl.jpg


acqiav6l.jpg


AKFxvbhl.jpg


zeB7zwRl.jpg


pPeIRzfl.jpg
 
Last edited by a moderator:
6nnRFkYl.jpg

Once I had those parts down, I switched over to the blades and the arms that hold them.

I sprayed these with Dark Steel and then once that coat dried I sprayed on a layer of Hammered Antique Pewter. I also made sure to spray the screws that hold the pieces together.

tfSgmDXl.jpg

vYuZNvPl.jpg

For the blades, I sprayed on two coats of Dark Steel. Once they were dry, I taped off the sections around the edges of the blade and then used Silver leaf rub-n-buff. I was very pleased with it. Rub-n-Buff is GREAT stuff for simulating metal, and it goes a long way.

wNnxbtLl.jpg


While I was waiting for the blades to dry, I moved back to the barrel. To achieve the worn look and discoloration on the metal, I started by lightly sanding the blue parts with 600 grit paper. Remember when I said earlier that the hammered paint would work in my favor later? Well here is where it totally did: When I sanded, the top layer of blue gets rubbed away, revealing the black underneath. When I kept sanding that exposed layer, it blended with the blue to create a slight greyish-orange that looked a lot like rust. What helped even more, is that the hammered paints unique texture creates bumps and divots so when sanded, it added to the effect!

You can see it best in these pictures

MAFEQFll.jpg

Qb2ZCmfl.jpg

I was so tempted to just leave it like this and call it a day, but then I wouldn't really be getting the whole look I wanted, so I pressed on.

While I had a good start to the worn metal look, I needed to take it a little further. Have you ever cooked something with a copper pot and noticed that as it heats up the metal changes color a little? That was the look I wanted to emulate, so I decided to use more Rub-n-Buff.

RnB is not a paint, it is a kind of wax. I've used it once before on one of Tactonyx's pistol kits and had great success with it, so I decided to see what it might offer for the Spiker. I got an Amazon and ordered the sampler kit of colors and got a nice selection of coppers, browns and reds.

The way the material works is you dab a small amount on the part, spread it around evenly with your fingers, let it dry, and then (as the name implies) rub and buff it to a shine. The more you rub, the more shiny it becomes. Then, you need to let it sit for several days in moderate temperature. Once it fully dries, it's just like paint in that it won't come off unless you scrape it away. I tired and had to really, really dig at it with something pointy to get it to come off. If you are patient, it is a great tool for your inventory and I highly recommend it.

I started by dry brushing the silver onto the edges of the handle side

NXzoOkWl.jpg

I then took the Spanish copper and used a small paint brush to dab and spread it on the barrel section

w6VF1Arl.jpg

As I went, I added more Copper to the arms that hold the blades, and a little to the back ends of the blades to show that they'd be getting pretty hot under so much sustained fire. I also added hints of ruby to lighten the darker brown look of the Spanish copper. It had just enough sparkle in it that when spread around, it blends nicely to look almost rusty. Then when that dried, I stared to dry brush silver leaf onto the edges to make it look like bare metal.

w6VF1Arl.jpg

t0LNAd8l.jpg

uhwhEkQl.jpg

I also went ahead and removed a chunk or two from the blades to give them some wear, and I took my x-acto and scratched lightly around the tips of the blades. I felt a little dirty doing it because they were just so perfect, it didn't seem right :(
 

Attachments

  • 6nnRFkYl.jpg
    6nnRFkYl.jpg
    64.4 KB · Views: 261
  • tfSgmDXl.jpg
    tfSgmDXl.jpg
    79.3 KB · Views: 250
  • vYuZNvPl.jpg
    vYuZNvPl.jpg
    66 KB · Views: 239
  • wNnxbtLl.jpg
    wNnxbtLl.jpg
    52.1 KB · Views: 226
  • MAFEQFll.jpg
    MAFEQFll.jpg
    48.8 KB · Views: 233
  • Qb2ZCmfl.jpg
    Qb2ZCmfl.jpg
    50.3 KB · Views: 225
  • w6VF1Arl.jpg
    w6VF1Arl.jpg
    48.3 KB · Views: 244
  • w6VF1Arl.jpg
    w6VF1Arl.jpg
    48.3 KB · Views: 255
  • t0LNAd8l.jpg
    t0LNAd8l.jpg
    74.5 KB · Views: 231
  • NXzoOkWl.jpg
    NXzoOkWl.jpg
    53.1 KB · Views: 233
  • uhwhEkQl.jpg
    uhwhEkQl.jpg
    62.7 KB · Views: 239
  • w6VF1Arl.jpg
    w6VF1Arl.jpg
    48.3 KB · Views: 233
At this point, I took all the pieces and did a test fit to see how everything looked. I made sure to re-touch areas so the "heat" looks like it spread logically in the affected areas. The front of the gun should look discolored and worn, while the back or grip area should look mostly un-touched, maybe just scuffed.

Once I was happy with that, I moved on to added some LEDs to the model.

I only needed 6 orange LEDs, so like any sane person I ordered 50 because they're dirt cheap and I never know when I might need to orange something up :D

I first began by taking a battery holder and attaching it to the main section of the prop. I used a plain machine screw to hold it in place, with a dab of hot glue under it. I put it towards the front to balance the thing out (it is quite heavy).

ePx2BcCl.jpg

I next went to wiring the LED pairs into the holes I drilled earlier. Once I was happy with their positions, I glued them into place. Then I had to figure out where to put the slide switch that powers them on. This was tough. I only had two, one that was far to big to fit anywhere unnoticed and one so small that it would be hard to turn on.

xrCHfIMl.jpg

I opted to use the smaller one. I'm not sure if this was a flaw in my kit or if it was designed this way, but the only area I could find to put the switch was up front near the dual barrels. My kit had a small hole in the side there and after looking at it long enough I came to the conclusion that if I made it a little bigger, I could put the switch there. So I got my sanding probe out and started to carefully remove material until I had a small hole.

I think it came out pretty good!

jmyCA8Fl.jpg

ZdUFhyzl.jpg

Once it was in snug I added some glue to be safe.

Then I wired everything up, gave it a test, and was pleased with the results. I ended up diffusing the light coming from the barrels because in the dark it looked a lot like someone was shining a double barreled orange light everywhere. To diffuse them, I used some stoppers I made out of hot glue and plugged them in.

Z9wdEH0l.jpg

Now it was time to add some finer details :cool!

I reassembled the Spiker and then put the main assembly in a grocery bag or two, and then splashed on some fake blood! This brand of blood is called "perma blood" and supposedly will never come off the surface it comes into contact with. Cool. So before I went psycho killer crazy in the back yard with the stuff I practiced splattering it on a card board box. Turns out there is a real science to making it look real (according to my other half, who works in haunted houses professionally. I swear that's how I got the blood. Really! Stop looking at me like that!!)

before
LPpTtIYl.jpg

after (sorry for the blurry pics)
cbkqf6Wl.jpg

I had to wait about 12 hours for this stuff to fully dry, which kinda stunk because I was on a roll that night. Oh well. The results were well worth it!

6tlmMLml.jpg

Yw2ybGel.jpg

kMh9RAml.jpg

I decided to use the blood on a whim. I thought it added more depth to the prop, maybe it had just recently taken some poor Human's life, or maybe it was liberated by a Spartan on some far away battle field, who knows?! :)

The next detail to add was the leather strapping on the handle. I didn't really give this much thought. I got some scrap pieces from the girlfriend and then painted them dark brown (they were very tan when I got them). Once they dried and I roughed them up a bit, I installed the trigger piece and then loosely wrapped them around the handle and guard. I didn't follow any particular pattern- I didn't wrap to tightly, but not so loose that it would droop off. I also made sure that small areas of the handle were exposed like the Brute didn't really take super care of this weapon.

yHbLGwll.jpg

5PrqM7al.jpg

Almost done!
 

Attachments

  • ePx2BcCl.jpg
    ePx2BcCl.jpg
    53.8 KB · Views: 239
  • ZdUFhyzl.jpg
    ZdUFhyzl.jpg
    67.6 KB · Views: 234
  • jmyCA8Fl.jpg
    jmyCA8Fl.jpg
    45.3 KB · Views: 235
  • xrCHfIMl.jpg
    xrCHfIMl.jpg
    48.7 KB · Views: 232
  • LPpTtIYl.jpg
    LPpTtIYl.jpg
    47.1 KB · Views: 246
  • Z9wdEH0l.jpg
    Z9wdEH0l.jpg
    59.8 KB · Views: 220
  • 6tlmMLml.jpg
    6tlmMLml.jpg
    60.9 KB · Views: 274
  • cbkqf6Wl.jpg
    cbkqf6Wl.jpg
    52.1 KB · Views: 243
  • Yw2ybGel.jpg
    Yw2ybGel.jpg
    68.4 KB · Views: 226
  • 5PrqM7al.jpg
    5PrqM7al.jpg
    57.1 KB · Views: 227
  • yHbLGwll.jpg
    yHbLGwll.jpg
    49.1 KB · Views: 229
  • kMh9RAml.jpg
    kMh9RAml.jpg
    61.1 KB · Views: 251
Home Stretch!

If you've read this far, I thank you :)


- - - - - - - - - - - - - - - - - - - - - - - - - -

At this point, the piece is 99% finished. I still need to paint on the tribal symbols but have been running into sizing issues. I hope to have this done in a few weeks, but otherwise it looks pretty good.

Below are the money shots, the completed model.

Enjoy!

8aydegkl.jpg

nRSnzyBl.jpg

KCECdQwl.jpg

uytlGM2l.jpg

hvRSfZpl.jpg

Even the bottom was detailed- I made sure ;)
LQB8zt7l.jpg


X69YFq5l.jpg

AJbcFBul.jpg


So there it is! My Halo Reach style Spiker kit.

I'd like to thank Sean for parting with such an awesome prop (it went to a good home) and I'd especially like to thank Smick6 for sharing a beautiful kit. I had a lot of fun putting it together and making it my own. I learned a lot of cool detailing things as I worked on this kit and it's definitely given me some help on my own builds, which will see the light, someday.

Soon....
 

Attachments

  • 8aydegkl.jpg
    8aydegkl.jpg
    57.3 KB · Views: 229
  • nRSnzyBl.jpg
    nRSnzyBl.jpg
    67.8 KB · Views: 231
  • KCECdQwl.jpg
    KCECdQwl.jpg
    62.9 KB · Views: 228
  • uytlGM2l.jpg
    uytlGM2l.jpg
    59.6 KB · Views: 227
  • hvRSfZpl.jpg
    hvRSfZpl.jpg
    47.2 KB · Views: 236
  • LQB8zt7l.jpg
    LQB8zt7l.jpg
    58.5 KB · Views: 216
  • X69YFq5l.jpg
    X69YFq5l.jpg
    51.7 KB · Views: 259
  • AJbcFBul.jpg
    AJbcFBul.jpg
    46.7 KB · Views: 230
Amazing work!! I've always been very envious of anyone that is able to get their hands on one his Spiker kits. You did it justice my friend. :)

-Matt
 
Great job.

Great job, its nice to see a finished one. Sent a lot of kits out but rarely see them done. Thanks for sharing...
 
Dude this is awesome! I ordered another one of these kits from Smick and hopefully it will be here soon! To be honest.... you inspired me to do 1 of these.
 
I might have to do a new version with the orange lights also, looks great that way.
Almost done with yours HaloMaster.
 
Status
Not open for further replies.
Back
Top