W.I.P. Halo 4 Master Chief Build [Pic Heavy]

Status
Not open for further replies.

Triple A

New Member
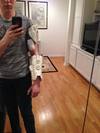
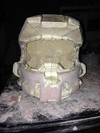
Hey guys, so this is my first build that I actually started a while ago. I took a bit of a break, but now I'm back and pumped to get started. Here's a picture of my progress so far that I will be updating as I go along. I have a chest piece that I pepped and resined, but I only got one coat on before it started to warp, so I nixed it.

WIPprogresspic_zps0be412a4.jpg


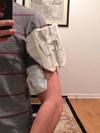
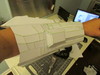
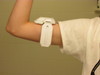
Moving on, here's a picture of the forearm

IMG_0150_zps9c57f3e9.jpg


IMG_0151_zps8dc30eb4.jpg


and the bicep (I only have pictures from when i had it only half-pepped, but you get the idea: it exists)

IMG_0153_zpse301af2d.jpg


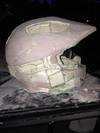
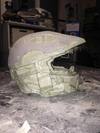
for some reason it seems I don't have any pictures of the shoulder right now, but Illl get on that later. The helmet is what I'm working on right now in conjunction with pepping a new chest out:

IMG_4674_zps4304ca2e.jpg


the mouth piece got a little pressed inward on the left side here, but I plan on building that back up as well as building up the left side wall under the visor a little. My main concern is the brim is not level due to some irregularities when it got pepped, the left side popped up, so hopefully if i build up the other side and bring the bottom of the left down, it should be fixed. Although the prospect of fixing that seems a little daunting.

IMG_4671_zps54fa2090.jpg


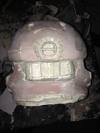
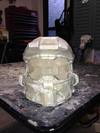
started to bondo the helmet, although I was too lazy to find my electric sander, but after several hours of hand-sanding and only getting this far I regret it. Something I wish I had done on the first version I made was hardened it with smooth-cast 320 like I did this one. It was so much easier, and my screw-up on the first one with the fiberglass ruined the helmet, so this one was comparatively much easier. I don't know if you can see it well, but on the outside the whole thing is white because despite 3 layers of fiberglass resin, it wasn't sealed and it leaked out when I was casting the plastic. It got on the table as well as the outside of the helmet and screwed up a lot of the details, so I see a lot of sanding in my future right now.

IMG_4676_zps141ab0e0.jpg


The back of the helmet. Again, the right side got pushed a little and the back "strap" thing that spans the back of the helmet flared up a little, but I'm not too worried about it.

IMG_4670_zpsa4a0f182.jpg


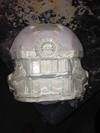
And lastly, just a photo of the top and my progress at bondoing the crown so far. Comments, criticisms, and especially any helpful tips would be much appreciated.
 

Attachments

  • WIPprogresspic_zps0be412a4.jpg
    WIPprogresspic_zps0be412a4.jpg
    89.5 KB · Views: 200
  • IMG_0150_zps9c57f3e9.jpg
    IMG_0150_zps9c57f3e9.jpg
    105.8 KB · Views: 199
  • IMG_0151_zps8dc30eb4.jpg
    IMG_0151_zps8dc30eb4.jpg
    73 KB · Views: 192
  • IMG_4670_zpsa4a0f182.jpg
    IMG_4670_zpsa4a0f182.jpg
    96.5 KB · Views: 181
  • IMG_4676_zps141ab0e0.jpg
    IMG_4676_zps141ab0e0.jpg
    64.1 KB · Views: 185
  • IMG_4671_zps54fa2090.jpg
    IMG_4671_zps54fa2090.jpg
    95.6 KB · Views: 221
  • IMG_4674_zps4304ca2e.jpg
    IMG_4674_zps4304ca2e.jpg
    85.3 KB · Views: 194
  • IMG_0153_zpse301af2d.jpg
    IMG_0153_zpse301af2d.jpg
    70.3 KB · Views: 185
Looking good mate, keep it up. If I can make a few recommendations:
1) Get an electric sander. I bought a Mouse from Lowes a few years back and have got my money's worth out of the thing for a lot more than this! Check Craigslist for a used one and test it. TOTALLY worth it.
2) Let the pepp do the work for you. You have good pepp lines and did a good job, all you have to do it round and fill it in with Bondo. Stuff gets heavy quick, so the more you can keep the shape of your pepp, the lighter, more accurate, and better!
3) Irregularities. If something gets warped or cock-eyed, don't sweat it. I found filling the back in with some rondo and sanding it back to shape, or building it up with a slight bit of bondo was the way to go. Not nearly as daunting as you'd think. See rule #1 though ;)
4) Find some utility blades at Lowes. Like straight edge razors, they fit into some cutting device (brilliant, I know...it's been a long weekend moving from house A to B), but with nice 45 degree angles on either sides, sort of like 2 exacto bladed mounted together to give you a nice flat edge, but 2 good pointy bits to gouge and scrape away with. Google Utility Blade, you'll see what I mean.

What was the smoothcast for? It does sand down easily or scrape away easily under that blade, so have at it if you're getting frustrated with the stuff. Works wonders.

Keep up the good work and keep on posting!
 
The upper arm piece is way too small. I understand that you're not as muscled as the reference spartan body but you should compensate for that by cutting out the middle of the side pieces or by adding some padding.

If you keep this scale then the shoulder plates will also be far too small and your silhouette will not be as strong as the ingame character.
 
@ghost bear - first, thanks for the tips. Ill see if i cant start chipping away at the plastic, but in the meantime i was able to get an electric sander from a friend already so im stoked to try it out. Also, i used the smoothcast in place of fiberglass\ rondo because it's lighter and similiarly durable, but considering an earlier encounter with glassing my helmet i chose it mainly for the ease of use. if i ruin another helmet im going to die so opted for smoothcast on this one. although, i dont plan on using it for the whole suit just the helmet.

@piggly - thats a good idea. a set of 8 files is surprisingly cheap and i was able to pick some up on the way home so hopefully i can try them out tomorrow

@vargatom - i see what you mean. ill see if i cant pep out another sometime soon and see how that looks and ill go from there

i picked up a sander and some files but i dont believe in posting pictures for the heck of it. When i make some progress this week ill put up more. Until then
 
Unfortunately, I'm double posting, but on the up side there's a bit of an update. I pepped out a little bit larger version of the bicep piece pretty quickly because it's so small. So I have pictures of it in relation to the shoulder piece and how that size is playing out. I was looking at some reference pics of master chief and I'm tentative to have the bicep go any bigger than this because it's really not that prominent a piece in the suit, but I think I may have to go up another 10% or so; it's getting difficult to tell after looking at it for so long.

IMG_4681_zpsa3ca0991.jpg


I just taped the pieces to my arm because the bicep was modeled in a way that keeps it separated into 4 distinct quadrants that aren't actually connected, so I just put the front piece on to see where it was size-wise in comparison to the rest of the arm, although I do have the whole thing pepped out already.


IMG_4684_zps137dac17.jpg


This one is of all of the whole arm just to see if all of the scales worked well together, and I think overall it went well. Looking at it though, I feel that the shoulder piece isn't long enough in height, but when i scale it up it gets too wide because it doesn't really curve as much as it should when compared to reference. I don't yet know what i'll do with that yet, but if anyody has any comments on the scaling here, that'd help a lot because I've been staring at it too long to tell anymore and any third-party view will maybe put things back into perspective. Until I decide what to do with the arm pieces, I continue to scrape at leftover plastic on the helmet.
 

Attachments

  • IMG_4684_zps137dac17.jpg
    IMG_4684_zps137dac17.jpg
    75.5 KB · Views: 188
  • IMG_4681_zpsa3ca0991.jpg
    IMG_4681_zpsa3ca0991.jpg
    69.1 KB · Views: 177
Awesome build man! Youve got the scaling pretty darn good, but the front of the helmet looks a bit warped, like the mouth piece, could just be the angle. Anyway man its looking great, gonna sub this thread to keep an eye on it :)
 
Ok, I've been too lazy to post the weekend update, but I got a decent amount done on the helmet. I've been also lazy in that I don't feel like working on the pep for the chest piece that I've started, but I guess it's a necessary evil in the whole process.

Most of my time over the weekend went into fixing the crooked chin/mouth piece. I had to completely rebuild it outward with bondo. I over-compensated though, and now it's flared out a little, but that's an easy fix with a little bit of sanding:
IMG_4695_zps642f5f78.jpg


I also found a new favorite tool: dremels. I put a steel wire brush tip in that rotated and it easily cleaned out the areas where I'd lost detail due to the plastic spillages, so I was happy about that.

I began the general application of body filler to the places that need it, but it seems like the phrase to describe this would be "there's always more work to be done." But it's fun so I don't mind.

Back (there's a lot of unsanded stuff in this shot because it was getting late when I stopped so I was too tired to sand it off, so I just left the raw filler on):

IMG_4698_zpsb35052dd.jpg


and the side:
IMG_4696_zps27d3fa34.jpg


You know the drill: questions, comments, criticisms, ideas are all welcome. With the long weekend coming up I should be getting a lot done, so there should be a lot more in the coming days
 

Attachments

  • IMG_4696_zps27d3fa34.jpg
    IMG_4696_zps27d3fa34.jpg
    76.6 KB · Views: 176
  • IMG_4698_zpsb35052dd.jpg
    IMG_4698_zpsb35052dd.jpg
    69.2 KB · Views: 183
  • IMG_4695_zps642f5f78.jpg
    IMG_4695_zps642f5f78.jpg
    92.9 KB · Views: 178
The pep models are nice. Be sure that you can wear the forearm easily. I've done mine a bit too small and now that is hardened I scratch my wrist every time I wear it... Just be as more careful as possible in applying and cleaning the bondo in your helmet...
 
on my build i noticed the right side (while wearing it) was bulged out my fix.. used the dremel to cut it out repeped that part resin/rondo/sand/painted.... i dont recommend it for all but if you have the time like i do.. being a retired butcher... you can do anything as long as you have a little time...

Also remeber.. if it looks good to you.. awesome.. everyone has their own "correctness" value.. and you can hide alot of "oh crap" moments with a good paint job
 
Status
Not open for further replies.
Back
Top