His & Hers ODST WIP (pic heavy)

Status
Not open for further replies.

Jason 078

Well-Known Member
405th_zps79efe60f.jpg


Greetings and slow mutations, readers!

So, I am putting my other projects on hold because of executive decision. My lovely wife thinks it would be cool for the two of us to do ODSTs together. And, guess who is making them? So, this is the planning, WIP, and picture thread of what we are doing. Thankfully, though, I have been given a little freedom to work with mine… a little freedom that I am running with for dear life!

First up, is my spouse, who is one tough little lady. One of our friends is a former Marine Infantry combat veteran who is actually scared of her, she has successfully told off an army infantry officer for doing something he shouldn’t have, and has thrown all 6’4”, 225lb me through the air in Martial Arts training without the slightest effort (and we weren’t even practicing that move at the time). However, she loves the idea of big guns. Well, you don’t get much bigger (and still able to walk at her size) than a sniper rifle. Yup, a 5’2” woman is going to be wielding a 4’5” rifle. So, her armor is going the Romeo route with the Sniper Goggles, lack of right shoulder armor, add-on to the left shoulder armor, but sans backpack. I don’t know how she wants her details, but she is looking at purple secondary color over the normal dark gray of the ODST. Oh, and she is going for the rank of Lieutenant (O3).

With that said, I am throwing a rather large twist into my character/armor development. My character is a Spartan-II, pre-MJOLNIR. In issue 3 & 4 of the The Fall of Reach: Boot Camp comics, the Spartans were seen wearing Black Body Suits and modified ODST helmets. Well, I am taking that one step further. John’s team was a light team acting as infiltrators, mine (see the link in my signature for the explanation) is a heavy team, thus the ODST armor.

Because of the style of ODST armor I am going for, mine won’t be colored as it is in the game. Instead, I will be going for the coloring and style of the much bulkier Halo 3 Series 2 figurine and yes, I’m using Hugh Holder’s files for my entire suit. I will be using a reflective orange-gold visor (similar to the one in the comics), and adding detail stripes in white (my character is the Team Leader of Spartan Fireteam White). The name/Spartan Tag “Jason-078” will be on the helmet and top of the chest plate. The left shoulder will include a med-plate and the right shoulder will include the Spartan-II patch symbol. The center of the chest plate will also have a stylized chess Knight in white. Oh, and it will be completely weathered to look tore the frak up, with the rank of Petty Officer Second Class.

So, the first part of the planning is how it will be built. The short answer is: Very Carefully. The long answer is a little more complex than that, though. It will be built with pepakura, foam, sintra, and cloth.

She is still deciding on which files she wants to use for her armor, but I have already decided on mine. It will be all Hugh’s files. The helmet will include a pair of fans in the cheeks just behind the vents and the temples cut out for ventilation. There will also be a voice amp in the chest armor (with throat mic). Finally, the visor will be made using Hugh Holder’s Tutorial: ODST Visors (and other useful info) with THESE gold window tinting.

The “hard” armor pieces will all be typical pepakura. It will be hardened with Smooth Cast 300 (two layers inside and out), “slushed” with the Ure-Fil 11 added (making it nearly identical to rondo), and then given two layers of Kevlar/carbon weave cloth on the inside (using the Smooth Cast as the resin). I plan to detail it in a similar manner to the Cereal Kill3r videos. Rather than using bondo, though, I plan to use Free Form® AIR Lightweight Epoxy Putty. This can also be thinned with water to use in place of the glazing putty. I am doing this because it is too cold to work outside and I don’t want to kill myself, my wife, or the cats inside with toxic fumes.

The shoulder straps, back armor/vest, insides of the thighs, and biceps, will be made of foam. It will be heat-sealed and plasti-dipped before painting and weathered appropriately. The only thing I am not planning on using from the files is the belt base (but I will be using the spine armor from that).

The strapping will be military-grade nylon straps and the belt buckles will be made with layered sintra/pvc foamboard (six 1mm thick sheets). The pouches and such will created with other methods, but we haven’t decided which yet (either leather, thin EVA foam that is sealed and plasti-dipped, or pepakura), though the pouches will actually be usable. Oh, and the D-rings will be purchased from the hardware store, as well as the side-release and center-release buckles.

My undersuit will be a little more complex than the typical as it will actually be a Black Body Suit (my payment for making her armor) from the Boot Camp comics. It will be mostly made out of navy blue spandex quilted over a series of foam pads (for the various plate shapes). The neck, shoulders, elbows, and knees will be made with flat black spandex and a thicker padding in strips. It will have the stylized “078” painted across the chest. The gloves will be black and have the padded strips across the back (as seen on the action figure) and the boots will be standard jungle boots.

Finally, my weapons will include a combat knife on the left shoulder strap, Assault Rifle, Magnum, and a pair of frag grenades. All of the items will be sliced at 1mm for maximum detail and have magnets for attaching to the armor.
 

Attachments

  • 405th_zps79efe60f.jpg
    405th_zps79efe60f.jpg
    8.8 KB · Views: 233
Last edited:
I’m starting with the helmet of my armor. I like Hugh’s files because they are relatively simple to put together. However, it is going to be interesting when I finally assembly them together. I am also cleaning up the pep file slightly as I complete each piece from my resize and rearrangement to fit my grape. I am doing this just in case I have to remake the file (if the size is off or one of my cats joins the Innies and decides to destroy my work.

Let’s start with the visor.

SDC12806_zps16752b41.jpg

SDC12809_zpsd46d0e85.jpg


Moustache

SDC12812_zps7abb4b80.jpg

SDC12813_zpsa7d80df8.jpg


Upper and lower lip

SDC12814_zps111cc709.jpg

SDC12819_zps481055e1.jpg

SDC12818_zpsb2913def.jpg


Left and Right Temple

SDC12822_zps4a4b5f6a.jpg

SDC12820_zps647f67fc.jpg

SDC12824_zps5dd1dd32.jpg


Left and Right Cheeks

SDC12826_zpsee40d426.jpg

SDC12827_zpsb56d9995.jpg


Nose

SDC12829_zpsd80d31c1.jpg

SDC12830_zps78e1d5f2.jpg
 

Attachments

  • SDC12806_zps16752b41.jpg
    SDC12806_zps16752b41.jpg
    14 KB · Views: 228
  • SDC12809_zpsd46d0e85.jpg
    SDC12809_zpsd46d0e85.jpg
    14 KB · Views: 244
  • SDC12812_zps7abb4b80.jpg
    SDC12812_zps7abb4b80.jpg
    14 KB · Views: 219
  • SDC12813_zpsa7d80df8.jpg
    SDC12813_zpsa7d80df8.jpg
    14 KB · Views: 237
  • SDC12826_zpsee40d426.jpg
    SDC12826_zpsee40d426.jpg
    14 KB · Views: 235
  • SDC12824_zps5dd1dd32.jpg
    SDC12824_zps5dd1dd32.jpg
    14 KB · Views: 246
  • SDC12820_zps647f67fc.jpg
    SDC12820_zps647f67fc.jpg
    14 KB · Views: 219
  • SDC12822_zps4a4b5f6a.jpg
    SDC12822_zps4a4b5f6a.jpg
    14 KB · Views: 236
  • SDC12818_zpsb2913def.jpg
    SDC12818_zpsb2913def.jpg
    14 KB · Views: 228
  • SDC12819_zps481055e1.jpg
    SDC12819_zps481055e1.jpg
    14 KB · Views: 229
  • SDC12814_zps111cc709.jpg
    SDC12814_zps111cc709.jpg
    14 KB · Views: 231
  • SDC12830_zps78e1d5f2.jpg
    SDC12830_zps78e1d5f2.jpg
    14 KB · Views: 230
  • SDC12829_zpsd80d31c1.jpg
    SDC12829_zpsd80d31c1.jpg
    14 KB · Views: 228
  • SDC12827_zpsb56d9995.jpg
    SDC12827_zpsb56d9995.jpg
    14 KB · Views: 221
One of the things I am already finding out is that the fold settings are too low. I set the folding line threshold to 150 hoping for a more smooth build before I reassembled the model. Unfortunately, I am finding that the V-indentations between the pieces are not coming out. So, that is something I will have to do by hand after I rondo. Otherwise, it is looking rather nice and the smooth is not much of a pain.

With some of the parts, the way I have them set, I have to cut off a small bit of the flaps to get them to sit right. Otherwise, it’s coming along nicely. This next set is the limit I have done. I’m waiting until my day off on Sunday to do more. Though, I might actually start working on it Saturday night if I have the time/drive. You can see, especially in the jaw, where I had to remove the entire flap because it was far too small to bend or even glue.


Jaw

SDC12831_zpsbc9625cb.jpg

SDC12832_zpsca4e9b63.jpg

SDC12833_zpsd129b0a9.jpg

SDC12834_zpsecd31fd9.jpg


Brow, Center Forehead, Widow’s Peak, and Sideburn

SDC12835_zps0d18bef0.jpg

SDC12836_zpsa5eac98f.jpg

SDC12838_zps3316f6d9.jpg


Center Bangs

SDC12840_zps98a4dd97.jpg

SDC12841_zps2f44dbcf.jpg


Left and Right Forehead

SDC12842_zps6db870dd.jpg

SDC12843_zpsc772f9d6.jpg


Left and Right Bangs

SDC12844_zps92784af7.jpg

SDC12847_zps9eb8f92f.jpg
 

Attachments

  • SDC12832_zpsca4e9b63.jpg
    SDC12832_zpsca4e9b63.jpg
    14 KB · Views: 212
  • SDC12833_zpsd129b0a9.jpg
    SDC12833_zpsd129b0a9.jpg
    14 KB · Views: 238
  • SDC12831_zpsbc9625cb.jpg
    SDC12831_zpsbc9625cb.jpg
    14 KB · Views: 242
  • SDC12840_zps98a4dd97.jpg
    SDC12840_zps98a4dd97.jpg
    14 KB · Views: 208
  • SDC12834_zpsecd31fd9.jpg
    SDC12834_zpsecd31fd9.jpg
    14 KB · Views: 226
  • SDC12835_zps0d18bef0.jpg
    SDC12835_zps0d18bef0.jpg
    14 KB · Views: 230
  • SDC12838_zps3316f6d9.jpg
    SDC12838_zps3316f6d9.jpg
    14 KB · Views: 233
  • SDC12836_zpsa5eac98f.jpg
    SDC12836_zpsa5eac98f.jpg
    14 KB · Views: 225
  • SDC12841_zps2f44dbcf.jpg
    SDC12841_zps2f44dbcf.jpg
    14 KB · Views: 226
  • SDC12844_zps92784af7.jpg
    SDC12844_zps92784af7.jpg
    14 KB · Views: 225
  • SDC12842_zps6db870dd.jpg
    SDC12842_zps6db870dd.jpg
    14 KB · Views: 224
  • SDC12847_zps9eb8f92f.jpg
    SDC12847_zps9eb8f92f.jpg
    14 KB · Views: 204
  • SDC12843_zpsc772f9d6.jpg
    SDC12843_zpsc772f9d6.jpg
    14 KB · Views: 215
This sounds like a great project. Best of luck going forward. I am especially excited to see how the undersuit turns out. You have some great ideas for it.
 
Wow where to start, It seems like you have many many hours of work ahead of you. Ill tell you what though when you finish this project I bet you'll be a star at cons. It sounds like it will look really good. Can't wait to see pics of the armor and guns.
 
Now that the holidays are over, I can necro my thread... I mean revive my thread!

Sorry, the holiday season was about as kind and forgiving as a Brute with a hangover.

I am still alive, though! I'll have some more pics up by this weekend and might even have a new chapter up in my novel (see the below link). Well, actually, I'll more likely have some updated/edited chapters in it.
 
Nice!!! I hear ya, been off of here for a few months too. It was a nice, relaxing break... and then BAM my helljumper was done. So back to the insanity.
 
Now that the holidays are over, I can necro my thread... I mean revive my thread!

Sorry, the holiday season was about as kind and forgiving as a Brute with a hangover.

I am still alive, though! I'll have some more pics up by this weekend and might even have a new chapter up in my novel (see the below link). Well, actually, I'll more likely have some updated/edited chapters in it.

Any updates? I was looking forward to this!
 
Holy carp it’s an update. It’s not much, but it is progress.

Two sets of four buckles.

Later tonight and tomorrow morning (after my coffee), I’ll cut the insides out a little and use some sandpaper to do the rest. If/when it clears before I go to work tomorrow, I’ll use a sanding wheel and take off the outsides and bevel the edges.

After that will come the scaling, re-unfolding, and building of the belt buckles.

Anyway, here’s the picture proof that I am finally working on the Sniper and Spartan ODST.

SDC13021_zps520faf4e.jpg


It is also my sad duty to report that my helmet came under attack by a Covenant-aligned feline lifeform. There were no survivors.
 

Attachments

  • SDC13021_zps520faf4e.jpg
    SDC13021_zps520faf4e.jpg
    14 KB · Views: 210
Weather didn't clear up, so I had to cut it out by hand with an exacto knife. So, I am asking for a volunteer to cut off my hand so I can relieve some of the pain.

Now, to sand the edges down, wash and give them a shot with primer. I'll paint them when I paint the rest of the costume.

SDC13023_zps3f457046.jpg


----------

Update:

While waiting for the storm to break, I also decided to resize and re-unfold the belt buckles (the next part).

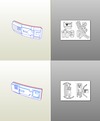
The top is the Hugh Holder Belt Buckle (His), the bottom is the ODST Final Beltplate by Nightshade (Hers). And, yes, those are the Spartan Eagle and the ODST Skull on them.

Belt_zps2aa1c8f3.png
 

Attachments

  • SDC13023_zps3f457046.jpg
    SDC13023_zps3f457046.jpg
    14 KB · Views: 212
  • Belt_zps2aa1c8f3.png
    Belt_zps2aa1c8f3.png
    81.4 KB · Views: 223
Well, belt is done. Forgive the bulging on the top. I need to flatten it out a little. I'm planning to do that when I resin it. I might try and spray it a little to straighten it out... but will probably wait until I resin it.

And, yes, I know hers is smaller than mine. I'm a little taller than she is and these are scaled for out heights. Though, trying to scale the non Hugh Holder file if a pain. I'm using the same scaling codes for the smaller files that I'm using for the Hugh files.

Though, I think IF I have to do it again, I will work from the bottom up rather than from the top down. It might make it look a little better.

SDC13028_zpsacb90fb1.jpg
 

Attachments

  • SDC13028_zpsacb90fb1.jpg
    SDC13028_zpsacb90fb1.jpg
    14 KB · Views: 206
First, I would like to thank Hugh Holder for such amazingly simple shoulders. I say that mostly in comparison to the Ral Partha. It could also be something with regards to the scaling. I'm 6'4", but my wife is 5'2". So, she had teeny-tiny details while I have huge details.

Her shoulders have some pieces that look a little funny, but can be easily fixed after hardening/slushing. The old saying definitely applies: Nothing that a little bondo can't fix.

There are some other details, mostly on mine, that I had to re-unfold and such. If nothing else, it will make it a little easier for the next time I make them (if my scales are off or if I decide to gift my friend with a set of armor.

SDC13030_zpsde20cfb2.jpg
 

Attachments

  • SDC13030_zpsde20cfb2.jpg
    SDC13030_zpsde20cfb2.jpg
    14 KB · Views: 231
One of HER gauntlets is done. This took me the length of The Fifth Element and all but the final fight scene of Gladiator to make (you do the math). Truth be told, I cut out most of the smaller flaps and a couple of the smaller faces. If the resulting holes aren’t sealed when I harden it, I will use some masking tape before I slush it.

Oh, and those teeny tiny details are a pain in the fourth point of contact… Just thought I’d say so.

Presenting the Left HD ODST Forearm by crackhead09, re-unfolded by Jason-078.

SDC13036_zps98a86e24.jpg

SDC13037_zpsb811f035.jpg

SDC13038_zps26783b98.jpg

SDC13035_zpsa65cc0a8.jpg
 

Attachments

  • SDC13037_zpsb811f035.jpg
    SDC13037_zpsb811f035.jpg
    14 KB · Views: 222
  • SDC13038_zps26783b98.jpg
    SDC13038_zps26783b98.jpg
    14 KB · Views: 210
  • SDC13036_zps98a86e24.jpg
    SDC13036_zps98a86e24.jpg
    14 KB · Views: 225
  • SDC13035_zpsa65cc0a8.jpg
    SDC13035_zpsa65cc0a8.jpg
    14 KB · Views: 203
SDC13052_zpsf63f15b8.jpg

SDC13053_zpsdd7617df.jpg


I have finished both sets of gauntlets. It only took me two and a half seasons of My Little Pony to do all four. Mine (the larger) are Hugh Holder’s designs that I re-unfolded. Hers are the Crackhead09 HD versions. And, I must say that the small details of the Crackhead09 gauntlets are beautiful, they are also a pain in the shebs to put together when you have fingers the size of mine.

And yes, I'm recycling pages from jobs that never panned out.

----------

SDC13046_zpsf44d05a7.jpg

SDC13049_zps2aec5320.jpg

SDC13050_zpsaab1e177.jpg


As you can see, the sizing on mine are spot on. I lost a little mobility, but that is mostly because I don’t want to bend/crease the paper before it is hardened. It’s loose on my arm, but within what I should be able to use. Worst case scenario is that I’ll have to drop it an inch in length.

----------

SDC13043_zps0a36f364.jpg

SDC13045_zpsfff8b49d.jpg


Her gaunts are a little looser than mine. I may have to drop an inch from them for the same reason. Hers look a little more than mine do, but that is mostly because she is so tiny.
 

Attachments

  • SDC13046_zpsf44d05a7.jpg
    SDC13046_zpsf44d05a7.jpg
    14 KB · Views: 207
  • SDC13052_zpsf63f15b8.jpg
    SDC13052_zpsf63f15b8.jpg
    14 KB · Views: 186
  • SDC13053_zpsdd7617df.jpg
    SDC13053_zpsdd7617df.jpg
    14 KB · Views: 197
  • SDC13049_zps2aec5320.jpg
    SDC13049_zps2aec5320.jpg
    14 KB · Views: 197
  • SDC13050_zpsaab1e177.jpg
    SDC13050_zpsaab1e177.jpg
    14 KB · Views: 196
  • SDC13043_zps0a36f364.jpg
    SDC13043_zps0a36f364.jpg
    14 KB · Views: 198
  • SDC13045_zpsfff8b49d.jpg
    SDC13045_zpsfff8b49d.jpg
    14 KB · Views: 200
Status
Not open for further replies.
Back
Top