Aztlan's Halo 4 Rogue + Binary Rifle + M6H + Exo-suit WIP, PIC HEAVY!

Status
Not open for further replies.
I'm anxious to see it, I vote Smoke Plastidip for color :)

LOL, and again... it seems that I get the post just after I went another route! Well, that and I already had three cans of black!

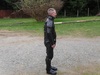
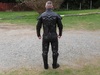
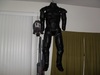
So, I wore the full Exo-suit for over an hour and a half, all the while doing normal things like climbing up and down stairs and making a cup of coffee and even using the restroom. All went fairly well, and let me know where I can improve just a few things to make this that much more comfortable. Heat was never an issue... in fact, I was cold for the most part. Granted, it is only 50F here today.

Parts I will be altering/adding to/repairing

Crotch area will finally get seamed up now that I know it will work properly
Codpiece to plate just above it will receive a snap buckle to keep it in place better
Repair on left arm by the wrist where a seam split just a bit (this should not happen anymore after I do the alteration listed next)
Add loops to the top portion of the arms where the strap from the shoulder will go through to keep the arm armor up my arm correctly.
I need to trim the lower portion of the outside of my leg armor just a bit to keep it from bunching on the boots... that or trim the outer side of the boot... either way I guess :)

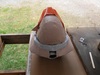
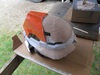
With that... here are some photos that were taken after the hour and a half.

SAM_1210_zps1d169c67.jpg

SAM_1211_zps9de64bc3.jpg

SAM_1212_zps48861789.jpg

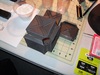
I started off with trying the hex pattern, but my first pass failed, so I promptly went for full coverage. Unfortunately, the last can of Plasti-dip decided to spray like spackle or truck bed liner. Most of that self leveled, but I may revisit the arms for one more coat. I am not sure if it was because of temperature or what, but I was not pleased that it happened. Note: the can has no recommended temperature range for use... go figure!
 

Attachments

  • SAM_1210_zps1d169c67.jpg
    SAM_1210_zps1d169c67.jpg
    236.5 KB · Views: 166
  • SAM_1212_zps48861789.jpg
    SAM_1212_zps48861789.jpg
    238.4 KB · Views: 142
  • SAM_1211_zps9de64bc3.jpg
    SAM_1211_zps9de64bc3.jpg
    233.6 KB · Views: 157
Best undersuit I have ever seen.
Bet your glad its complete :)
Can't wait to see some armour on top of it.
Keep up the above awesome work.
 
Best undersuit I have ever seen.
Bet your glad its complete :)
Can't wait to see some armour on top of it.
Keep up the above awesome work.

Thanks so much! I am very happy to have it finally finished (I just now completed all the things I had listed above. This was an all day task!), as I am sure you are too with yours.

Well, other than a few tidbits here and there - blade 'n 'nades - I will be focusing on the exterior armor now... so we should start seeing progress pics on that very soon, especially with the weather finally warming up here :)

Also, just a quick shot to demonstrate what one has to do when you have a family of four living in a studio... you maximize the efficiency of all space!

SAM_1220_zpse345d6a3.jpg
 

Attachments

  • SAM_1220_zpse345d6a3.jpg
    SAM_1220_zpse345d6a3.jpg
    144.9 KB · Views: 154
Holy cow!! That is seriously impressive, you've done such a great job on this.
It must be so satisfying to wear it around :p
 
my armor lives in the garage lol she wont allow it inside, or me if I smell like bondo lol your foam work just continues to show nothing but pros as far as the medium goes
 
Thanks all for the awesome comments!

It has been a little while since my last post, but trust me when I say I have been very busy.

I started on two new projects as well as resumed work on the Rogue set now that 'tis the weather for chemicals :) :)

I have begun the outer shell to the Rogue helmet. It is amazing that when you thought everything was perfectly symmetrical, it really was not! I must admit though, it is pretty darned close and is making the exterior shell a breeze so far. These are photos of just after the second layer of Bondo. I have already sanded that down and have one more layer to go. These layers range between 1/32" - 1/8" in thickness max. I am a firm believer in many thin layers as a pose to globbing it on trying to get it done in one shot.

SAM_1227_zps3b55b87d.jpg

SAM_1226_zps66f897d1.jpg

Next, I am working on my Pulse Grenade. I started it out attempting to use balsa wood. Epic fail! I was using 1/16" thickness and it ended up being way too flimsy and warped horribly when I went to harden it with PVA. Lesson learned! I then went back to ol' trusty, EVA foam. Using the same measurements I had done with the balsa, I think I have a winner. I went to a local thrift store and picked up an acrylic picture frame and used a bandsaw to cut it to lengths the same as the sides of the grenade. I then used 220 grit sandpaper to smooth the edge as well as help diffuse the light from the orange LEDs that will be housed inside. Then, since the measurements were the same as the balsa one, I used the spike design I had created using cardstock. I simply took my hot glue gun and filled one of them up with hot glue. After that cooled, I soaked it in water to deteriorate the cardstock, leaving me with a perfect solid spike. Then I took a tube of silicone caulking and filled a clear Solo cup with the silicone. I mixed in a generous amount of glycerine and then coated the hot glue spike with Vaseline and put it into the silicone until that cured. Once that cured, I removed the hot glue spike and filled the mold I had made with the silicone with crystal clear epoxy. Once that cured, I pop it out and repeat. This will have to be done eight times total. It will take some time since the epoxy takes 12 hours to set and another 12 hours to fully cure... and I only have one mold... so, eight days later, I will be done with that! Once they are all finished and cured, I will take 220 grit sandpaper and sand down the faces to make them opaque as well. This should all be done about the same time my orange LEDs show up in the mail. I am figuring for up to 20 LEDs (one per edge - 12 edges, and one per spike - 8 spikes). This thing should be EXTREMELY bright! I just hope the batteries last more than a couple of minutes :)

Here is a couple of photos of where I currently am... and also of the next project I am about to discuss.

SAM_1225_zps5b3eeb58.jpg

SAM_1224_zpsc5b220b3.jpg

Demonstration of the glow of the spike using a LED flashlight (this is a hot glue spike, not the epoxy one)

SAM_1222_zpsadab9eb4.jpg

So, the next project is an AI chip. This one, the balsa did the job it was supposed to. I created the buck using both 1/16" and 1/4" thick balsa. I then painted it with primer, sanded it down, then covered it with Vaseline and did the same steps listed above with the silicone. Right now, it is only one sided because I had to support the balsa with a backer plate to keep it from warping. Once I have completed the first half, I will use the strength of it to hold the other half of the balsa buck in place so I can make a full mold that can be poured. I have future plans for this chip, but that will be addressed after I have had more time to think a few hurdles through some more. :)

As always, thanks for checking out my thread and feel free to comment away!
 

Attachments

  • SAM_1225_zps5b3eeb58.jpg
    SAM_1225_zps5b3eeb58.jpg
    197.6 KB · Views: 155
  • SAM_1226_zps66f897d1.jpg
    SAM_1226_zps66f897d1.jpg
    190.3 KB · Views: 156
  • SAM_1227_zps3b55b87d.jpg
    SAM_1227_zps3b55b87d.jpg
    181.8 KB · Views: 158
  • SAM_1224_zpsc5b220b3.jpg
    SAM_1224_zpsc5b220b3.jpg
    185.8 KB · Views: 160
  • SAM_1222_zpsadab9eb4.jpg
    SAM_1222_zpsadab9eb4.jpg
    264.7 KB · Views: 135
That is a VERY interesting way how to make molds with out having to buy $50 worth of mold making stuff form smooth on. I may be taking the idea if I ever get anything that small to mold.
 
That is a VERY interesting way how to make molds with out having to buy $50 worth of mold making stuff form smooth on. I may be taking the idea if I ever get anything that small to mold.

Yes it is! I learned about it when I was doing research for my very first project I posted on this site way back when (October) which was a blank helmet buck that I wanted to make a mold of so I could then make another. It was a great idea because the helmet has so many variations that it can take from where it is. Anyways...

The down side to using silicone caulking (be sure it is 100% silicone only!) is the smell it emits, consistency (it is rather thick), and the fact that you can usually only pull one or two detailed casted pieces from it (more if they are simple and without complex angles that may catch the silicone). Other than that, it is great and inexpensive stuff.

Anyways... I got bored. Waiting for epoxy to cure is not my cup of tea... soooooooooooo

Time to play with some balsa!

The one piece I still had not started... and go figure... it was SO easy to make this!

The design template and rough cut 1/4" thick balsa

SAM_1230_zpsd0485429.jpg

After I shaped the blade's edge

SAM_1231_zps9f1e082c.jpg

Bottom view of the blade's edge

SAM_1232_zpsefc815a4.jpg

Top edge of blade's edge

SAM_1233_zpsa7753407.jpg

Rough cut of the handle grips

SAM_1234_zps021369ea.jpg

And this is where I am now... just after I shaped the handle grips.

SAM_1235_zps944d2ddb.jpg

I figure I have about 6 hours into it right now.

All I have left to do is drill the holes in the grips and tang, install the "rivets", cut and shape the ridged edge on the top of the knife, epoxy for strength, and paint :)

The only tools I used were: Scalpel, dremel with barrel sander, 60 and 220 grit sandpaper.
Materials used will be: Wood glue, 1/4" balsa sheet (4"x36" piece), Seamstress eyelets (for the rivet look), acrylic paint, and epoxy.

I am just glad I didn't start with this project, it would have given me a false sense of hope on how easy the rest of them would have been! :)

Just a quick edit to update. I thought I was done for the night, but figured I would go ahead and cut and shape in the ridged edge on the top of the knife, and also install the "rivets".

SAM_1236_zps8034602e.jpg

Now all that is left is epoxy and paint! Woohoo!
 

Attachments

  • SAM_1231_zps9f1e082c.jpg
    SAM_1231_zps9f1e082c.jpg
    172.2 KB · Views: 154
  • SAM_1232_zpsefc815a4.jpg
    SAM_1232_zpsefc815a4.jpg
    176.1 KB · Views: 142
  • SAM_1230_zpsd0485429.jpg
    SAM_1230_zpsd0485429.jpg
    193.3 KB · Views: 147
  • SAM_1233_zpsa7753407.jpg
    SAM_1233_zpsa7753407.jpg
    205.7 KB · Views: 138
  • SAM_1236_zps8034602e.jpg
    SAM_1236_zps8034602e.jpg
    190.8 KB · Views: 150
  • SAM_1235_zps944d2ddb.jpg
    SAM_1235_zps944d2ddb.jpg
    196.5 KB · Views: 156
  • SAM_1234_zps021369ea.jpg
    SAM_1234_zps021369ea.jpg
    182.2 KB · Views: 144
now thats a knoife right there mate, foam sheath or will you buy a leather one?

I have not quite decided yet on the sheath. I am considering either foam or balsa... or, integrating a sheath into my armor's chest piece. I think the latter will add to the "cool effect" and would be quite easy to accomplish.

Combat Knife Completed :) (minus the clear coat)

This is after I applied Rondo to the handle and resin to the blade

SAM_1237_zps12aeaec7.jpg

Spot putty on all of the pinholes and imperfections

SAM_1238_zps6e405da2.jpg

All sanded and ready for paint

SAM_1239_zps8bd83ba9.jpg

Paint applied (the stripe is still wet, it is actually a matte paint), "rivets" installed, and ready for clear coat

SAM_1242_zpsf547c59b.jpg

I was tempted to weather the weapon until I read "The UNSC's multi-purpose combat knife has a blade 20 centimetres (7.9 in) long made of high carbon steel, an anti-flash non-reflective titanium carbide coating, edge coated for corrosion and rust resistance and is 43.3 centimetres (1 ft 5.0 in) when sheathed." - halo.wikia.com

Even though my blade is not identical to the one they show, my blade length is 7 7/8" long and I figured they would not change the combat coating just because they changed the blade design :)

This was by far the smoothest, quickest, and most fun of all my projects so far. Now back to the Rogue helmet, pulse grenade, and AI Chip (I am starting over on this I think).
 

Attachments

  • SAM_1237_zps12aeaec7.jpg
    SAM_1237_zps12aeaec7.jpg
    196.2 KB · Views: 145
  • SAM_1238_zps6e405da2.jpg
    SAM_1238_zps6e405da2.jpg
    194.2 KB · Views: 131
  • SAM_1239_zps8bd83ba9.jpg
    SAM_1239_zps8bd83ba9.jpg
    186.5 KB · Views: 132
  • SAM_1242_zpsf547c59b.jpg
    SAM_1242_zpsf547c59b.jpg
    191.4 KB · Views: 141
wow you can work with wood too i see lol. Great looking knife :) will add even more awesomeness to an already awesome build :)
Great job
 
Great work on the blade, Spartan. I'd have given measurements on the scale of it had I known, but it seems that most data refers to the Halo Reach combat knife.
 
wow you can work with wood too i see lol. Great looking knife :) will add even more awesomeness to an already awesome build :)
Great job

Thanks so much! Woodworking was a skill I learned from my father. He has always been amazing at waving his hands above a piece and making it bend to his will :)

Great work on the blade, Spartan. I'd have given measurements on the scale of it had I known, but it seems that most data refers to the Halo Reach combat knife.

Thanks! I too noticed that. I figured if I just went with the measurement of the Reach knife, it would be very close. And my blade length is 7.875 inches (.025" off), I can live with that :) Just curious though, what is the true blade measurement for this one? And the overall length... that I never found for the other knives also... just the blade length and the whole thing sheathed. If its close, I will whip out my board stretcher and fix it!:p
 
Have you thought about making a kydex sheath? Kydex can be a bit pricey, but I think it looks cool. Though you could probably make a sheath out of foamies with rivets on one edge to make it seem like kydex.

And the blade looks awesome (what a surprise, eh? ;) )
 
What is the true blade measurement for this one?

Not really sure. All the references I can find refer to the Halo Reach combat knife, so I think this is going to be a case of 'whatever you think works' until somebody (probably me) can do some maths to work it out.
 
Status
Not open for further replies.
Back
Top