glasscutter
Jr Member
As always great work. Love seeing all the different mediums being used.
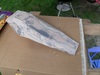
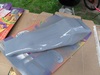
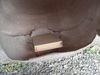
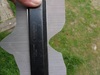
") ) and working three layers of bondo on the top portion of the lower stock of the Needle Rifle. I have wet sanded that, primered again, and will start on the lower half tomorrow. All the top needs is a tiny bit of spot putty in places (1/64" low spots at most). Just as a heads-up, I am aiming for very close to the quality of what Volpin Props did with their Needler. I would love to claim that it will be the same or better quality, but how could ANYONE beat that?!
) and working three layers of bondo on the top portion of the lower stock of the Needle Rifle. I have wet sanded that, primered again, and will start on the lower half tomorrow. All the top needs is a tiny bit of spot putty in places (1/64" low spots at most). Just as a heads-up, I am aiming for very close to the quality of what Volpin Props did with their Needler. I would love to claim that it will be the same or better quality, but how could ANYONE beat that?!

Heres the link to his needler build if youre interested: http://www.tested.com/art/makers/458215-building-halo-needler-prop/
Looks good so far, can't wait to see more progress updates on just about everything
May I ask what 3-D printer you are planning to get?
And great work on the armor and needle rifle it looks beautiful
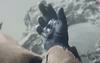
I will demonstrate how the AI chip will work in just a bit.


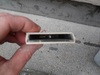
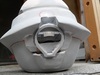

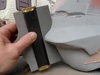
T I will demonstrate how the AI chip will work in just a bit.
But, before I go there, I recently found a tool that I think none of us should be without.
A profile gauge is cheap (around $10 for a good one) and simply amazing for making sure everything is symmetrical.
Pretty darned close. If you look closely, you can see I am a bit off at the top part of the brim and at the very lowest part (maybe a 1/32"). Anyways, I hope you can see how valuable this tool is.
wow it's a lot bigger then I thought.
That looks really good, im going to try to do the same thing with a h4 cortana chip on my chief helmet, which im working on now
I hate when something so simple rocks your world. I wish I'd had that on hand for several steps of my Splaser. I struggled for a month on symmetry with my fiberglass receiver! I won't start my next project without one. Thanks!
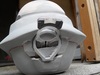
Your chip slot work looks great too.
Redshirt
At 3.75"x2" (guessing by the cutting mat lines and comparing to the Halo trailer with Chief holding Cortana's AI chip) I'd say the AI chip is a tad large scale wise

The AI chip is gorgeous nonetheless and the fact that you are implementing it into your helmet is amazing. I wouldn't be worried about the scale at all