TheCaptainBacon's MJOLNIR Mark VI Sculpt

Status
Not open for further replies.

TheCaptainBacon

New Member
Well, I think that after lurking for about two years now, it is about time to make my first post. So here it is!

I have been making armour for two years (since I was 13). I've made two foam suits (with pepped helmets), and while they are the two coolest things I've ever created, I have never been completely happy with them. As you might be able to tell, I am a bit of a perfectionist.

So, my goal for this build is to make it to the best of my ability, and end up with something that I will be truly happy with (a pretty tall order for me).

Enough about me, more about my project, the MJOLNIR Mark VI from Halo 3:

IMG_2796_zps4985e403.jpg

IMG_2801_zps181e5c18.jpg

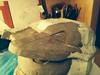
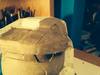
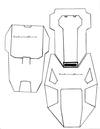
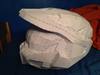
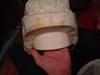
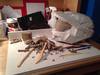
So here you can see that I pepped the helmet using a low-def model (I think it was by DANNIFOOD4LESS). I would have used a high-def model, but with the method I'm using it didn't really matter. Anyway, I prefer adding detail by hand, I think it is easier than trying to piece together really small bits of paper.

IMG_2805_zpsc596c057.jpg

IMG_2832_zps2b45b017.jpg

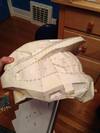
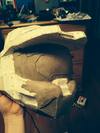
I resined the helmet with watered down wood glue, as per the "Wood Glue Method" that Justinian117 posted, except that I used LePage Carpenter's Glue. It seems to have worked pretty well.

IMG_2833_zps6fe7e60a.jpg

IMG_2834_zpsdb02931f.jpg

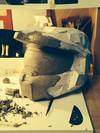
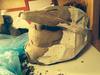
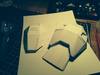
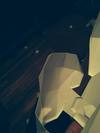
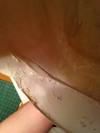
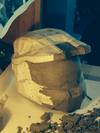
I glassed the helmet using fiberglass cloth and the watered down wood glue. I ran out of fiberglass near the end of glassing it, so I cut up an old rag and used that for the back of the helmet. This was NOT a good choice. It never hardened properly; I had to rip it out, buy more fiberglass cloth, and reglass that area (unfortunately I don't have pictures of that).

IMG_2836_zps6e632d3c.jpg

IMG_2837_zps8d15b354.jpg

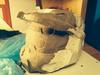
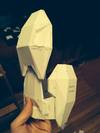
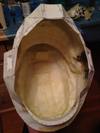
Pulling out the rag resulted in this though, and I had to tape it back together on the outside as well (although it really wasn't a big deal at all, it just really annoyed me at the time).

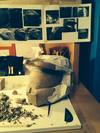
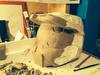
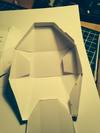
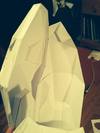
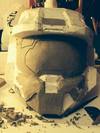
Once the fiberglass had cured, it was solid enough to start sculpting onto it (but definitely not strong enough to actually wear it). I started with the visor:

IMG_2839_zpsc78070b0.jpg

IMG_2843_zpse1253118.jpg

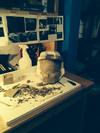
Then I went to bed. The next day I decided it would be a good idea to gather some reference pictures outside of my head (the plastic is to stop the clay from drying, I also sprayed it with water):

IMG_2848_zps7e479996.jpg

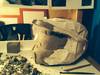
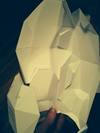
The jaw was next on the docket, and I also cut in some lines on the visor (just because I was impatient, they weren't the final lines or even symmetrical at all).

IMG_2854_zpsff2dd273.jpg

(sorry about the filter that's on most of the pictures - I took them with my iPhone and it seems to automatically add the "instant" filter...)

The next day I got rid of the imperfect visor lines and did the other side of the jaw (as well as the bottom of the jawline, but that has been getting smushed away as the helmet rests on it). I also filled in the nose and started working on that. All the bumps on the sculpt (or most of them, anyway) are from the water I sprayed on it to keep the clay from drying.

IMG_2857_zps633d3362.jpg

IMG_2863_zpsad1b8b97.jpg

I'm going to have to continue in the next post, because it says that I can only have 15 pictures.
 

Attachments

  • IMG_2796_zps4985e403.jpg
    IMG_2796_zps4985e403.jpg
    95.9 KB · Views: 305
  • IMG_2801_zps181e5c18.jpg
    IMG_2801_zps181e5c18.jpg
    49.3 KB · Views: 308
  • IMG_2805_zpsc596c057.jpg
    IMG_2805_zpsc596c057.jpg
    69.3 KB · Views: 302
  • IMG_2832_zps2b45b017.jpg
    IMG_2832_zps2b45b017.jpg
    61.2 KB · Views: 297
  • IMG_2833_zps6fe7e60a.jpg
    IMG_2833_zps6fe7e60a.jpg
    60.2 KB · Views: 290
  • IMG_2839_zpsc78070b0.jpg
    IMG_2839_zpsc78070b0.jpg
    71.7 KB · Views: 299
  • IMG_2837_zps8d15b354.jpg
    IMG_2837_zps8d15b354.jpg
    35.5 KB · Views: 289
  • IMG_2836_zps6e632d3c.jpg
    IMG_2836_zps6e632d3c.jpg
    56.7 KB · Views: 282
  • IMG_2834_zpsdb02931f.jpg
    IMG_2834_zpsdb02931f.jpg
    56.5 KB · Views: 283
  • IMG_2854_zpsff2dd273.jpg
    IMG_2854_zpsff2dd273.jpg
    75.5 KB · Views: 272
  • IMG_2848_zps7e479996.jpg
    IMG_2848_zps7e479996.jpg
    64.6 KB · Views: 307
  • IMG_2843_zpse1253118.jpg
    IMG_2843_zpse1253118.jpg
    75.5 KB · Views: 290
  • IMG_2857_zps633d3362.jpg
    IMG_2857_zps633d3362.jpg
    69 KB · Views: 310
  • IMG_2863_zpsad1b8b97.jpg
    IMG_2863_zpsad1b8b97.jpg
    65.8 KB · Views: 299
Continued from last post...

Next I made the visor lines again, this time using templates made of masking tape (because for some reason, both sides of the masking tape sticks to the clay, even the non-sticky side). This way they were perfectly symmetrical.

IMG_2866_zpsd99e7054.jpg

IMG_2872_zpsebfe654f.jpg

IMG_2868_zps755c7825.jpg

Then I started laying more clay on the parts of the visor that are raised in the game. My favourite tools are the white serrated one (for shaping) and the wooden flat-ended one (for secondary shaping and smoothing) from the below picture.

IMG_2883_zps8cc9b727.jpg

IMG_2886_zpsf30b563e.jpg

IMG_2887_zpsad66f65f.jpg

IMG_2882_zps93ebf5c2.jpg

I almost forgot to mention that I am using Chavant NSP Medium clay for this.:rolleyes

That about sums up my project so far. I'm planning to make a mould of it with silicone (not sure what product yet) and vacuum-form the visor if all goes well. I'm not sure if I'll make the whole suit or not just yet (but it would be fun :D).

TheCaptainBacon
 

Attachments

  • IMG_2866_zpsd99e7054.jpg
    IMG_2866_zpsd99e7054.jpg
    91.1 KB · Views: 286
  • IMG_2872_zpsebfe654f.jpg
    IMG_2872_zpsebfe654f.jpg
    78.4 KB · Views: 276
  • IMG_2868_zps755c7825.jpg
    IMG_2868_zps755c7825.jpg
    75.1 KB · Views: 298
  • IMG_2883_zps8cc9b727.jpg
    IMG_2883_zps8cc9b727.jpg
    97.9 KB · Views: 287
  • IMG_2886_zpsf30b563e.jpg
    IMG_2886_zpsf30b563e.jpg
    72.4 KB · Views: 295
  • IMG_2882_zps93ebf5c2.jpg
    IMG_2882_zps93ebf5c2.jpg
    88.8 KB · Views: 294
  • IMG_2887_zpsad66f65f.jpg
    IMG_2887_zpsad66f65f.jpg
    81.4 KB · Views: 274
That's some badass sculpting skill.
So you strengthened the inside with fiberclass cloth and PVA? How did that work out for you? How strong is it? And, if you've ever used resin, how does it compare?
 
That's some badass sculpting skill.
So you strengthened the inside with fiberclass cloth and PVA? How did that work out for you? How strong is it? And, if you've ever used resin, how does it compare?

Thanks! I actually used wood glue (although that may just be a type of PVA now that I think about it). It seems to have worked out very well, although it is definitely not as strong as if I had used actual resin (I have used it on many projects in the past). It is maybe half to three quarters as strong as if I had used the real deal. The only reason I used the wood glue was due to these darn Canadian winters - too cold to use resin outside, and if I used it inside it would kill everyone. Oh well. Seems to work.
 
If your budget allows, you could us laminate epoxy resin. You can find it at smoothon.com. that way you can resin in-doors, without the toxic odors. And everyone including yourself stays alive. Didn't know if you were aware of epoxy resin?
 
The only reason I used the wood glue was due to these darn Canadian winters - too cold to use resin outside, and if I used it inside it would kill everyone. Oh well. Seems to work.

Haha that's exactly why I'd do it too! But I don't trust the strength with bondo, it could crack if there's any movement so I may wait for the weather to warm up so I can resin!
 
I was thinking of doing the same thing with my helmet now that i got far into bondo and sanding it all the time. I wiould think it would be easier to clay sculpt it the mold it. Thinking clay would be alot easier to put detail into. Would the clay stand up to the mold process ?
 
If your budget allows, you could us laminate epoxy resin. You can find it at smoothon.com. that way you can resin in-doors, without the toxic odors. And everyone including yourself stays alive. Didn't know if you were aware of epoxy resin?

Yes I am aware of epoxy resin, but I didn't use it on this project because the wood glue was cheaper, more readily available (there's one or two bottles of it in my house usually), and it works well enough for my purposes.

Haha that's exactly why I'd do it too! But I don't trust the strength with bondo, it could crack if there's any movement so I may wait for the weather to warm up so I can resin!

Yeah I wouldn't use it for anything that I am actually wearing. This is going to get molded and casted, so it just has to be strong enough to withstand clay being put on it.

I was thinking of doing the same thing with my helmet now that i got far into bondo and sanding it all the time. I wiould think it would be easier to clay sculpt it the mold it. Thinking clay would be alot easier to put detail into. Would the clay stand up to the mold process ?

I have made things with bondo in the past, and I definitely like the clay better as of now. The only problems with using the clay is that it doesn't dry, so that it is really easy to nick a finished surface, and that it is harder to smooth than bondo (it is easier to work, but it is harder to get smooth as you can't really sand it... If you know what I mean). The clay should hold up to being molded, as sculpting and molding/casting is the go-to method for a lot of movie prop makers.

I used smoothcast 320 and you can get it that Viking plastic (southeast area)

I didn't know that there was a place that stocks smooth-on products in Edmonton! I looked at the Viking Plastics website, and it also stocks molding rubber! That will be so helpful when I get around to molding and casting, and I'll have no shipping costs either! Thanks so much!


I don't have an update just yet, but I should have made progress by the weekend.

Stay classy 405th! (just saw Anchorman)

TheCaptainBacon
 
Sorry for the double post, but I have an UPDATE!

I only got a short time to work on the helmet, but it wasn't really going all too well, so I stopped. However, I did feel like doing pepakura, so I made a bicep instead. I figure that the bicep is easier to make then the helmet, and is looked at a lot less then the helmet, so I think that it will be best to do the whole bicep, including sculpting, moulding, and casting, so that I get a feel for moulding/casting. Also, it's probably a lot less of a problem or disappointment if I screw up the mould and sculpt for just a bicep rather than a helmet.

First off, the helmet:

IMG_2955_zpsdd0f0008.jpg

IMG_2958_zpsb3f585bf.jpg

IMG_2956_zps37844b1a.jpg

IMG_2957_zps597c71ad.jpg

Yeah, I really didn't do much on it.

But now the bicep:

IMG_2961_zps75b3c47b.jpg

IMG_2962_zps3ed6d74d.jpg

IMG_2966_zpse826946f.jpg

As you have probably noticed, I pepped it with the tabs on the outside (gasps from the audience). I did this so that the inside would be nice and clean (same idea as SirPalesAlot). However, I will be filling the finished pep with clay (I'm going to heat it up first, of course). I will then rip the pepakura model off, leaving a nice clay shoulder piece to refine and detail.

Here's the clean inside:

IMG_2963_zps975a1962.jpg

IMG_2969_zps63c24568.jpg

IMG_2971_zps8beeb715.jpg

IMG_2970_zpsf6675172.jpg

(How many ways are there to take pictures of the inside of a bicep? Not very many.)


TheCaptainBacon
 

Attachments

  • IMG_2958_zpsb3f585bf.jpg
    IMG_2958_zpsb3f585bf.jpg
    83.5 KB · Views: 274
  • IMG_2955_zpsdd0f0008.jpg
    IMG_2955_zpsdd0f0008.jpg
    75.2 KB · Views: 280
  • IMG_2962_zps3ed6d74d.jpg
    IMG_2962_zps3ed6d74d.jpg
    47.5 KB · Views: 295
  • IMG_2956_zps37844b1a.jpg
    IMG_2956_zps37844b1a.jpg
    83.4 KB · Views: 299
  • IMG_2957_zps597c71ad.jpg
    IMG_2957_zps597c71ad.jpg
    68 KB · Views: 279
  • IMG_2961_zps75b3c47b.jpg
    IMG_2961_zps75b3c47b.jpg
    61.2 KB · Views: 254
  • IMG_2966_zpse826946f.jpg
    IMG_2966_zpse826946f.jpg
    48.4 KB · Views: 243
  • IMG_2963_zps975a1962.jpg
    IMG_2963_zps975a1962.jpg
    50.1 KB · Views: 278
  • IMG_2971_zps8beeb715.jpg
    IMG_2971_zps8beeb715.jpg
    43.5 KB · Views: 244
  • IMG_2969_zps63c24568.jpg
    IMG_2969_zps63c24568.jpg
    38.3 KB · Views: 255
  • IMG_2970_zpsf6675172.jpg
    IMG_2970_zpsf6675172.jpg
    34.2 KB · Views: 280
Looking SUPER good! It's great to see a good old fashioned clay sculpt in the wake of all of these foam builds (and I love EVA builds, but it's nice to see this kind of thing!)

Word of advice- I would recommend using a plasticine modeling clay or anything oil based. Those don't dry out so you won't have to worry about that overnight! Another thing, when you're sculpting on top of pep, you're adding to the final mass of the helmet. Therefore, if you scaled the helmet for your head, it will be bigger on you once you mold and cast it because the clay has been added on top of the scaled pep (making it bigger by a few mm or cm depending on how thick the clay is).
Great sculpting skills, man! Keep it up!! :D

Thanks for your comment! I like foam builds too (I've made 2 in the past), but I agree, the clay sculpting method is seen a lot less these days. I also find it more fun :)
I actually am using oil based clay - Chavant NSP Medium to be exact. I'm just spraying it with water and covering it for extra precaution. I have also taken into account how much the helmet will grow, it just barely fit on my head in the pep stage, so it should fit nicely once cast.
 
Just a quick update.

I found that the bicep was too small, so I rebuilt the model a centimetre and a half larger (only took me 4 hours). Originally, my plan was to heat up some clay and squish it into the pep model, but that didn't work out very well. The clay didn't form any kind of surface that looked good, it warped the model badly, and the clay didn't stick to the paper at all. So then, I decided to melt some clay and just pour it in. This didn't work either, as when I tried to microwave the clay it didn't heat up at all, and my microwave stopped working (don't worry, it is working properly again, it just shut off for some reason). So I decided just to draft up some templates for the symmetrical parts and sculpt them out normally without the help of a pep model.

Templates:

H3BicepandShoulderTemplates_zps59f45011.jpg

(please feel free to use these templates, just give me credit)

My plan now is to sculpt the bicep cover and the shoulder cap with the strip thing attached as two different parts, then make cheapo caulking moulds of them, cast them in rondo, and then sculpt the rest of the bicep parts (that aren't symmetrical) onto them. The final sculpts will be moulded as normal.

TheCaptainBacon
 

Attachments

  • H3BicepandShoulderTemplates_zps59f45011.jpg
    H3BicepandShoulderTemplates_zps59f45011.jpg
    46.1 KB · Views: 278
My goodness! I have barely seen clay sculptures but this is wicked man! I am really impressed with the helmet so far! Being Canadian as well I completely understand the fight with the cold haha! I have worked with the pep and foam methods but I doubt I could sculpt worth a darn! :p Keep it up man!
 
Status
Not open for further replies.
Back
Top