Retralpha's First Build - Halo Reach Noble 8

Status
Not open for further replies.
Thanks for all the advice. Really appreciating it all, and taking every word in.

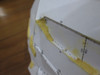
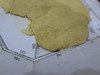
EVAkura, my issue is that I cant find a resin online, or in shops. I've asked the teachers at my art school to lend me some finishing varnish to seal up a handpiece, it becomes waterproof, but also more flimsy. Adding additional dangers like tearing during proper hardening.

I am fairly sure that I won't be able to find any fibreglass to harden up my armour. Just because of a lack of well stocked hardware shops etc. (Malaysia's a real pain in this area)
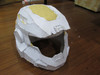
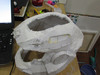
Ive found though, that hot glue seems ok for hardening (it's not stiff, but as a costume, it seems up to par for drops and falls. [the helmet as least..]), and I might try to get some Drywall mud to substitute for bondo.

Anyways, thanks for all your guys help, I've got to get reading up on this "Drywall mud".
 
Just so you know, drywall mud (joint compound) is like chalk in consistency. It is extremely brittle and will not be a good solution for anything that would be worn.

But... here is another idea, and I am sure all of these components will be available to you.

Look up "paper clay recipe" and find one that has all of the ingredients you can acquire. Most of them use Joint Compound, toilet paper, wood glue, hot water, and linseed oil or glycerine (this is just to keep the clay from drying out your hands... it has nothing to do with it being a necessary component)

It is not the easiest to work with, but once you get the hang of it, it is pretty cool stuff. I would rate the strength one step beyond paper mache, but lower than epoxy. It is sand-able, and is quite easy to sculpt. At least it would be worth looking into, and once again, would give you another skill and medium to work with! (Also, it is CHEAP!! :) )
 
Hey! I just wanna say that the finished pep of the helmet looks awesome. By the way, Im a new member and just joined. I went with the Halo 2 Marine for my first armor build. Im already having trouble too on this end. First of all i started with 75 cover stock. This was before i got around to seeing some videos that said use 110. My biggest problem is angles. I dont have enough arms to be able to glue every spot easily. Anyway yeah its rough making these things, but its tons of fun huh? Hope to see you guys all over thee 405th. Keep up the awesome work Retralpha.
 
Hey! I just wanna say that the finished pep of the helmet looks awesome. By the way, Im a new member and just joined. I went with the Halo 2 Marine for my first armor build. Im already having trouble too on this end. First of all i started with 75 cover stock. This was before i got around to seeing some videos that said use 110. My biggest problem is angles. I dont have enough arms to be able to glue every spot easily. Anyway yeah its rough making these things, but its tons of fun huh? Hope to see you guys all over thee 405th. Keep up the awesome work Retralpha.

I use 180+ cardstock. Hard to fold, but worth it for anti-warp strength.
 
I wouldnt even know where to get 180 plus. I only just now got a hold of some 110 cardstock. Ill keep a lookout for the 180 plus though. Your helmets looking good.
 
Progress!

I tried wood-filler to patch some small holes, but had some left over so put it on the top of my helmet to see what it would do on a large scale.
z9N2B97.jpg

Mnx45th.jpg

WBO94bW.jpg


Note, these are all taken before I sanded.
 

Attachments

  • z9N2B97.jpg
    z9N2B97.jpg
    1.6 MB · Views: 113
  • Mnx45th.jpg
    Mnx45th.jpg
    1.7 MB · Views: 114
  • WBO94bW.jpg
    WBO94bW.jpg
    1.6 MB · Views: 131
EVAkura, thank you for everything.

A lot has happened since my last post. Found drywall filler, boched the top of my helmet, etc.
I now know why halo armour has to be so hard. because finishing stages need the surface to be hard to prevent cracks.
Due to this, I am going a step back to re harden my helmet with paper clay stuff.

I probably wont be able to make another post for a bit, because I have exams coming up, and they take priority over everything at the moment

thank you all, it means a lot to me.

OMG, I don't know why I didn't think of this until just now! If it were me, I would use the paper clay on the INSIDE of your helmet (just make sure it will still fit afterwards). Just sculpt it to the inside, making sure that ALL the gaps are filled and is thick enough to allow you to sand and sculpt through the cardstock and still have enough strength to hold itself together. I think that would be a better route to go than trying to sculpt from the outside with paper clay simply due to the fact that it does not sculpt super easy. It would be worth a shot, especially if you have the opportunity to try it on a botched helmet where your losses would be minimal if it didn't work out perfectly.

Just keep in mind that either way you go, if you use the paper clay, it will try to warp the helmet. Do whatever you can to stop or limit this from happening. If you need help, just gimme a shout and I will see what I can do.
 
Damage report : you be the judge
I663Cgq.jpg

The plaster and stuff around it is fine, just the hole.
 

Attachments

  • I663Cgq.jpg
    I663Cgq.jpg
    1.8 MB · Views: 121
Looks like a redo to me. And, I'd advise using actual bondo, not plaster - in thin layers. You get nothing from slopping it all on in one go.
 
yea i would go resin and bondo, drywall is too brittle, it will crack and chip, if not now then later.Are you not from the US or something? Resin and bondo are very easy to find, go to an automotive store/a hardware store. If not that, order it online... google is your friend. I am a little confused, you keep asking for help/advice but then doing the opposite of what the veteran crafters suggest...

Have you read up on foam crafting? I almost feel like that might be a better alternative for your situation.
 
The only advice I have from here is... now you have experienced what paper clay can do... start over with re-pepping the helmet and making it a bit (maybe 5%... but I don't have experience resizing... so check further on that) larger so you can use the paper clay on the inside rather than the outside. Also, next time, don't cut out the visor... you need to keep it in there for stability. In addition, TomCatHeavy made a great point by stating you should seal the cardstock with something like 3M Scotch Guard or the likes. If you are going to go with this method, be sure to switch to super glue for the pep phase. The hot glue will be your worst enemy if you have to sand through it whereas super glue is easy to sand. Stick with one medium... don't use a little bit of one product and then another (eg: wood putty and paper clay). Consistency is key when it comes to getting a uniform sanded surface.

Your consistency for the paper clay looks to be perfect (better than my first attempt for sure!). I admire the work you have done so far, and your willingness to push forward considering all of the hurdles you have experienced. Keep up the great work... and keep in mind, if you are able to pull this off... you will be a pioneer with a new alternative for those who also don't have chemicals at their disposal!
 
For sealing you could try Mod Podge. Or a homemade version of Mod Podge if only white glue is available. I've tried it for sealing before using Aqua-Resin. It worked better than the acrylic sealer did. It also gave the paper a light rubbery coating (after several coats) which helped it not warp. For homemade recipes just google homemade Mod Podge. Some examples below:

http://www.wikihow.com/Make-Mod-Podge

You could even make your own homemade white glue to make the Mod Podge recipe if needed. Lots of recipes for homemade white glue also.
 
Last edited by a moderator:
Retralpha,
I concur with the others that a redo from here would save time. I can relate to your issue of not having access to resin for hardening. I built my costume while in XYZ country and had none of the traditional materials. I built from cardboard, but sculpted with paper clay. I hardened the clay and cardboard by brush painting with oil-based industrial paint. The drying paint shrunk everything just slightly, adding lots of strength in the process. I also used a water-based varnish. This turned out to be exactly like acrylic floor wax available here in the US. Here it is sold under the trade names Mop-N-Glow or Future. Water soluble until dry, then permanent. You could even substitute the floor wax into your paper clay recipe instead of water for a really tough result. Don't let the setback slow you. We've all been there.

Redshirt
 
yea i would go resin and bondo, drywall is too brittle, it will crack and chip, if not now then later.Are you not from the US or something?

First, I'm not using drywall straight. I mix it up (as EVAkura said) with paper to prevent cracking. Also, I come from New Zealand where this would be a breeze, but now live in Malaysia. Not the best place for this sort of thing.
I am not sure about using foam either, I am very confident with mediums like paper clay, and feel as if I would make a wreckage out of foam.

I have a large issue with the internet too, nothing on ebay for amazon etc that I'd want ships to Malaysia. Just countries like the US, Canada and Australia.


be sure to switch to super glue for the pep phase.

I used UHU super glue o. 0 I think you're mixed up with what I used for anti warp.
I also did seal my work, just forgot to mention it in a post.

Im not quite sure If I am even using drywall filler... Everyone says it will crack, and that I shouldn't use it. I used some straight onto my helmet for a test while I was feeling confident about what I've got. Whatever it is though, it makes a good paper clay.

Also, I'd like to know before making a start on a redo, I am extremely slow at pepping. Would you guys have any advice on how to make the process faster, or is it just because I am doing a helmet? I feel as though patching the hole would be faster at the moment. The work on the outside would easily be sanded.

I feel as if whenever I post it's negative, so I'd like to end on a happy note say that I will become a pioneer in non chemical armour building. Either if you cant use / source the products.
 
Two days is not uncommon for a helmet build. I think mine took me three, maybe even four days... I don't quite recall, but I know it was the slowest part of my pep build.

I think you could easily get away with a patch job on the helmet though. Worst case scenario, it will be a learning experience.

Yes, you are correct in stating that I mistook your UHU for hot glue! Good to know that you are sealing the inside though... that takes away any huge worries of warping due to the paper clay.

Also, if you are using drywall mud, as long as it is an ingredient for the paper clay, it will be very stout. Used alone, it would be very weak. If this is not the case, then you are using some mutant brand with a fibrous cellular bond that we have not heard of yet!
 
Also, if you are using drywall mud, as long as it is an ingredient for the paper clay, it will be very stout. Used alone, it would be very weak. If this is not the case, then you are using some mutant brand with a fibrous cellular bond that we have not heard of yet!

It's spackling compound mixed with paper. Effectively a rubber-ish drywall mud that sets solid with paper.

I hot glued some cardboard on top of the helmet, and I think that that'll be enough strength with the paper clay. I think I wont waste time making another helmet. ( if this was another fast pep piece, I would take your advice and start from scratch). I just don't ave the patience with long pepping.
 
There will be a post within 24 hours on my patched hole. After the post, you can comment weather it would be worth moving on, or scrapping.
 
Status
Not open for further replies.
Back
Top