Retralpha's First Build - Halo Reach Noble 8

Status
Not open for further replies.

Retralpha

New Member
Hello 405th Members,

Im really exited to get into armour building as a Big fan of Reach and Halo 1-2; and as a Noble Team fan, why not start there?

Sure it sounds cheesy making a Noble 8 suit, but as this is my first suit, I believe that I will not be able to make a game-accurate suit.
So why not give the Noble team a 'new' member!

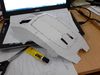
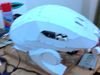
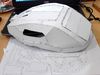
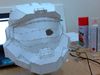
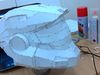
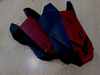
I plan on going from the Helmet down. Red and black with weathered scratches, and use some kind of Rondo/Rondo-like substance to harden the armour.
I cant be sure on what to use though, as I have left New Zealand to study in Malaysia and supplies for Halo armour are sparse.

If any Malaysia based 405th members could possibly assist on any relative materials sourced in Penang, that would be appreciated.
 
Update : Helmet pep 1/4 done

Wqw6tye.jpg

Q8L1IxH.jpg

ljb9cuk.jpg

3rd one is slightly blurry, but my camera died after that photo so it'll have to do. :(
 

Attachments

  • Wqw6tye.jpg
    Wqw6tye.jpg
    44.2 KB · Views: 186
  • ljb9cuk.jpg
    ljb9cuk.jpg
    41.6 KB · Views: 179
  • Q8L1IxH.jpg
    Q8L1IxH.jpg
    49 KB · Views: 171
Lookin' real good. Keep it up, and remember, the pep stage is the most important part of a build.
 
Good start. I would normally suggest starting with smaller pieces and saving the helmet for later. That way you get some practice before doing the centerpiece. But so far it looks like you are doing well!
 
Good start. I would normally suggest starting with smaller pieces and saving the helmet for later. That way you get some practice before doing the centerpiece. But so far it looks like you are doing well!

I made a hand piece just to get the hang of Pepping
 
Ive got the helmet pep done! after 2 days non-stop with some Halo in between, it's done.

knxUkYO.jpg

Awehtvz.jpg


any advise on resining a reach helm would be appreciated.
 

Attachments

  • Awehtvz.jpg
    Awehtvz.jpg
    44.2 KB · Views: 190
  • knxUkYO.jpg
    knxUkYO.jpg
    48.8 KB · Views: 187
any advise on resining a reach helm would be appreciated.

I am unsure about anything specific to a Reach helmet, but I will give the advice of making positive that everything is perfectly symmetrical at this point. Any where it is not, or you feel that may bow or dip from adding the liquid resin to it, be sure to reinforce it somehow. Personally, I used wooden craft sticks (almost like popsicle sticks) because they give it the rigidity I required, and also, if they get permanently attached by the resin, they are easily sanded down.

Looking real good btw!
 
It is awesome to see someone still doing reach armor like i am keep up the good work
 
I've decided to get another big piece out of the way by pepping the chest piece.

Pictures will follow soon :) (within a day or so)

Question : How would I build a support for the chest piece for when I resin?
 
UPDATE:

I have that painful pepakura issue where the lines don't print, but the numbers troll you and do. :I

If anyone possibly knows how to solve this issue please enlighten me on this fix. I cant risk wasting anymore card stock (used up so much trying to get it to work)

-Ret
 
Update!

I got pepakura working again so you can hope to see more pepping being done while I find some suitable resin.

These are just some hand plates I scratched built while I was trying to get pepakura working
(Used Tons of PVA and hot glue to strengthen. Should be ok as they're small pieces)

CuqHIoK.jpg


I know they're pretty much just Master cheif's hand plates, but as I said; I wont be making this "game-accurate"
 

Attachments

  • CuqHIoK.jpg
    CuqHIoK.jpg
    235 KB · Views: 187
Looking grea! I still have that issue with files sometimes. I thought my printer was out of ink. If you go under Printer and Paper Settings just select print the lines clearly instead of smoothly. Works just fine now lol. Can't wait to see more!
 
I still have that issue with files sometimes. I thought my printer was out of ink. If you go under Printer and Paper Settings just select print the lines clearly instead of smoothly. Works just fine now lol. Can't wait to see more!

I just had to do what everyone said not to do; use vector settings
 
Everything that could go wrong, has.

Nothing scales, nothing prints, no resin or bondo, etc.
After around a month of thinking, I'm just going to use the hot glue method. As I have an excess of the stuff as of now.
It will be a long process, with heavy results, but I think I can manage.
 
I have a question for you. You say that there is no resin... does this mean you cant find any? If so, I would check out a place that does or sells flooring. A lot of time, they use epoxy for the coating over cement floors. It may provide an alternative... and my even be quite a bit less expensive. Also, if you do find that resin, and still cant find bondo, the next option I would consider would be to pep first, resin, then use drywall mud to detail like you would with bondo. It sands super easy, but you have to be very careful as not to drop it or let it crack. After you have built the part, then you could create a cast for it (I found it was really simple and used just tubes of latex caulking + a few drops of glycerin). After you make the cast, you can mold out a new part using just epoxy and fiberglass (or something fibrous and similar). That way, it would be light, detail accurate, and you could always make more parts easily... in addition, you would have learned a new skill! :)

Just an idea... but I commend you on really sticking to this through all of the difficulties you have experienced.
 
Tagging onto what EVAkura was saying, if you find that you do have to use an alternative hardener (like epoxy) you might look into sealing your pep work with 3M Scotch Guard before you put anything else 'wet' on it to harden. It's just a thought, and I've never tried it personally so I can't vouch for the results. I was thinking about doing it when looking at other hardening compounds and figured it would help with less deformation in the resin process (as opposed to applying a hardener to bare paper/ cardstock). The only down-side is that I can see the Scotch Guard creating a more stippled surface, seeing as how it is coming out of a spray can and is not self-leveling. Then again, if bondo/ filler is going over the top of a slightly stippled, resined surface, it wouldn't make much of a difference. Whatever your solution - keep up the good work! I know roadblocks in creating can be frustrating but every avenue that doesn't work for you is building skill, efficiency, and experience that will make your finished product what you want it to be.
 
Status
Not open for further replies.
Back
Top