Project Reach

Status
Not open for further replies.
Oh haha my bad I was under the impression that it was cutting the hobby foam like the 2mm stuff. Could be good for doing card stock building though.

it probably could handle 2mm stuff, but I never really had the chance to use it with anything other than cardstock. It's brilliant for normal pep, cut out around 20 pages worth within half an hour which could take me up to a few hours normally!
 
So Helmet back has been cut out, mainly because my head is too big for the opening! Funnily enough though when I actually got my head in it was fine to wear, so with that being said I went ahead and made a foam back. I will try and get the texture as close looking to vinyl as possible, I may be wrong in thinking this, but when looking at the deliver hope behind the scenes the backing on those helmets looked like vinyl. Anyway the pep didn't take too well to the foam, being too large initially when offered up, hence the seam down the middle.

IMG_20140327_2024011_zps5ab72692.jpg

IMG_20140327_2024341_zps6b8bc660.jpg


I also got the thighs done. I dread the day I need to make the cod piece!

The scaling is done so it's a little above the knee and a little below my hip. I think this is right going from game images, but it seems a little short too me. Thoughts or suggestions welcome :)

IMG_20140327_2022131_zps0b39913c.jpg
 

Attachments

  • IMG_20140327_2022131_zps0b39913c.jpg
    IMG_20140327_2022131_zps0b39913c.jpg
    59.4 KB · Views: 76
  • IMG_20140327_2024341_zps6b8bc660.jpg
    IMG_20140327_2024341_zps6b8bc660.jpg
    52.4 KB · Views: 61
  • IMG_20140327_2024011_zps5ab72692.jpg
    IMG_20140327_2024011_zps5ab72692.jpg
    49.1 KB · Views: 70
Had a good few days of sun so decided it's paint time! I scrapped the idea of a white spartan, then played with the idea of urban camouflage, but ultimately went with a red/black theme!

3 layers on the helmet were used, a steel/gunmetal base layer, matt black layer and then finally the colour layer this was mainly for the battle damage. The idea is to sand back the layers using different grades of grit, not sure how this is going to turn out, but i always have more paint if it turns out bad!

Steel Layer:

10153247_1412080619053101_1222630892_n_zps75c8ab53.jpg


Masked off areas:

1009873_1412367282357768_1692423654_n_zps6ebc8d1d.jpg

1975104_1412367309024432_1897125010_n_zps9b039062.jpg


And sort of finished:
1897925_1412367325691097_225392191_n_zpsd105f088.jpg

10153919_1412367379024425_470026695_n_zpsa071f1c3.jpg

10151383_1412367365691093_2006596047_n_zps887d60ba.jpg


I know some areas need to be black and I intend to do so, I just ran out of masking tape at the time and REALLY wanted to paint something :D
 

Attachments

  • 1009873_1412367282357768_1692423654_n_zps6ebc8d1d.jpg
    1009873_1412367282357768_1692423654_n_zps6ebc8d1d.jpg
    83.9 KB · Views: 75
  • 10153247_1412080619053101_1222630892_n_zps75c8ab53.jpg
    10153247_1412080619053101_1222630892_n_zps75c8ab53.jpg
    49.8 KB · Views: 79
  • 1975104_1412367309024432_1897125010_n_zps9b039062.jpg
    1975104_1412367309024432_1897125010_n_zps9b039062.jpg
    113.4 KB · Views: 69
  • 10153919_1412367379024425_470026695_n_zpsa071f1c3.jpg
    10153919_1412367379024425_470026695_n_zpsa071f1c3.jpg
    91.4 KB · Views: 77
  • 1897925_1412367325691097_225392191_n_zpsd105f088.jpg
    1897925_1412367325691097_225392191_n_zpsd105f088.jpg
    99.3 KB · Views: 65
  • 10151383_1412367365691093_2006596047_n_zps887d60ba.jpg
    10151383_1412367365691093_2006596047_n_zps887d60ba.jpg
    89 KB · Views: 80
This is it finished, padding and lights need to go on, but I'll get around to this when the rest of the armour is completed.

I noticed in sunlight the mirror effect on the visor suffered from the orange colour of the resin, so that got sprayed black and seems to have done the job nicely.

IMG_20140407_1124331_zpsfc89a9f7.jpg

IMG_20140407_1125311_zps833e97f4.jpg

IMG_20140407_1125401_zpsc250589a.jpg

IMG_20140407_1125201_zps24f25582.jpg

IMG_20140407_1125581_zps780db3c3.jpg


Paints used:

Krylon Ultra Flat Black
Peugeot Diablo Red
Unbranded steel metallic paint
 

Attachments

  • IMG_20140407_1125311_zps833e97f4.jpg
    IMG_20140407_1125311_zps833e97f4.jpg
    58.2 KB · Views: 73
  • IMG_20140407_1125581_zps780db3c3.jpg
    IMG_20140407_1125581_zps780db3c3.jpg
    48.6 KB · Views: 82
  • IMG_20140407_1124331_zpsfc89a9f7.jpg
    IMG_20140407_1124331_zpsfc89a9f7.jpg
    155.1 KB · Views: 78
  • IMG_20140407_1125201_zps24f25582.jpg
    IMG_20140407_1125201_zps24f25582.jpg
    66.4 KB · Views: 82
  • IMG_20140407_1125401_zpsc250589a.jpg
    IMG_20140407_1125401_zpsc250589a.jpg
    51.8 KB · Views: 71
OMG i love the paint on the helmet, it makes it look so menacing. Great job!
Keep up the great work
 
It's been some time since I updated this! I can say that the project isn't dead, but it is moving along at a snail's pace :(

Finished my second year of university with a 2:1 and recently started working for my placement year of the degree, so it's been hectic!

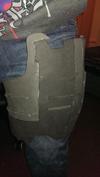
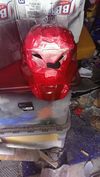
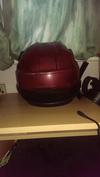
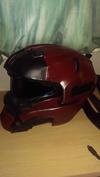
I've recently finished the chest piece. I went the PVA route, but used something called an electric airless sprayer. It works amazingly well and got a smooth coat on nearly every application, I only needed to sand the drip downs, everything else was pretty good!

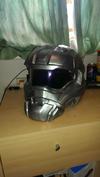
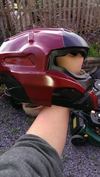
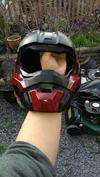
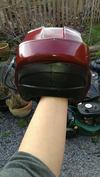
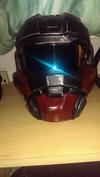
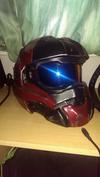
Stuck with the same colour scheme and it's starting to grow on me, didn't think I'd take to the red as I have done.

CameraZOOM-201407190102008291_zps557ad7fb.jpg
CameraZOOM-201407190102166001_zps9e9a8f37.jpg
CameraZOOM-201407190102269641_zps16664828.jpg
CameraZOOM-201407190103010631_zps4f152a53.jpg

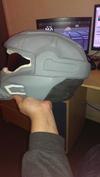
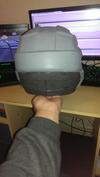
I apologise for the dodgy pictures, the camera on my phone is slowly dying and I couldn't find the charger for my digital camera :rolleyes

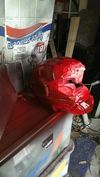
And here's a sneaky selfie wearing the helmet and chest!

10501997_10204416400750585_3955007930402512493_n_zps49fc7bd4.jpg
 
I've had a couple days of this week so my evenings primarily consisted of getting the rest of this built!

I got both shins, knees and cod piece done!

CameraZOOM-201407232242075621_zpsb5c8f8ad.jpg
CameraZOOM-201407232242211491_zps350be566.jpg
CameraZOOM-201407232242407891_zpse698119e.jpg
CameraZOOM-201407232242558271_zps44bd7b51.jpg

and a quick snap to make sure the cod was scaled properly!

MySnapshot7_zps3989b973.jpg

The cod piece is held together entirely of glue at the moment, so there's little flexibility. I have got clips and straps on the way though!
 
Unfortunately due to space restrictions I can only really work on two small pieces or one large piece at a time. I have both arms and shoulders now, but will be remaking the grenadier attachment.

IMAG00431_zps3902ba0a.jpg
IMAG00441_zpsb9b41cc9.jpg
IMAG00451_zps9445d963.jpg
IMAG00461_zps220bae52.jpg
IMAG00471_zpsc359c645.jpg
IMAG00481_zps76aeddec.jpg

It's my first time using Vaseline to recreate weathering/battle damage, so i think i may have used too much in some places on the shoulder.

Cod piece and thighs are drying now so will get some paint next weekend hopefully!
 
Status
Not open for further replies.
Back
Top