BluerBlue's First Set of Halo 3 Mk VI Armor (South from RvB)

Status
Not open for further replies.

BluerBlue

New Member
Hello everyone! On this thread I will be posting progress updates on my South Mk VI armor from RvB.

d60a6ce202f86bc9a38f774eb3077f08_zps3cf5564e.jpg

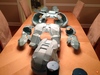
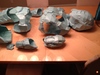
So far, I have peped the helmet, chest piece, biceps, and thighs.

securedownload4_zpsd99135c4.jpg

securedownload6_zpsbf695df9.jpg
To me, the back of the helmet looks a little lopsided. Should I redo it or is it fixable once I apply bondo?

securedownload_zpsc8408464.jpg
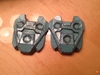
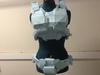
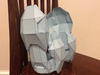
Here is the chest piece and cod piece. I'm redoing the cod piece since it's too small and my gluing skills were failing me :p. I originally was using hot glue to bind the pep pieces, but I switched to tacky glue because it doesn't get all over the outside of the pieces.

securedownload2_zpsf9205398.jpg

fc3293621efbf783805d45741aa0cd38_zps7f1cbfcc.jpg
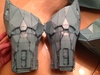
Here are the bicep pieces. I'm using the low definition ones.

fc4a3304feee00cb4fc0870a1b1b2921_zps13799168.jpg
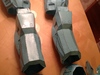
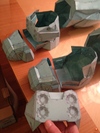
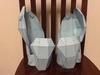
Here's my thigh pieces.

That's all for now! Thanks for reading :)
 

Attachments

  • d60a6ce202f86bc9a38f774eb3077f08_zps3cf5564e.jpg
    d60a6ce202f86bc9a38f774eb3077f08_zps3cf5564e.jpg
    338.9 KB · Views: 704
  • securedownload4_zpsd99135c4.jpg
    securedownload4_zpsd99135c4.jpg
    14 KB · Views: 180
  • securedownload6_zpsbf695df9.jpg
    securedownload6_zpsbf695df9.jpg
    14 KB · Views: 156
  • securedownload_zpsc8408464.jpg
    securedownload_zpsc8408464.jpg
    200 KB · Views: 180
  • securedownload2_zpsf9205398.jpg
    securedownload2_zpsf9205398.jpg
    260 KB · Views: 171
  • fc3293621efbf783805d45741aa0cd38_zps7f1cbfcc.jpg
    fc3293621efbf783805d45741aa0cd38_zps7f1cbfcc.jpg
    426 KB · Views: 153
  • fc4a3304feee00cb4fc0870a1b1b2921_zps13799168.jpg
    fc4a3304feee00cb4fc0870a1b1b2921_zps13799168.jpg
    14 KB · Views: 159
The helmet looks a little tweaked, but that should be fixable in the Bondo stage, or maybe even now- make supports for the inside till it is shapely, and resin it like that.

Your pep-work on the other pieces looks nice, and the folds are spot on, so you should have a little less work to do on them. Good luck! I'll keep an eye on your thread for more!
 
For glue you can try Aleene's Fast Grab Tacky Glue. I get it from Wal-Mart or Hobby Lobby. Holds up to polyester resin and doesn't cause any sanding issues later. For application I just squirt a little on a paper plate and use a q-tip to apply.
 
The helmet looks a little tweaked, but that should be fixable in the Bondo stage, or maybe even now- make supports for the inside till it is shapely, and resin it like that.

Your pep-work on the other pieces looks nice, and the folds are spot on, so you should have a little less work to do on them. Good luck! I'll keep an eye on your thread for more!

Thank you, I will use this advice once the weather gets nicer and I can fiberglass :) .
 
For glue you can try Aleene's Fast Grab Tacky Glue. I get it from Wal-Mart or Hobby Lobby. Holds up to polyester resin and doesn't cause any sanding issues later. For application I just squirt a little on a paper plate and use a q-tip to apply.

I've already found some glue at Joann's that I like, but using a q-tip to apply it is a good idea! Thanks!
 
Unfortunately I am currently unable to access the 405th from my house (I'm using my phone to post this and it really sucks) so I won't be posting until I find a way to get on.
 
I know the feels :/ I can't access it either at home, my browser says it 'can't connect' and has an error screen yet I can access is on my...work *cough* computer just fine... :( I need more 405th in my life :(((((((( Wish I knew how to fix it.
 
You can try tapatalk for accessing and posting from the phone. I just downloaded it so can't help much. Others might be able to give more information.
 
Thanks glasscutter! Sorry for not updating in awhile, but here are some progress pics! I have peped all of the pieces and have started resining.
ereju5aj.jpg

eqevugu5.jpg

5unebu3y.jpg

9e9atu7y.jpg

suqe5y3u.jpg
qyzygada.jpg


I've been using some sealer (pic below) to prep the pieces for fiberglass. For me, applying the sealer before fiberglassing helps keep the armor from deforming. Here is what I use
eqe9ydyt.jpg


Sent from my iPhone using Tapatalk
 

Attachments

  • ereju5aj.jpg
    ereju5aj.jpg
    280.9 KB · Views: 152
  • eqevugu5.jpg
    eqevugu5.jpg
    220.9 KB · Views: 162
  • 5unebu3y.jpg
    5unebu3y.jpg
    247 KB · Views: 155
  • 9e9atu7y.jpg
    9e9atu7y.jpg
    252.3 KB · Views: 140
  • suqe5y3u.jpg
    suqe5y3u.jpg
    225.6 KB · Views: 154
  • qyzygada.jpg
    qyzygada.jpg
    259.9 KB · Views: 160
  • eqe9ydyt.jpg
    eqe9ydyt.jpg
    129.1 KB · Views: 146
Thanks guys!
@HaloMaster yes, but I don't think you could use it instead of fiberglass, as it doesn't harden the armor as well as actual resin does.

I will try to get more progress pics up during the weekend :)


Sent from my iPhone using Tapatalk
 
Hi guys, really sorry about not updating like I said I would. Here's an update on my armor- except I don't have any pictures to
show. *giant wall of text warning* The helmet is almost finished, but needs a lot of sanding. I need to redo my chest piece because it is too small. The biceps are nearly done, they need a bit more sanding for detail. The forearms are primed and I'm not bonding the outside because I don't want to lose the details but are bondoed on the inside for reinforcement. Hand plates are primed, I bondoed the insides to reinforce them. Codpiece is bondoed and needs some sanding and to be separated and reattached with magnets. Thigh pieces are primed, I bondoed the insides to reinforce them but I'm leaving the outsides only resined. Calf pieces need a lot more sanding for detail. Boots are primed and reinforced with bondo but I still need to cut off the bottoms and add the piping in between the sole and the heel.
I hope you enjoyed this wall of text and I will upload pics soon.
 
I am back with some progress pics!
ImageUploadedByTapatalk1411594806.425524.jpg
This is my new chest piece I built since the first one was too small. I'm planning not to bondo it but instead spray a rubberized coating on both the inside and out.
ImageUploadedByTapatalk1411594920.215603.jpg
Here's my helmet so far, it needs some detailing like the rest of my armor. If anyone knows of or uses a certain tool or technique that they would like to share with me about how to remove the visor or detailing, I could really use some help :)
ImageUploadedByTapatalk1411595114.396885.jpg
ImageUploadedByTapatalk1411595146.171370.jpg
ImageUploadedByTapatalk1411595162.366965.jpg
Here are some pics of my entire suit so far (sorry if they're bright). You may notice that some pieces are bondoed more than others, that's because I'm a noob (and I did a bad job of explaining to my dad who was helping me at first what parts to bondo) and thought that I could bondo a whole piece and then detail it in one go :p. It is especially bad with one of he calf pieces, which, as you can see in the pic below, needs a lot of work.
ImageUploadedByTapatalk1411595428.724627.jpg
If you are wondering what the black stuff is on the biceps, helmet, and calves (I may have missed a part or two), that is what I believe is called spot putty, courtesy of my dad. It's like bondo except premixed, easier to sand, and more expensive, so I don't recommend using a lot of it, but it is nice when leveling out small areas.
The black stuff on the shoe pieces is rubberized spray. I don't have much to add about it other than it smoothed out some of the flaws and parts where two pieces of paper were glued together.ImageUploadedByTapatalk1411595914.925127.jpg
This is another piece I'm having trouble on detailing, so if you have any tips please post them :). Sorry again for not posting for so long!
 
Status
Not open for further replies.
Back
Top