Hey Guys!
Got another update for you and I couldn't wait to show you!
Update:
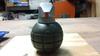
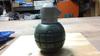
Alright guys I got plenty of progress done in the past couple days. Just checking off my to-do list for this grenade. I fixed the errors and imperfections that were on the grenade before. after sanding and wet sanding countless times, the grenade finally began to become smooth and was heading in the right direction. The head and neck were also prepped and worked on. I primed the head and eliminated imperfections that appeared. I also gave the head a coat of hammer textured paint. I assembled it and it looked awesome!

Once the grenade was primed and fixed, It was ready to go to the next preparation. I added the lines on the body using a band saw and a Dremel. The band saw was able to get the lines that stretched horizontally and vertically across the body while the details were etched with a Dremel. A rasp/file was used to smooth out any uneven or imperfections in the lines. The result was stunning and I couldn't tell you how excited I was to get to the final product!
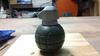
Here is the Grenade primed and textured... 80% done in these pictures.
Side:


I am planning to mold it tomorrow or the next day. I am using Rebound 25 to create the mold and Smooth-Cast 300 to cast the grenades. They will also be foam filled to help support the hollow structure.
I plan to sell these for about $20 per raw cast and $30 for painted (I know this belongs in the marketplace but I think as long as I am not saying "PM me to buy" I should be fine, but I apologize if i am wrong)

Also just a side question but how do you guy's recommend molding this grenade. I will be making it a 2-Part brush on mold but there are a couple ways to do it. Some are more fullproof than others.
I plan on using something similar to this method:
.
Check it out and tell me What you guys think! Any comments and questions are greatly appreciated!
Edit:
The hammered paint was removed due to not coating correctly. If someone could tell me how to use it properly, that would be great!
Thanks for viewing