[RELEASE] Halo 4 Armour Assets

Status
Not open for further replies.
I'll be happy to get you the assets you want - however, if you know anything about using these textures, please let me know ASAP. I have some work that's dependant upon them and would like to leverage that request as recompense for putting them up.

EDIT: The total file size for the entire texture package is closing on 250Mb - far greater than the 405th's upload allowance. Splitting this pack down into parts is inefficient, and I don't recall my Dropbox password. Does anybody have any suggestions?
 
Possibly converting them to .tif format could reduce the size without removing the information.

As for using them, I'd need a couple of samples to play with, but the programs that I use are Daz Studio and Paint Shop Pro.
They should generally break down into four types of map, if what I've found online holds true:

m_04_chad_haley_Halo_4_Helmet02Tex.jpg
The map on the upper left would be the "Diffuse" or the basic color of the part. You could load that one into a paint program and recolor it for the primary color. The bottom right, the "Tint" you could color the non white parts and overlay in the paint program to make the secondary color. Now, as far as Daz Studio is concerned, though it may be the same in other games, I'd use the upper right map, that they label Spec, for a bump map and the lower left one as a specular.

Other forums have said that the maps are somehow layered inside each other in the bitmap as Alpha Channels and I wouldn't know how to seperate them without getting some to play with, unfortunately.
 

Attachments

  • u_03_chad_haley_Halo_4_Plasma_Pistol_texture.jpg
    u_03_chad_haley_Halo_4_Plasma_Pistol_texture.jpg
    586 KB · Views: 960
And I wouldn't ask you to do the converting, I imagine that will take a long time, as well as individual part attention to do them all. I've just been trying to find a way to get the raws so I can figure out how to seperate and make them usable myself as its much faster than trying to hand paint every texture map till it looks right >_<. I do have some non armor model rips that have the raw textures and they do have various maps stored as alphas but I'm thinking the multiplayer armor has more, due to the customization in-game.
 
Right, well - I think you'd better PM me so we can work this out, then. I have all of the textures, and they've been exported NATIVELY as .TIF format - all I need to do is figure out how I'm getting them to you, and from there we can work out how they function.

HOWEVER: here's some to play with (Multiplayer Mk VI) while I obtain the normal maps for you and work on finding a storage solution.
 

Attachments

  • storm_spartan_mjolnir.zip
    3.5 MB · Views: 484
Alright, I think I have some progress here. Never written a Tutorial before so this might be messy and I'll try to clean it up if its unclear, so bear with me.

I used the Mark VI male shoulder model. I tried the female model and in Daz Studio for some reason the texture doesn't apply correctly- not sure who's end that issue is so I just went to the male model.

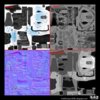
Firstly, I opened storm_spartan_mjolnir_shoulder_control.tif in Paint Shop Pro, set the color to "Greyscale" and saved this image as "Mark VI Shoulder Bump.png" I always work with PNGs in Daz Studio as it preserves transparencies but for this map any format is fine. Set that one aside as you are done with that one.

TUT1.png

Secondly, open storm_spartan_mjolnir_shoulder_control.tif again and go into your paint program's Alpha Channel controls. In Paint Shop Pro, this is called "Load Mask from Alpha Channel". There should be one Alpha channel in the image, called "Alpha Channel 1". Load this, and part of the texture turns transparent. This is where the secondary color will go in a moment; for now, select the layer containing the texture's color and paint it whatever color you want your primary armor color to be. Its fine if it covers all the details but if you want it to be a little more natural looking, use whatever overlay settings your program uses. Just make sure the transparent areas remain empty.

TUT2.png TUT3.png TUT4.png TUT5.png

When you are satisfied with the primary color, save this map as "Mark VI Shoulder Diffuse.png" and save, then close and reload it. You should have a one layer image with intact transparent areas. Create a new layer, and move it below the layer with colors and paint your secondary color on this layer. On this model it preserved most of the detail in the transparent area so I didn't need to do much else; save and overwrite as the same name.

TUT6.png TUT7.png

Now, onto your 3D program. I use Daz Studio, but most programs should have similar texture map areas and likely more options. Apply the file "Diffuse" under "Diffuse Color" and "Specular Color". Apply "Bump" under "Diffuse Strength" "Specular Strength" and "Bump Strength". If you did like I did and use solid colors, it won't look very detailed yet but they will pop once you render.

TUT8.png

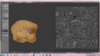
This is what I came out with:
Mark VI Shoulders.jpg

Firstly you'll note the square "floating" over the surface of the shoulder. This is where the emblem should go. Also, there will be certain darkened areas. There are two ways to deal with those; either assign those polygons to a new texture area and use a glowing shader, using the tools in your modeling program, or you can go back into your Paint program. We'll do it with the paint program. Go back and open storm_spartan_mjolnir_shoulder_control.tif again, and repeat the steps from before, but color the primary area flat black and the secondary area pure white, no overlay, and save this as "Mark VI Shoulder Ambient". Then find the parts that are grey and not pure white, then paint those black, leaving only the parts that are pure white. Save.

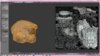
Back in your modeling program, apply this map under "Ambient Strength". This should make the lights on the model glow. It's not a perfect effect but until someone finds where the lightmaps are, it's a quick way to do it. And as you can see from the inner arms, some trial and error. The inner arm shouldn't be glowing.

Mark VI Shoulders2.jpg

The emblem area, and the Visor on helmets, you really do need to use a modeling program and assign those to their own material zones- there's no way to apply an emblem otherwise and the visor should be lit and shaded differently to get the best results. In Daz Studio, its fairly easy- go into the Polygon Group Editor tool, highlight the polys that make up the helmet and lights (If possible; I found that some of them on the Deadeye helmet blend into other areas) and assign to->Create New Material From Selected. You can apply the same texture file to these areas as normal but you can play around with the lights, reflections and such to make them look more like glass, as I did in my above test render.

I hope this helps someone, and will try to answer any questions I can, though my experience with programs outside those listed is very minimal.
 

Great work, Hotaru. I do believe that the general line of this tutorial can be taken over to other programs fairly simply - I use Photoshop and Blender myself, and it shouldn't be much of an issue to replicate this tutorial there.

If I can get it to work I'll let you all know!

EDIT: the tutorial might benefit from some pictures of the process, since I'm not able to replicate your success to any appreciable degree.

What stages are you having trouble with?

Added some workflow images, hope that helps. I really should upgrade to Photoshop but I've used PSPX for so many years that I just know how to make it do what I want quickly.
 
I've -somewhat- replicated your tutorial - in Photoshop it essentially breaks down to using the Alpha channel as layer masks. Which -sort- of works, but tends to destroy any level of detail such as scuff marks and grooves in the base armour.

I'm still working on getting those textures uploaded - I'll let you know when they're up.
Well, not sure how it works in Photoshop but in Paint Shop, you can go an extra step to preserve details in the Diffuse maps.

TUT09.png

Add a new layer between the mask and the color layers before painting the primary color.

TUT10.png

Paint your primary color on this layer, and look for your program's "Blend Mode" settings. If its like Paint Shop, it will have settings like "Hard Light" "Soft Light" "Burn" etc. In this image I used "Color (Legacy). You might have to experiment to get the best color match. From here continue as normal.

I like using flat colors because, at least in Daz, the Diffuse Strength, Bump and Normal fields can recreate the details while leaving the actual colors more like what I want.
 
Ah, right. Seems I have some learning to do.

Also - I'm uploading the textures to Mega.co.nz as it's the only free fileshare service I can trust. I'll have the files online tomorrow at some point - unfortunately, I'm not the only person using this connection and a 300+Mb file sort of clogs the tubes somewhat. In the meantime I'll try and find a decent version of Paint Shop Pro and learn how to use it.
 
Thanks, will look forward to it. Corel Paint Shop Pro X is the version I use and it is extremely old, like early Windows XP old, but it works. Blender.. I have that program but I only use it for mesh conversions.
 
I finally managed to get the assets online. Please find the complete texture pack HERE (WARNING: 332Mb download).

Also, having obtained a copy of Paint Shop Pro, I'm now finding the tutorial difficult to follow since it doesn't seem to want to play ball. Naturally.
 
I'm sorry it's not working well. I run mine in Windows 7, using XP compatability mode and it turns Aero off when I start it. And thanks a TON for the textures, this will really help. I'll be sure to post my results.
 
I'm sorry it's not working well. I run mine in Windows 7, using XP compatability mode and it turns Aero off when I start it.

Oh, the PROGRAM is working, it's just not doing what your tutorial suggests it should. Which is frustrating, to say the least. I'll have to harass you later for a more in-depth thing - I have a few things planned for a few people here and I need to be able to use the textures :p
 
To be honest I'm not sure what else I can say to clarify.. but that might be irrelavant because I just made a huge discovery!

Loading the Deadeye helmet tif from your pack, I was googling some other info on the texture maps Halo uses and found that the control.tif file is actually ALL the various non normal maps combined. When I went into Image/Split Channel, this happened:
RGBsplit.png
It generated the hidden texture maps. Green seems to be the Diffuse map, Red the Specular map and Blue seems to be the lightmap. I'll have to play around with them to see what the best result is.
 
To be honest I'm not sure what else I can say to clarify.. but that might be irrelavant because I just made a huge discovery!

Loading the Deadeye helmet tif from your pack, I was googling some other info on the texture maps Halo uses and found that the control.tif file is actually ALL the various non normal maps combined. When I went into Image/Split Channel, this happened:

It generated the hidden texture maps. Green seems to be the Diffuse map, Red the Specular map and Blue seems to be the lightmap. I'll have to play around with them to see what the best result is.

Yeah, I've been using those maps for a while in Photoshop, but I've had no such luck - unfortunately I'm not so skilled in the image manipulation department.
 
Thank you for working on this, Hotaru and Arcanine. Good, mapped renders at orthographic angles make high-poly remodeling much easier and more accurate, and there's a lot of interesting halo 4 assets that have yet to be fully born into meatspace.
 
Thanks, will look forward to it. Corel Paint Shop Pro X is the version I use and it is extremely old, like early Windows XP old, but it works. Blender.. I have that program but I only use it for mesh conversions.

Hey Hotaru99, when you say that the version you are using is version X (version 10), is that the same thing that the software tells you when you go to:
[Help] → [About] → [Version Info] ?
(I'm guessing that's where it would be since most programs include their version info in a similar location)

If you find the version information, is there also any details as to what service pack you have installed? (assuming that C-PSP has service pack updates)
Have you added any additional Plug-Ins / Add-Ons that you know of?


I haven't had the chance to follow/test your tutorial myself since I've been busy, but I would like to momentarily consider that issues others are having might be attributed to issues with their versions of the software.

Other than that, it is possible that the Tutorial is just a bit too shallow. I mean no offense by this and I thank you for making one, especially since Google doesn't really return many results on the subject.


Is there any chance you would be willing to install Blender and test out trying to apply the textures in it?
Me, I'm not a digital artist, which is who Daz3D is designed for.
I'm also not the best 3D-Modeler in regards to soft/mesh-body modeling, but I am good at 3D-Modeling in regards to Solid-Modeling (for engineering purposes), so I struggle a bit with Blender, but I try to make do with it.

Since many of us on the forums here use Blender because its free, having a guide for applying the textures using it would be outstanding.
I know it's a lot to ask for though, so I don't blame you if you don't want to write a guide on how to do it in blender.
(Note: When importing models in Blender, for most models I find it best to import them with the orientation set to Y-Forward, Z-Up.)​


One last thing I would like to comment on / question you on is:
How do the textures know where to be applied when you add them?
How do those 4 square images know that they need to wrap around the model in the way that they do.
Do you ever have to shift or rotate a texture/map around a model in order to orientate it correctly?
 
Last edited by a moderator:
Since many of us on the forums here use Blender because its free, having a guide for applying the textures using it would be outstanding.
I know it's a lot to ask for though, so I don't blame you if you don't want to write a guide on how to do it in blender.
(Note: When importing models in Blender, for most models I find it best to import them with the orientation set to Y-Forward, Z-Up).

The orientation of the model itself doesn't matter - what matters is that the original UV map is intact. When you select the model and open it in the UV/Image Editor, it will automatically display the correct UV unwrap. From there it's a simple case of opening and importing the relevant texture.

One last thing I would like to comment on / question you on is:
How do the textures know where to be applied when you add them?

See above: the UV unwrap data for the models is intact, and so the texture maps will work automatically. If the UV data wasn't intact we'd have to mess around with recreating the unwrap ourselves.

How do those 4 square images know that they need to wrap around the model in the way that they do.
Do you ever have to shift or rotate a texture/map around a model in order to orientate it correctly?

See above. Also, no - again, the UV unwrap data is intact. The textures will work for the models they correspond to. I shall be writing up a tutorial for this once I've rebuilt the OBJ File Archive.

EDIT: have some images to show what I mean:
 

Attachments

  • uvunwrap1.JPG
    uvunwrap1.JPG
    397.6 KB · Views: 553
  • uvunwrap2.JPG
    uvunwrap2.JPG
    430.2 KB · Views: 612
Its 10.00, no updates, since its from an old disk I installed and they don't support it anymore. For service packs, I'm on Windows 7 and its fully up to date. No plugins or other addons are used in my Paint Shop.
 
Status
Not open for further replies.
Back
Top