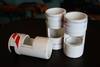
Hey, I got those same lights!! Just an FYI, the battery case that comes with it contains an insane amount of button batteries and are usually close to dead when you buy it because everyone wants to push the test button (like, who doesn't??!!). Anyways, since it is a 12v system, the "standard" A544 6v batteries fit perfectly into the box. Much easier to replace/install, you only need two, and also should last much longer.
You are using an out of date browser. It may not display this or other websites correctly.
You should upgrade or use an alternative browser.
You should upgrade or use an alternative browser.
ODST Project. Bobby Boucher --> 03MAR18 Latest
- Thread starter Bobby Boucher
- Start date
- Status
- Not open for further replies.
Ooh I need to make some flash bangs soon, and yours look so nice and clean. Great looking work man, your peps are super clean.
With bondo though, use as little as possible, and while it's curing use a razor blade to cut the high spiky crap down. It's worth investing in a hand plane, a rasp and a file too- and the final secret ingredient is bondo spot putty (sometimes called glazing putty).
When I'm doing a bondo job I lay down a layer, use the razor blade to make sure everything is almost level once the bondo gets rubbery, then I use my rasp to take everything down to level when it gets a little closer to cured. Next I take my file and further refine and shape the spot I'm doing (work in spots rather than whole areas of a piece). Then 80 grit sandpaper. If I have excessive low points or pitting I'll mix a small batch of bondo specifically for those areas and do the whole process again, but just on a smaller scale.
Once all the big craters are filled I use a credit card to smoothly apply spot putty to the whole bondoed area and then move upwards in sandpaper grit from 220-400 and onwards.
i hope I have given some useful advice, rather than unwanted advice on that- my first my vi helmet and chest had bondo that looked just like your helmets on it, so you're at least on the right track for a first timer with the pink goop.
Keep eps it up man, I love odst builds.
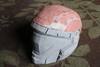
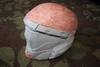
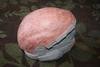
Your work's not bad at all. My only critique is that maybe you've put a little too much bondo onto that lid, and left it a little too lumpy. It's salvageable, but recall this piece of advice for the future:
Small, thin batches in small, thin layers are easier to work with and less wasteful than one huge batch splashed on in a hurry. If you want your helmet to match the standard of the rest of your build, you're going to have to be patient with how you apply and smooth over your bondo.
Other than that, nice work, trooper.
Hey, I got those same lights!! Just an FYI, the battery case that comes with it contains an insane amount of button batteries and are usually close to dead when you buy it because everyone wants to push the test button (like, who doesn't??!!). Anyways, since it is a 12v system, the "standard" A544 6v batteries fit perfectly into the box. Much easier to replace/install, you only need two, and also should last much longer.
Yeah I'm guilty as much as anyone! I'm debating whether to split up the strips and make new harnesses for both, or keep them together and swap the test button. Cause these things aren't cheap.
Ooh I need to make some flash bangs soon, and yours look so nice and clean. Great looking work man, your peps are super clean.
With bondo though, use as little as possible, and while it's curing use a razor blade to cut the high spiky crap down. It's worth investing in a hand plane, a rasp and a file too- and the final secret ingredient is bondo spot putty (sometimes called glazing putty).
When I'm doing a bondo job I lay down a layer, use the razor blade to make sure everything is almost level once the bondo gets rubbery, then I use my rasp to take everything down to level when it gets a little closer to cured. Next I take my file and further refine and shape the spot I'm doing (work in spots rather than whole areas of a piece). Then 80 grit sandpaper. If I have excessive low points or pitting I'll mix a small batch of bondo specifically for those areas and do the whole process again, but just on a smaller scale.
Once all the big craters are filled I use a credit card to smoothly apply spot putty to the whole bondoed area and then move upwards in sandpaper grit from 220-400 and onwards.
i hope I have given some useful advice, rather than unwanted advice on that- my first my vi helmet and chest had bondo that looked just like your helmets on it, so you're at least on the right track for a first timer with the pink goop.
Keep eps it up man, I love odst builds.
Clean so far anyway, I'm running through different ideas on how to add a yellow filter to the front. It's not very easy when you have no precise tools. I guess all those years of Legos are paying off! I could pep for hours.
I need to invest in a good rasp and a better file then. I've been watching your Emile helmet build, it's obvious you know how to bondo! I picked up some spot putty after I first read your post too.
look nice man,")
Thanks! Hopefully it turns out the way I want it.
Your work's not bad at all. My only critique is that maybe you've put a little too much bondo onto that lid, and left it a little too lumpy. It's salvageable, but recall this piece of advice for the future:
Small, thin batches in small, thin layers are easier to work with and less wasteful than one huge batch splashed on in a hurry. If you want your helmet to match the standard of the rest of your build, you're going to have to be patient with how you apply and smooth over your bondo.
Other than that, nice work, trooper.
Yeah the bondo took me by surprise. I thought I put a thin layer but that obviously wasn't the case. Lessons learned, and I've paid for the mistakes. The reason why I don't have any new pics of the helmet is because I just finished sanding down that first layer. Next layer will only be in small patches like you said. Hopefully I can get this all done before I go on my next trip this week.
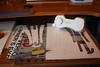
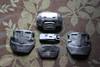
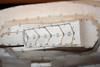
I'm making progress on the flashbangs! Here is a small reference collage I put together. There's little documentation to work on since they are never used in game. As for the blue grenades I have no idea what those are, and I couldn't find any information on them either. But I'll just be sticking with the flashbangs.

Would you like me to get you a raw file for those flashbangs? Wouldn't be a difficult thing to do.
I actually found a file a while back on the database but it was huge, so I scaled it way down and used some pieces as templates. I deleted the files but it was the F3ttman/Nightshade grenade canister. I think I scaled these flash bangs down to 2/3s that size, so they're not so huge.
Short Update
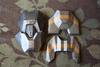
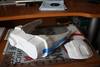
Bolted the shoulder together, necessary since I'm using Kirrou's hinged model. And a sneak peak at the paint scheme I'm looking at!

Also started remaking the sniper goggles. I scaled them up just a few millimeters so I don't have to force them to fit my helmet. Luckily I enjoy pepping.

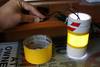
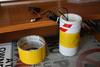
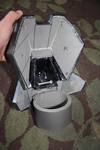
Progress on the flahsbangs! Cut the openings in the front for the leds, and angled the bottom edge. Did the best I could with a dremel, one of those moments where I wished I had nicer tools.

Now to the part of the build that has me thinking. I need to make a translucent lens, because the light needs to be very diffused but still bright. The near-perfect solution is yellow duct tape; it creates an even wash of light and is still very yellow. I say near perfect because it's duct tape, so it's far from sturdy with just one layer. I've tried various methods using clear plastic as a base, but the duct tape gave the best light spread out of everything. Open to thoughts and criticisms.


Attachments
ooh shiny
ooh shiny
You can never go wrong with shiny!
man this is coming along so nicely
How is the helmet bondoing coming along?
Thanks! You had to ask? Just messing. Slow is the word, I'm having trouble getting it smooth. See my update below.
Short Update This is the last update you all will get until next week! Heading out of town.
Got the last of the upper body armor painted, just needs to be hooked together!

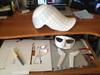
And finished pepping the sniper goggles. The extra few millimeters helped, the new size is easier to work with,

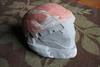
Now to the helmet…… I've been slaving over this for the last few days. And slaving is the proper term. After much bondo sanding, and "some" spot putty I still have a way to go. Sanding has always been my LEAST favorite thing, I've done it a lot but I'm not the best at it. So it's getting there, slowly……


Attachments
Have you thought about getting an electric palm sander? Might be useful to cut down on the amount of time you have to sand.
Palm sanders are only good for removing large amounts of bondo at once - which, if I'm completely honest, is redundant once you learn to apply your filler in thin layers and build it up. For the moment, on the helmet, they'd be useful for scraping back the excess, but following that, it'd probably not see much use.
Regardless: nice work, trooper. I'm very impressed at the shoulder work, and the flash-bang isn't looking too shabby either.
INFANTRYMAN! :cool It's been an awesome month so far. Glad I made it this far!
I only used a palm sander for getting rid of the big blobs, and that took me just a few minutes. I haven't used it since then because it's not as precise as doing it yourself. Really paying for that awful first layer of bondo……
Yeah that's exactly what I used mine for, took me just a few minutes. I wish I didn't have to use it at all! But my first layer was terrible, consequences of being new to bondo. Thanks! I'll finish assembling the shoulder tomorrow, if homework allows it. Look for an update soon!
Have you thought about getting an electric palm sander? Might be useful to cut down on the amount of time you have to sand.
I only used a palm sander for getting rid of the big blobs, and that took me just a few minutes. I haven't used it since then because it's not as precise as doing it yourself. Really paying for that awful first layer of bondo……
Palm sanders are only good for removing large amounts of bondo at once - which, if I'm completely honest, is redundant once you learn to apply your filler in thin layers and build it up. For the moment, on the helmet, they'd be useful for scraping back the excess, but following that, it'd probably not see much use.
Regardless: nice work, trooper. I'm very impressed at the shoulder work, and the flash-bang isn't looking too shabby either.
Yeah that's exactly what I used mine for, took me just a few minutes. I wish I didn't have to use it at all! But my first layer was terrible, consequences of being new to bondo. Thanks! I'll finish assembling the shoulder tomorrow, if homework allows it. Look for an update soon!
Congrats on becoming an infantryman
Congrats on becoming an infantryman
Thanks! Just got to keep working.
Sorry for the lack of an update. I've been real busy lately and on a trip. You all will get an update before this weekend, promise. I've still been working on my helm. But it's almost done getting smoothed out!! So apart from finals over the next 2 weeks
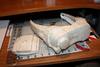
, I have two other projects going at the same time:Trying to finish up a T-21 LRB. My E-11 wasn't big enough for me.

And a Maximus Gladiator helmet. Not for me it's a b-day present.

Attachments

Working on other projects is actually a good idea - I tend to get burned out from looking at one piece, or one project, for too long, and need to work on something else as practise or to take my mind off of the first set before it becomes tedious and I lose the motivation.
The work looks good, though! I look forward to seeing your helmet looking better.
The work looks good, though! I look forward to seeing your helmet looking better.
Working on other projects is actually a good idea - I tend to get burned out from looking at one piece, or one project, for too long, and need to work on something else as practise or to take my mind off of the first set before it becomes tedious and I lose the motivation.
The work looks good, though! I look forward to seeing your helmet looking better.
Sort of guilty haha. After a short vacation I was just feeling lazy. But when I'm done with finals in the next week and a half I'll be all in again! Helmet is looking loads better, maybe I'll post a pic tomorrow.
Time for a: Short Update
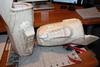
Finished sealing my sniper goggles. I would have rondo'd them too but it was snowing today!! Freaking New Mexico weather. So that wrecked my rondo plans.

Also finished sealing the gauntlets. But that is not all!

I wanted a little more detail on part of the gauntlets. Took some pieces from crackhead09's design, cut some holes, then added it to hugh's design. Don't know what this part is called, but it looks better than just having a flat surface and I didn't have to start over! Very happy with this.

Attachments
Looks great! love the little details in those gauntlet. Curious to see the result
Likewise. They would be done if it wasn't for finals! One week left…
Time for another Short Update
It's aaaaall… mmoooost… there… Just a little smoothing left to do. No more bondo, it's all rondo from here on in.


And working on the shoulder mounts, just one more to add on the upper half. Then the sniper add-ons will be attached

Attachments
Looks good mate. I'm not a big fan of some model of the ODST helmet going around right now, the one with the giant jaw, but this one looks pretty sweet. Great job on the detail going into everything and keep it up!
- Status
- Not open for further replies.
Similar threads
- Replies
- 35
- Views
- 939
Similar threads
- Replies
- 35
- Views
- 939