Hey everyone! A few friends and I decided to start work on some halo armor for each of us this summer, and while looking for pepakura files, I stumbled upon the 405th. I was planning on going with Halo 4 scout armor, but am having a bit of trouble when it comes to finding all the parts I want. I have found the helmet, chestpiece, and shoulders, and know I need to choose forearms, but when it comes to legs I'm a bit confused. In the Halo 4 portion of the pepakura database, all the codpieces for every leg choice are just the back portion, just the butt pad, and I don't know why they don't have a front. Am I missing something?
You are using an out of date browser. It may not display this or other websites correctly.
You should upgrade or use an alternative browser.
You should upgrade or use an alternative browser.
zdruck07's Halo 4 Scout build (and problems along the way)
- Thread starter zdruck07
- Start date
- Status
- Not open for further replies.
Cool, same goes to you. At this point I've been doing some pepakura practice projects, picked the reach noble six helmet to try a practice run once (in retrospect I probably should have just tried scout and found the problems on the first run through) but I've been having some trouble with small pieces, and getting some lumps in the larger pieces, and overall some warping. Does anyone have any tips for how to do the pep work more effectively? Been using an x-acto knife, 110 lb cardstock, and gorilla superglue.
Are you scoring and pre-folding before assembling? Personally, I use a tool that is semi-sharp, but not sharp enough to cut the cardstock, to score each fold line. Then, I use needle-nosed pliers to pre-fold each piece before gluing them together. Using the backside of the X-Acto blade tip can work as well... or some people like to use ball point pens because they score decently, and they can use different colors for the valleys and peaks.
I too use superglue and love how it works. The smaller pieces are a pain, but with patience and steady hands, they are not impossible.
Warping usually happens when your tabs start to not align properly. Forcing them to align will cause buckles in the cardstock, and progressively get worse the further you go. If you are not already, start in the middle of the two pieces to be joined (if there are a total of 11 tabs, 5 on one piece and 6 on the other, start on the 3rd tab of the one with 5. This should help you line up the tabs more accurately.
Hope this helps.
Also, photos really are nice help explain any problems you may be experiencing, and for our viewing pleasure too")
I too use superglue and love how it works. The smaller pieces are a pain, but with patience and steady hands, they are not impossible.
Warping usually happens when your tabs start to not align properly. Forcing them to align will cause buckles in the cardstock, and progressively get worse the further you go. If you are not already, start in the middle of the two pieces to be joined (if there are a total of 11 tabs, 5 on one piece and 6 on the other, start on the 3rd tab of the one with 5. This should help you line up the tabs more accurately.
Hope this helps.
Also, photos really are nice help explain any problems you may be experiencing, and for our viewing pleasure too
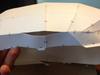
I've just been using my x-acto for scoring, and I agree that superglue has been working great. Thanks for the tip about starting in the middle, it really does seem to be making things easier. I think I've almost hit the halfway point on it, and the only trouble I've had is with this one place that doesn't seem to have tabs to glue together, and just hangs in the air. I feel like it might correct itself later on, but if it doesn't, I could always just glue a small piece of stock to the inside to keep it in place.
Here are just a few pictures of my progress so far:


And then here's that one odd space that is left over.

I'll post progress pictures again soon, probably once I've finished up the helmet.
Here are just a few pictures of my progress so far:


And then here's that one odd space that is left over.

I'll post progress pictures again soon, probably once I've finished up the helmet.
Attachments
There are far better Scout helmet files available now. You seem to have the basic skill for Pepakura down, but I'd advise finding a much better file to make your life easier.
All right, I just used the one in the 405th database thinking that would be good. I guess I'm just not really sure what makes one file better than others, or where I would find a better file.
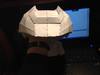
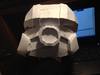
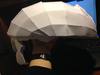
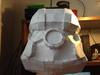
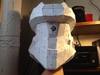
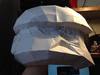
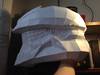
Still not sure where I would find a better file, but I finished up the one I had. The scaling is a bit off, it seems too long and too thin to fit my head, I can fit it, but it squeezes my ears, then my head bounces all over the place inside. Criticism and ideas welcome, I may end up rebuilding and calling this one a test run.
A few different perspectives of the helmet:


I feel like it looks a little lopsided from the front.

Here is one of me wearing it from the side, notice the huge amount of space between my neck and the front lip

All in all, went surprisingly well for my first full build, but debating on a restart due to the general lumpiness and just seeming a bit off kilter. Thoughts?
Attachments
-
 7EED3107-6473-40B6-AD07-3CBFBAC63744_zps1sog4hpr.jpg55.2 KB · Views: 127
 -
 0CE78382-5DEA-4883-B9DF-D86B04261C23_zpsjn9krcyn.jpg79.1 KB · Views: 140
 -
 6AD7B512-B1C7-474C-AC09-40B17BA72B9A_zpskeassvvs.jpg58.2 KB · Views: 142
 -
 5758959F-3CBA-4E15-AA32-43FF76E1F521_zpsuva3no6n.jpg49.4 KB · Views: 138
 -
 8E058021-A995-4AD7-8AB2-FC6A9EB85A92_zpszf2j7ekz.jpg50.4 KB · Views: 129
The helmet looks good and it looks like you have the hang of pepakura. If it's lumpy, bumpy or misshaped at all, I would take Arcanine's advice and grab a better Scout helmet file and make a new one. The foundation of a great armor is the pep.
The helmet looks good and it looks like you have the hang of pepakura. If it's lumpy, bumpy or misshaped at all, I would take Arcanine's advice and grab a better Scout helmet file and make a new one. The foundation of a great armor is the pep.
Yeah, the only thing is, I can't find another file for the halo 4 scout helmet, so if anyone knows of one, I would really appreciate it.
Yeah, the only thing is, I can't find another file for the halo 4 scout helmet, so if anyone knows of one, I would really appreciate it.
Well, since I just happened to have this lying around....
Unfolded for A4 by me, test built by me, fitted for me. You'll have to do some jiggery-buggery to get the file to Letter and at the scale you like, but. It's a game-accurate Scout helmet file.
Holy crap. This looks great, thank you! I'll start work on that one ASAP.
It should, it's a game-ripped file. Please keep me informed on how the build goes, I'd love to see the results people get from my files.
A few pointers, however:
- You may need to install a 'back-off' mod to the helmet to get your head in. The opening is a little small.
- Account for the large cheek/chin/jaw area when scaling the piece. There's a lot more there than you'd think.
- The temple areas may be a little close, but it shouldn't be much to worry about unless you plan to fit a headset into your build.
Good luck with the build, Spartan.
Thank you, much appreciated, and the temples shouldn't be a problem at all, seeing as the armor alone is such a large project, I wouldn't even think about trying to set up a headset as well. A few more quick questions:
1. When you say a 'back off' mod, are you talking about literally being able to take the back of the helmet off? If so, are there specific guides on how to easily pull something like this off?
2. The only thing that confuses me about this file is the red pieces that line the middle of the top part of the helmet, they don't seem to have numbers on them for attachment. What do I do with these and what are their purpose?
Thank you again for all the help, it's really refreshing seeing how people here are genuinely interested in seeing others succeed.
THIS should help you out. I found that with a test build, removing the area below the AI port helped a lot with fitting the back of my head into the helmet.1. When you say a 'back off' mod, are you talking about literally being able to take the back of the helmet off? If so, are there specific guides on how to easily pull something like this off?
2. The only thing that confuses me about this file is the red pieces that line the middle of the top part of the helmet, they don't seem to have numbers on them for attachment. What do I do with these and what are their purpose?
Those are detail pieces, designed either to be added on in layers or to be used as stencils when working with bondo. Take a look at the Scout helmet in reference, you'll see where these details need to go.
Thank you again for all the help, it's really refreshing seeing how people here are genuinely interested in seeing others succeed.
Armour, Honour, Community. This place wouldn't exist without all three.
If you cast that, I want a copy
The file's right there. Why not make one yourself?
- Status
- Not open for further replies.
Similar threads
- Replies
- 3
- Views
- 361
Similar threads
- Replies
- 3
- Views
- 361