Master Chief MK VI Foam

Status
Not open for further replies.

Sasq23

New Member
Well I'm back again. A couple years ago I tried making a MK V suite and I was not happy with the low detail of the files or my work. I am not a fan of fiberglass and Bondo. I'm not ruling it out for future endeavors, but since I've seen what can be done with foam, I'm going to give a Spartan a try. I was working on an Iron Man made of foam last year, but you have to be real thin in the midsection to pull that off, so until I can drop some more weight, I'm working on this.
I started this in November. My goal was to have the whole thing done in six months (yeah right) but hopefully have it done by Halloween. I don't really do the pieces in any particular order, just whatever looks like fun at the time, so please forgive me if things seem scattered around.
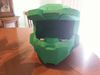
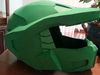
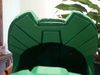
The files are modeled by ROBOGENESIS and modified for foam by DEMOLITION. I must admit I go in and tweek with the modifications a bit to suit my needs. The foam is "Silly Winks" foam sheets from Hobby Lobby and are 5 mm thick in case you are interested. I might make the torso out of thicker floor mats, but I haven't decided.

IMG_7249117326570.jpe

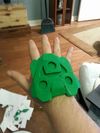
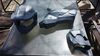
Here is the first hand plate. I got this done in about four hours back in November.

Questions, comments, or constructive criticism is welcomed.
 

Attachments

  • IMG_7249117326570.jpe
    IMG_7249117326570.jpe
    72.7 KB · Views: 167
Here is the helmet. This is before I added the extra details that weren't in the pep file that help it stand out. Now my question to anyone reading this with the answer: How do you make the respirator tubes there on the side of the helmet? I'm assuming its split-loom tubing or vacuum cleaner hose. I've been looking for a tutorial on how to make this look right, but to no avail.

IMG_7261805793805.jpe

I added the little plates using the outline of the pep pattern and a ruler and just kind of eye-balled it.

IMG_7276032851249.jpe

IMG_7280002771872.jpe

The devil is in the detail. I know I'm not as good as the elites on here, but I try.
 

Attachments

  • IMG_7261805793805.jpe
    IMG_7261805793805.jpe
    51.2 KB · Views: 189
  • IMG_7276032851249.jpe
    IMG_7276032851249.jpe
    89.3 KB · Views: 165
  • IMG_7280002771872.jpe
    IMG_7280002771872.jpe
    79.9 KB · Views: 159
Here is the helmet, right shoulder and shin that I also made. Sorry for the lack of progress pictures. I coated them with four layers of watered down Tacky Glue, and then a layer of Plasti Dip. This is them with primer on them and ready to paint.

IMG_7284389248485.jpe

IMG_7287525857547.jpe
 

Attachments

  • IMG_7287525857547.jpe
    IMG_7287525857547.jpe
    78.8 KB · Views: 157
  • IMG_7284389248485.jpe
    IMG_7284389248485.jpe
    123.3 KB · Views: 155
Okay, seriously. Can someone post a link or something and tell me how to cut the tubing to fit in the helmet, please?
 
I'm not sure if there's a real tutorial on cutting the tubing for the helmet but there could be one buried within the forum. This is what I would do:

1) Find a tubing that has the proper diameter
2) Cut the tube in half
3) Print out the shape the tubing has to fit into
4) Trace ^^^ onto tube
5) Cut tube out and glue it in place

That's how I would go about doing it, hope this helps.


do as Demogorgon stated but, you can also fill the cut tube with bondo or something similar, remove the cut tube and glue the piece in place. basically a mold, but you can then carve it, sand as you see fit and it wont run the risk of caving in if someone was to push on it. hope it helps. looking good, keep up the good work
 
Status
Not open for further replies.
Back
Top