ODST Crossover: Venom and Carnage

Status
Not open for further replies.
Update time

I spent a little time here and there working on the kit, the bulk of the work was done over the weekend.

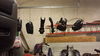
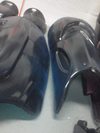
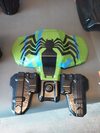
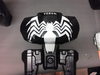
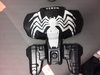
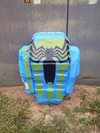
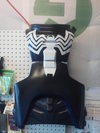
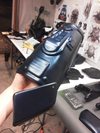
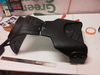
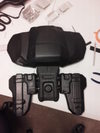
I was able to get the majority of the torso section done (trimmed, sanded, riveted, basic strapping)

TIg7hmbl.jpg


3tJHB0xl.jpg


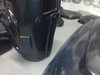
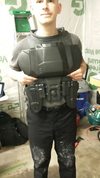
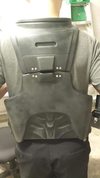
It fits my back like a glove!

b75Wto1l.jpg


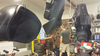
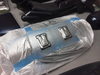
The sections are connected with strips of nylon webbing that's been riveted to the plates. Sean recommended to use scraps of the HIPS material, but I think I may not be the only one wearing this (especially when I get the Carnage suit done)so I opted for the flexibility instead. It still feels very solid. I'm not worried abou it tearing.

eeGGAeUl.jpg


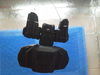
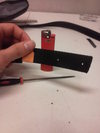
I found that an easy way to make the holes in the webbing for the rivets to slide through was to heat a file I had with a lighter and poke it through. This works better than a drill or dremel in my opinion because the nylon has a tendency to catch or dethread if the right amount of speed and pressure are not applied.

This was MUCH easier and the hot file seals the ends, so the possibility of tearing is minimized.

NSQNdcnl.jpg


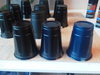
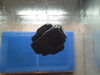
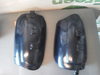
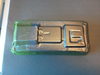
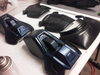
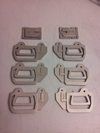
I was also able to cleanup the buckles and get them painted. I still plan to seal it with a clear coat and then black wash these.


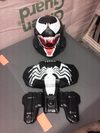
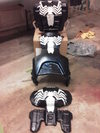
Here is how the torso sections look on me so far

ImCSjRjl.jpg


qcXOV50l.jpg


That's all for now.

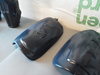
I've slowly been making progress on on sewing the ends of the straps for the D-rings and such. It's a slow, tedious process, but I'm getting there.

Thanks for reading!
 

Attachments

  • TIg7hmbl.jpg
    TIg7hmbl.jpg
    41.4 KB · Views: 361
  • 3tJHB0xl.jpg
    3tJHB0xl.jpg
    37.6 KB · Views: 302
  • b75Wto1l.jpg
    b75Wto1l.jpg
    34.6 KB · Views: 340
  • qcXOV50l.jpg
    qcXOV50l.jpg
    37.6 KB · Views: 317
  • ImCSjRjl.jpg
    ImCSjRjl.jpg
    26.4 KB · Views: 320
  • NSQNdcnl.jpg
    NSQNdcnl.jpg
    36 KB · Views: 344
  • eeGGAeUl.jpg
    eeGGAeUl.jpg
    30.4 KB · Views: 318
Tiny update- I've started the paint selection process and have begun testing different blends and ideas.


RymgUzll.jpg


The left cup is "Toyota Black"
The center cup is "Honda Royal Blue"
The right cup is "Ford blue pearl"


The cups you see in the back are Krylon Gloss black (back left), Krylon Flat Black (back center), and then more Toyota black on the left.

What I'm going to be trying is lightly misting the two blues above to see if I can achieve a sort of blue sheen on the armor under certain lighting conditions and angles. I did this once before on my Brute Spiker kit and it came out very well. I'll be doing two specific things with the blues; I'm going to test

a.) Just a light mist of the blues on the blacks
b.) Tape off the ribs of the black cups and spray them with the blues to accentuate the details, as if they were the edges of the armor pieces*.


*
other_mongoose-rookie-visr_photo_01_md.jpg

Kinda hard to explain until I do it, but try picturing how the ODSTs look through VISR mode from the game (only way less neon in my case)

I hope to have the results soon. I've also started working on the stencil for the chest, which I know is what people really want to see haha :)
 

Attachments

  • RymgUzll.jpg
    RymgUzll.jpg
    53.3 KB · Views: 335
Keep up the awesome work, I'm loving it. I can't wait to see the white spider painted on the torso.

Where are you at with the eyes for the helmet? Still deciding or have you painted them on yet?
I'm totally digging the ones in the first few pictures with the extra contours on the upper edges.

You should post a tutorial on how you are going to accomplish that painting effect if you decide you like it this time around.

I have not made much progress on this part yet- work\life has been getting in the way. I have a feeling this will be the very last thing I do. I'm still a tad nervous about it. The one with extra contours will lend itself better to the carnage build that will come after this one.

Thanks for the kind words :)

dude this is looking awesome keep it up

Thank you :)

This is a fantastic crossover idea! I hope your paint job works out.

Love it, can't wait to see it done!

Thanks! Me too!

Update

Work has been getting in the way more than I'd like to admit but I'm still moving along. The pieces have all be assembled and I've done most of the sewing for the strap system.

A friend of mine has a paint booth and was kind enough to let me use it the past weekend to start painting the suit pieces. So far everything is primed in matte black and looks pretty slick like that alone. I still need to hit it with some gloss black and then the highlights\details will come after. Humidity has been pretty high right now and that's been preventing me from working on it this week.

(again, sorry for the cell phone pics)

sqBHt8Sl.jpg


pYCQ52Sl.jpg


BK7aG6Rl.jpg


xXhOXXyl.jpg


Thanks for reading, more to come soon :)
 

Attachments

  • BK7aG6Rl.jpg
    BK7aG6Rl.jpg
    46.2 KB · Views: 356
  • xXhOXXyl.jpg
    xXhOXXyl.jpg
    48.8 KB · Views: 313
  • sqBHt8Sl.jpg
    sqBHt8Sl.jpg
    43 KB · Views: 324
  • pYCQ52Sl.jpg
    pYCQ52Sl.jpg
    41.9 KB · Views: 375
Damn, those pieces look beautiful, keep up the great work!

Thank you


Update Time and a Happy Accident

I hit a huge milestone over the weekend with regards to painting. Last weekend I was able to get everything primed (as seen in the pics a few posts up) but suffered a setback the next day when I went to paint the gloss coat. I got caught up in the moment and didn't bother to check the humidity which led to orange peel all over nearly every single piece!

I was very angry face! >:c

After wallowing for a few days I began the process of wet sanding each piece down to remove the imperfections and after another humidity check, it was safe to try the gloss again. That layer applied successfully. I'd post a pic but you've all seen enough of the black armor by now I feel :rolleyes

Painting, round 3

The next step was brainstorming how I was going to attempt to add that slight blue sheen to the finish I mentioned earlier. I really want to capture the look of comic-book style Venom, particularly the McFarlane style which is black but with blue highlights and accents.

Before painting, most of the pieces had a slight layer of dust on them from being in my garage, so to clean them, I used what I had laying around which were some of these swiffer sweeper cloths.
037000318224lg.jpg


I'm sure some of you are reading and thinking "why is he mentioning this?" Hold on just a second and you'll see :)


After wiping each part, I taking the now glossed pieces and ever so lightly misting Duplicolor "Ford royal blue" over them, one at a time. This produced a fine coating of blue paint dust on the floor where I was painting.

As I kept going along, I would check each piece in the sun to see the difference in bright light vs low garage light and I noticed something interesting- some of the pieces had a very well defined blue translucence to them on certain details and edges (?!).

Then it dawned on me what happened : When I dusted the pieces, they became statically charged, and as the paint dust built up it attracted some of that dust to the finish, achieving just the look I was hoping for!


BFatJfJl.jpg


ZgHXR31l.jpg


(Again, I'm sorry for the cell phone quality and these pieces are sooper glossy so they don't photograph easily as it is)

Can you see it!? That slight blue on the edges? That only happens at certain angles, otherwise the piece appears gloss black. It's perfect!

Here is another that shows it a little better

rNEMwpzl.jpg


2o2Zu9cl.jpg


At this point, I was elated. I figured I would only achieve the black from a distance and slight blue sparkle if you were maybe a foot away from me, but this is exactly what I wanted. When I walk under natural light, the armor now "shifts" and highlights certain details. I won't be certain until I have everything put on with my under suit, but I think this is going to rock.


Painting round 4!

Now I had so much momentum built up after that success that I decided to keep going with painting, specifically the chest piece.

I started by making a template for the spider emblem on card stock. To get the proportions just right, I used a projector to throw the image on a wall, traced it to card stock, and then cut out my template.

From there, I found that the leggy-ness of the emblem proved to be difficult to get the stencil on the chest, so I got around that by masking off the whole piece, taping my template to the piece, tracing the emblem on the tape, and then gently cut out the emblem from the piece.

This took me longer than I care to admit, and was an extreme effort in patience and finger dexterity.

Q68ncGsl.jpg


Then I took a chip brush and dabbed it in some Vaseline and carefully flicked it at the chest piece to be a resist agent against the white paint.

It paid off beautifully.

Here it is with just the tape removed.

1SILZrJl.jpg


Here it is with the Vaseline wiped away

RcI5fW0l.jpg


For fun, here is what it looks like wit the helmet (which is still a WIP as of now)

yKsG3Syl.jpg


I'm feeling pretty good about this project now. Having that part of it done makes this all the more real to me.

Thanks for reading! More updates soon.


brhPJ46l.jpg
 

Attachments

  • rNEMwpzl.jpg
    rNEMwpzl.jpg
    38.2 KB · Views: 360
  • 2o2Zu9cl.jpg
    2o2Zu9cl.jpg
    44.4 KB · Views: 338
  • ZgHXR31l.jpg
    ZgHXR31l.jpg
    40.7 KB · Views: 346
  • BFatJfJl.jpg
    BFatJfJl.jpg
    33.4 KB · Views: 359
  • Q68ncGsl.jpg
    Q68ncGsl.jpg
    48.3 KB · Views: 348
  • 037000318224lg.jpg
    037000318224lg.jpg
    84.4 KB · Views: 327
  • 1SILZrJl.jpg
    1SILZrJl.jpg
    44.3 KB · Views: 332
  • RcI5fW0l.jpg
    RcI5fW0l.jpg
    48.1 KB · Views: 345
  • brhPJ46l.jpg
    brhPJ46l.jpg
    62.7 KB · Views: 331
  • yKsG3Syl.jpg
    yKsG3Syl.jpg
    46.2 KB · Views: 318
That paint effect really turned out quite beautifully. I can't wait to see when you have the helmet finished up!
 
Absolutely beautiful! I'd love to see that paint job in person. Keep up the good work!
 
OMG!!! Thats is amazing looking! I love that effect the paint gives the armor. I might have to try that too. I wanted to make armor with that magic effect. Congrats on the awesomeness. Keep them updates rolling!
 
My most Favorite ODST ever now. Keep it up the build is looking awesome!!!!
 
Re: ODST + Venom cross-over : ODSV

That paint effect really turned out quite beautifully. I can't wait to see when you have the helmet finished up!

Thank you! Every project I learn something new, this one has been really neat.

That sir, is a beauty! I love the paint scheme!

Thank you

Absolutely beautiful! I'd love to see that paint job in person. Keep up the good work!

If you are at Dragon Con this year you may have have that opportunity :)

Can't wait to see a picture of you wearing it all.

Me too! Slowly but surely....

OMG!!! Thats is amazing looking! I love that effect the paint gives the armor. I might have to try that too. I wanted to make armor with that magic effect. Congrats on the awesomeness. Keep them updates rolling!

Thank you. I'll do my best to outline how I did things so that others may use it.

This is looking really good. Cant wait to see more of it.

Thank you!

My most Favorite ODST ever now. Keep it up the build is looking awesome!!!!

Thanks!

Dude, gotta say, this is one badass project so far!

Thanks! Glad you like it!

-------------------------------------------------------------------

Update Time


It's been a couple weeks and I've not posted much but I have made some great progress. Right now I'm mostly working on sewing and strapping the pieces together, and I don't think anyone really cares about that :rolleyes

Last week I mostly worked on the emblems and got them finished. I thought about a few different options for how to tackle them, and decided against the decal route because it was too complex to stick them over such an uneven surface.

That left me with stencils. So I taped off each piece, traced the image I cut out and then very gently with a fresh x-acto I cut just deep enough to remove those sections of tape. It took forever to remove them, but it came out very well!

rc0YQWZl.jpg


JS7TfRMl.jpg


kfACrFHl.jpg


FeRdvO2l.jpg


For the battle worn look, I took some Vaseline on the end of a chip brush and flicked or splattered it on the cut out area- this acted as my paint resist.

Then I painted over it, let that cure overnight, and the next day I wiped the Vaseline off and removed the tape.

I also got the gloves painted. They are just some old paintball gloves I had around. I need to remove the old velcro strap and sew in a new one.

xDs0jPMl.jpg


This shot is out of order, but here is the helmet after a I painted its base coat. You should just be able to make out the blue hue on the edges. The effect is more pronounced in sunlight.

IzVaLlAl.jpg


Earlier this evening I began painting the details onto some of the other pieces. When they are done, I'll hit them with a gloss clear coat and then on top of that I'll dry brush some battle damage on.

inyLf5vl.jpg


HoZGv40l.jpg


Black and Blue

VJszZOFl.jpg


DLD2PoFl.jpg


That's all for now. I hope to have more to share after the weekend, but it' supposed to be pretty humid and rainy here.

Thanks for reading!
 

Attachments

  • rc0YQWZl.jpg
    rc0YQWZl.jpg
    92.6 KB · Views: 329
  • JS7TfRMl.jpg
    JS7TfRMl.jpg
    60.5 KB · Views: 304
  • kfACrFHl.jpg
    kfACrFHl.jpg
    46.3 KB · Views: 331
  • inyLf5vl.jpg
    inyLf5vl.jpg
    38.3 KB · Views: 308
  • HoZGv40l.jpg
    HoZGv40l.jpg
    50.3 KB · Views: 332
  • IzVaLlAl.jpg
    IzVaLlAl.jpg
    58.8 KB · Views: 323
  • xDs0jPMl.jpg
    xDs0jPMl.jpg
    46.8 KB · Views: 330
  • FeRdvO2l.jpg
    FeRdvO2l.jpg
    58.8 KB · Views: 320
  • DLD2PoFl.jpg
    DLD2PoFl.jpg
    55.1 KB · Views: 313
  • VJszZOFl.jpg
    VJszZOFl.jpg
    50.2 KB · Views: 334
Re: ODST + Venom cross-over : ODSV

Damn those pieces are beautiful. I am genuinely stunned just looking at them. Great job mate! This should look amazing when you are finished!
 
Status
Not open for further replies.
Back
Top