Runescape Build Thread

Status
Not open for further replies.

Retralpha

New Member
This thread will cover some upcoming stuff I'm planning on doing.

These include:

Tetsu armour
Bandos Godsword
Steadfast boots
Saradomin's Whisper [Done] [pg1]

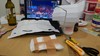
Progress is going to have to wait for now, seeing as I can't get my hands on any EVA foam currently. I'm searching hard when I can get away from Exams.
Taking into consideration all the comments of got on my Reach build, I think I'd be easier just to build in EVA foam.

If anyone wants to add me on Runescape I currently go by NexTimeMate


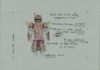
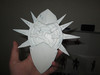
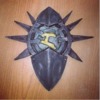
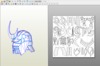
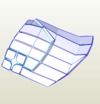
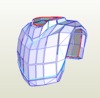
Heres some pictures of whats planned so far (Thanks to crimmson for making the 3D models)

BSF51KU.png

tWfgAQQ.png

whLsYIn.png
 

Attachments

  • BSF51KU.png
    BSF51KU.png
    131.3 KB · Views: 252
  • whLsYIn.png
    whLsYIn.png
    19 KB · Views: 271
  • tWfgAQQ.png
    tWfgAQQ.png
    22.8 KB · Views: 277
Ive got a concept done of the tetsu armour; in a more realistic tone. I've added some extras to the armour, and removed some areas. To give it more of a real Japanese aesthetic, while still keeping the 'scapey goodness'

au4NjeD.png
 

Attachments

  • au4NjeD.png
    au4NjeD.png
    669.9 KB · Views: 267
Looks promising! Are you still working on your other thread? I'd love to see the Spartan armor keep going.

Redshirt
 
The spartan armour is still in operation, but after my chest piece collapsed, I lost a lot of moral within the project, I still hope I can get atleast a good helmet out of the project.
 
Build Update

So, I've started working on a Saradomin's Whisper (A combat necklace)

Heres a photo of the card base

yWMXW2l.jpg


And one where I've started to do finer details


For the main armour, it is going to have to wait until I can go out and get some EVA foam. Then I'll have the Holidays to work my heart out to get the armour as far as possible.
 

Attachments

  • yWMXW2l.jpg
    yWMXW2l.jpg
    2 MB · Views: 236
Build Update

For the past couple days, I've been trying to get the scale correct on each piece of the Tetsu armour. For each piece I've just been trying to scale it to the reference pictures and my body, then printing them out to see if they fit. Once the scale is correct, I've then gone ahead and fixed up the file in Pepakura Designer, then converted it to more of a foam file.

That's why in the picture following, the shoulder is in 2 pieces. Only the templates for the foam are printed out. For this test piece, I included the tabs seeing the test was executed in paper.

w3t2MAS.jpg


I've finished the Waist, Shoulder, and Chest pieces so far, and still have to scale the Gauntlet, Helmet, and Abdominal/Back area.
 

Attachments

  • w3t2MAS.jpg
    w3t2MAS.jpg
    825.5 KB · Views: 251
I've been stagnant for a while now seeing as I still have no access to EVA foam. Never the less I have some progress on the Tetsu armour. While most pieces of armour will be made of EVA foam, certain components will be made from local materials I use as an alternative to Fibreglass resin, and Bondo bodyfiller. These are PVA glue and Spackling compound if you are interested; I use these together to create my own form of weak rondo. Mixed together they form an elastic rubber like texture with around 5 minutes work time before the materials become unworkable. Components like the Abdominal and back plates connected to the chest piece (refer to the Concept art on p1) should be made with this method.

Some components specified and yet to be chosen to take this alternate method of fabricating are done so because of their compound structures. I have little to no experience with EVA foam yet, and so I am taking a safe route for these challenging components in making them with my alternate methods.

Here is the Abdominal plate pepped and curing from the unique mixture (it takes longer to cure than materials like rondo) with other pepped pieces which were made to test the scale and size.

Parts scaled and test pepped as of posting:
Shoulder
Upper thigh
Abdominal plate

Note: Both test peps are shabby and "half assed" because I only needed them to check if the file sat properly on my body, in case any measurements were slightly off. They are still distinguishable with reference to the Concept art I made of the original armour if you're interested in the pieces.

Time for photos!
jN47Mgq.jpg

wEtSSk7.jpg

YsfjIDY.jpg
 

Attachments

  • jN47Mgq.jpg
    jN47Mgq.jpg
    1,021.8 KB · Views: 252
  • wEtSSk7.jpg
    wEtSSk7.jpg
    895.3 KB · Views: 226
  • YsfjIDY.jpg
    YsfjIDY.jpg
    916.4 KB · Views: 237
After curing the hardening mixture, I sculpted the exterior surface with Vinyl Filler putty and my favourite Spackling compound. These together are like my own accessible Bodyfiller. While the Vinyl Filler has a tenancy to crack, the Spackling compound fixes these issue fairly quickly with it's lightweight 'cloud-like' texture.

The first photo shows the Vinyl filler on the exterior surface curing.
The second photo is the Abdominal plate paint ready with strapping to be connected to the chest piece. (the photo does not do it justice)


FV8XFBJ.jpg

decEsl8.jpg


I hope to locate some EVA foam soon to start work on the main chest pieces.

Remember; if you make a mistake... take it as battle damage.
 

Attachments

  • FV8XFBJ.jpg
    FV8XFBJ.jpg
    1.2 MB · Views: 257
  • decEsl8.jpg
    decEsl8.jpg
    913 KB · Views: 260
I haven't posted in ages! Progresss has been made though, I've found a source of foam. It's not really the classic EVA, but it is near perfect for costumes I'm making.

The tetsu armour shoulders are being made as I type this entry, but A simpler project is going strong.

The Bandos Chest plate (and soon Tassets) are progressing well. Heres the photos

P_20140731_005836.jpg
P_20140731_005854.jpg
.
 
Status
Not open for further replies.
Back
Top