Detailed construction tutorial: Reach Foam Forearms (file in the 405th db)

Status
Not open for further replies.

EVAkura

Well-Known Member
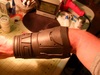
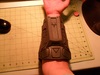
Please note: Construction finished... the continuation of the build is further down this page and on the next. Please enjoy, and feel free to comment or ask questions :)

Okay, so I have an individual that requested some help with the Reach foam files they found in the 405th 4Shared database in Foam Templates/Reach/Base/Male/Forearm. They are new to working with foam, so when they told me they were confused with the layout of the individual parts, I told them I would take a look-see. After looking at the files, I realized the issues he was experiencing could stump just about any beginner, and maybe even some with a bit more experience than that. I am not saying they are bad files... because they are not. They simply need a bit of explanation to help users along.

With that, let's begin.

FIRST AND FOREMOST, due credit must be given. Model by Ruze789 and Foam Unfold by L3x Blu3r1v3r

Tools required:

EVA foam - These parts utilize approx. 3/4 of a 2'X2' sheet of EVA Foam for both left and right forearms
*Scalpel handle with #11 blades (I used just one blade and sharpened it between each piece at a minimum)
Ball point pen
Printed templates (X2) I used the default size of H:200mm W:101mm D:114mm
*Box Cutter blade - I use the small, rectangle, single edge ones (the kind you put in a cheap box-cutter)
*Cutting mat (or other surface to protect your table or whatever is under your foam!)
Hot glue gun
*High temp glue sticks (I ONLY use hot temp and not low or multi-temp ones... they make a difference!)
Heat gun
*Dremel with barrel sander bit (120 grit)

* indicates optional or personal preference. I have found that using these items generally yield superior builds if used correctly.

So, now that we have covered the tools, let's look at the file. Note: I am only focusing on the 2D portion for now and just a reminder, this is the Left only:

The numbers being all jumbled up will become apparent in the photo after this one.

labeledparts_zpsee4467e0.jpg

And now my cut-outs:

SAM_1413_zpsdb47d2b5.jpg

Now, to explain how I came up with these cuts, and special instructions for each one if needed.

1. This part is pretty self explanatory. Cut the outside line, then the inside one. TIP: When cutting the inside, hold your blade perpendicular to the foam when you approach a corner or curve and lightly use a sawing motion so you get a clean 90 degree cut

2 & 3. This is where you will need the 2nd copy. Cut out the smaller rectangle from one copy, and transfer it to the other. Align it so that it completes the gap in the larger part. Also, this is where you will position the oblong hex pieces to bridge between multiple parts (PLEASE NOTE, WHERE I PLACED MINE IS NOT GAME ACCURATE! ADJUST ACCORDINGLY!). As you can see in my foam cut-outs, #2 is an exploded view, whereas #3 is it all assembled. Notice how cutting it out of a single piece creates perfect seams. Try to do this whenever possible. So, you notice that there are two in foam, but only one is the template. This was done to save space I believe. You will need to use your cutout twice, flipping it upside down to create the second piece.

4. This is another piece that gets flipped to create the mirror piece. Where the "V" is, I simply eliminated that gap and just cut the line (you can see the cut and ink line where the "V" would have been. I did this for two reasons. 1. Foam is forgiving. Cutting unnecessary "V"s will result in noticeable seams. 2. If it does become necessary to cut the "V" in due to the piece not forming properly, I can always cut it in later... but it is really difficult to go the other way around :)

5. Simple cut

6. This one is a bit more difficult and is where I used my box cutting blade. Also, a bit of pre-planning is required. The outside curve and the sides are cut normal... BUT the inside curve has an approx. 60 degree OUTWARD angle cut into it. I stress the outward bit because you have to plan this on your EVA mat when transferring the template to allow for the extra EVA that angle will require. Be sure not to butt another piece too close to it in attempts to save EVA. I have found using a box cutter blade gives excellent control of the angle while maintaining a very clean cut.

7. This is another tricky one to transfer to the EVA from the template. If you look at the template piece, then my cut out piece, it becomes pretty clear what I had to do. Note: The bisecting line on the outside piece is just a drawn line, not a cut. This was necessary to keep alignment on the template piece when it is flipped over to trace the opposite side.

8, 9, & 10. Simply trace and cut

11. This one was cut out of a single piece. I did not put the gap you see in the template, I simply eliminated it. Once again, this makes the two pieces join perfectly.

12. Just like the previous one, this too was cut from one piece by eliminating the gap. The only difference is I took the small piece and rotated it 90 degrees (so now it was lying on its long edge with finished surface of the EVA facing the larger piece. I then cut a small "V" in the back without fully cutting the piece in two.

13. Yay!! A simple cut for the final one :D (Even though it looks like it could be coupled with #12, it varies in shape a bit too drastic for my liking.

Now, do it all over again for the other arm!

Since it is 4:30am here, I will continue (and most likely finish) the construction phase of this part "tomorrow"

I hope this tutorial helps those that may be in the same predicament as my friend, and if I get good feedback, I will continue to do more parts. (I need something to do since all my main projects are on hold due to lack of parts, supplies, and cash! Luckily, I make sure I ALWAYS have EVA on hand for times like these!)

labeledparts_zpsee4467e0.jpg


SAM_1413_zpsdb47d2b5.jpg
 
Now, to explain how I came up with these cuts, and special instructions for each one if needed.

2 & 3. This is where you will need the 2nd copy. Cut out the smaller rectangle from one copy, and transfer it to the other. Align it so that it completes the gap in the larger part. Also, this is where you will position the oblong hex pieces to bridge between multiple parts. As you can see in my foam cut-outs, #2 is an exploded view, whereas #3 is it all assembled. Notice how cutting it out of a single piece creates perfect seams. Try to do this whenever possible. So, you notice that there are two in foam, but only one is the template. This was done to save space I believe. You will need to use your cutout twice, flipping it upside down to create the second piece.

11. This one was cut out of a single piece. I did not put the gap you see in the template, I simply eliminated it. Once again, this makes the two pieces join perfectly.

12. Just like the previous one, this too was cut from one piece by eliminating the gap. The only difference is I took the small piece and rotated it 90 degrees (so now it was lying on its long edge with finished surface of the EVA facing the larger piece. I then cut a small "V" in the back without fully cutting the piece in two.

Thanks so much for taking time out of your life for this TUT Evakura, it means a lot to us all. :)

I do have some questions about some of your instructions, and it might be that i am just not grasping it for whatever reason so please bear with me.
Ok so first for 2 and 3, i understand that you make practically the whole thing out of one piece and what not and attach one piece by way of the oblong hexagons, but my question is where did the oblong hexagons come from? It is not in the template you posted. just curious is all if that is your own thing or something. :)
For 11 and 12, you said you didnt include the gap for either. Well either my eyes are playing tricks on me or i am seeing a gap between two pieces on both 11 and 12. Or is there another gap that is not showing in the templates that im not seeing. Like i said, just curious and want to understand as much as possible :)

Thanks for all that you do. You are a great inspiration to us all.
If my questions do make sense then feel free to let me know either here or via PM so i may explain better :)
 
Wow, this is great! This is going to be a huge help once I start working on my forearms. Thanks a ton for making this tutorial, it's going to help a lot of people in the future.
 
Thank you for the tutorial, awesome job!

I figured asking some noob-ish questions would help everyone that stumbles upon the thread later... once they get answered. ;)
• What kind of paper do you print the templates onto?

• Do you cut the paper first and then the foam, or do you do them simultaneously with the paper on top of the foam?

• Why high temp glue sticks?
- - I think I read about why years ago, but I cannot remember what thread I found it in.

• Where do you buy your Eva foam from? I'm not sure if any of my local stores carry those child-friendly floor mats.

• As per #1, is that more than 1 piece stacked on top of one another? How did you cut out the narrow depth into the foam and the rectangular insert?
I'm guessing you cut out the interior section, divided it into the 2 lower areas and the 1 rectangular area, and then you simply glue the lower areas at an offset from the others.

• As per #6, is there a way to increase control on angled cuts by adding pre-made incisions into the foam? In other words, when you finish cutting it, there will be an obtuse angle and an acute angle. But before you start cutting, for the acute angle, could you take the template to the back of the foam, trace a line approximately 0.5" outside of the template (just making up a random dimension, sorry), and then cut slightly into it so that as you cut the blade naturally tries to follow that curve? Or is this idea just completely farfetched?

I've used blue camping pad foam for making padded sparring weapons for myself and friends, and cutting angles into it is just a nightmare, it always comes out jagged or I have difficulties maintaining the angle I'm trying to cut and it comes out uneven. Granted it is a different kind of foam, it would be nice to know some extra tips or techniques on cutting at an angle.
 
The reason why you use high temp glue guns is because it will only melt again at the temperature it melted at, which is REALLY hot (380 F or 193 C). So the bond between the pieces will be stronger than a low temp. If you use a low temp gun and leave your armor in the car plus it's really hot out, you run the risk of your armor falling apart.

You can buy EVA foam from Harbor Freight, Walmart and Home Depot. Price ranges between 10-20 dollars for 4 mats.
 
Before I get to answering the questions and completing the construction phase of this build, I want to thank all of you for your encouraging responses and gratitude. It is nice to know that this is appreciated :)

Now to answer questions:

Mstruvmgc:

The oblong hex piece is on the template (I forgot to point it out), just to the left of #7 and below #11. As far as positioning that template piece on your foam to cut out, you have to use your best judgment by referring to the 3D panel (not pictured here yet). While we are at it, #1 has a piece that is not shown as well. It is on the inside piece. This too was cut by referring to the 3D panel.

The gap between #11 and #12 was there because I "exploded" the view so that it would be easier to see the parts. I can see how that could be confusing now. But, like the instructions say, they are indeed seamless and there is no gap when they are placed together :)

WandererTJ:

I prefer to use 100lb cardstock as it has less a tendency to move or collapse when I am holding it to transfer the pattern to EVA. Alternatively, in the past, I printed out on standard paper, transferred that to cardboard, then to EVA. One more step, but it is cheaper and might help someone that can't afford to purchase cardstock. I highly recommend avoiding using standard printer paper.

The paper is cut out first, then traced to the EVA foam with a ball point pen (felt tip works too, but ball point can be removed with either rubbing alcohol or a baby wipe) to be cut later. Another step I failed to mention is: When you have a piece that contains multiple parts (example: #3), cut only the exterior lines of the template... don't cut it into individual pieces yet. Trace the outside edge to EVA, then cut ONE piece out. Now you can align everything and trace that piece. Continue until all pieces are separated. Doing it this way ensures everything stays in alignment.

The reason why I only use high temp glue sticks is EXACTLY why Snortellini stated.

Again, Snortellini is correct... BUT, I won't buy my mats at those places. Just like the high temp glue stick deal, I will only purchase items that have proven to be exceptional in quality and consistency. I purchase my mats from an Amazon seller by the name of "Wesellmats.com". They are a bit more pricey (the shipping is what kills it), but when they are on sale, they are fairly comparable in price. The quality of the mats they sell are indeed exceptional as far as consistency of thickness and shape, and have practically no blemishes or surface bubbles, scratches, or marks (all of the ones I have ordered had ZERO defects).

You are correct with #1. It is one level piece cut into several sections. They are then offset in depth and glued into that position.

Your idea for #6 is not something I have tried. Since I have started using the box cutter blade to make angled cuts, I have never needed to alter the way I do it. They always come out consistent and clean. Reason? I always use a new blade (I buy them in boxes of 100) and the fact that they are small, forces my hand to be in contact with the EVA. This reduces/eliminates rolling and excess movement. I also make sure my hand has 3 points of contact with the EVA to add stability (I may have to photo that to explain better)

As far as your material that you are using; sometimes we just have to make due with what we have on-hand. When you get a chance though, invest in some quality EVA. Your mind will be blown with the difference!

OK, next update will be a bit later this evening and should consist of the rest of the construction phase. Thanks for your patience and support!
 
Working on this project has prompted me to create a new instructional video on EVA cutting techniques! :)

So now, on with the project.

One thing I always do is lay out my parts in the order they will go. This helps me in several ways. It gives me an idea where they will join, and also whether or not they will need angles cut to make the edges have significantly less seam (if any).

SAM_1414_zps7590466d.jpg

I am starting on the bottom portion first. I did this because it is the only flat piece and wanted to build off of that to help maintain that shape. Warping from having to stress a seam together is much easier disguised on a piece that has a curve. This image shows the detail lines I cut in to the pieces. I also used my dremel with a small stone bit to make the holes. Here is my video on detail lines. This also shows the difference between pieces that have had heat applied via a heat gun. The one on the left has not, whereas the one on the right has. The heat closes the cells of the foam and really does a great job at cleaning up the detail lines.

SAM_1415_zps74c77965.jpg

For this next step, I have put an arrow pointing at each of the edges that require a 45 degree angle cut so that the edges come out clean. Make sure you use a very sharp razor (I prefer the box cutter blade for this part), and follow the instructions I gave in the video at the beginning of this section of the tutorial if you are new to this.

SAM_1416_zps11a03777.jpg

This is a photo I took so that I could point out a couple of mistakes I made.

1. The detail lines on the two pieces inside these boxes are reverse of what they should be. The upper one should have the 3 lines, and the lower piece should have the box.

2. This shows where I put the two hex pieces, and approximately where they should have gone. Not a big deal unless you are going for accuracy. I failed :)

3. This is not a mistake, but does show that this inset piece is raised.

4. This is also not a mistake, but shows that the inset pieces are sub-level, and that the middle one is just a bit higher than the other two on either side.

SAM_1417_zps5152b258.jpg

This piece was a bit tricky. You will need to cut a piece of scrap and attach it about 1/16" below being flush. This scrap piece will act as a ledge to glue the next piece on to.

SAM_1418_zpsdd85d7cd.jpg

Here is the piece that was glued to the ledge and how it aligns.

SAM_1419_zps5a54107d.jpg

For the sides of this part, it is recommended that you disassemble the parts and just work with what is shown here. I also have added lines indicating the lengths of glue I advise applying each time. This will help keep you in check by limiting the amount you have to join without having to hurry before the glue gets too cold. Rushing a long piece where the seam is so important usually ends up looking sub-par.

SAM_1420_zps105feb30.jpg

This photo shows the different levels that I put each piece at. It really helps make a piece "pop" when you add more dimension to it.

SAM_1422_zps951474df.jpg

To be continued on the next post....

SAM_1414_zps7590466d.jpg


SAM_1415_zps74c77965.jpg


SAM_1416_zps11a03777.jpg


SAM_1417_zps5152b258.jpg


SAM_1418_zpsdd85d7cd.jpg


SAM_1419_zps5a54107d.jpg


SAM_1420_zps105feb30.jpg


SAM_1422_zps951474df.jpg
 
Now that the bottom is completed, it is time to work on the top.

This picture demonstrates where I decide to make contour lines (not detail lines). My contour line video can be found here. First, I lay out the pieces like I have shown here and mark where the pieces coincide with the other two (the inside ones). The bottom contour line aligned with the corner of that piece, and the upper one aligns with the angle change in that piece. Then, I take the two pieces (the outside ones in the picture), and set them side by side... lining up where I have put the two blue lines. This will allow me to be sure that the contour lines are the same. These pieces will later be heat formed and glue inserted in the contour lines to help them maintain shape.

SAM_1425_zpsd3b447d8.jpg

At this point in time, I decided to heat form all the pieces on this side that required it, and then set them into position.

SAM_1426_zps94fe6709.jpg

The part on the top has to have an angle cut into it so that it joins in this way. The arrow points to the edge that requires the angle.

SAM_1427_zpsf60b911e.jpg

This photo simply shows the order of which I glued the pieces.

SAM_1428_zps0992abdf.jpg

The two completed halves.

SAM_1429_zpsb37a5fc3.jpg

At this point, it was time to tack the pieces together with about 4 drops of hot glue at even intervals down each side. I didn't want to permanently glue them together in the case that I have to make some alterations... of which I do. Side view:

SAM_1431_zps63ec9930.jpg

Here it is from the top:

SAM_1430_zpsc93c6fa7.jpg

Opening closest to the elbow:

SAM_1432_zps3d3d5f3e.jpg

Opening closest to the wrist:

SAM_1433_zps7169f04c.jpg

It is really tough to get my hand through the end (this is the part I was speaking of... I will probably use woven elastic to joint the two halves at the end), but this shows the scale and how it fits when put on. Top view and arm slightly bent:

SAM_1434_zpsbf18beaa.jpg

Bottom view and arm straight:

SAM_1435_zpse802a263.jpg

Now it is time to do the second one! If you have any questions or comments, please feel free to ask away!

Tomorrow I will start on the Bicep armor... It REALLY needs good instructions!

SAM_1425_zpsd3b447d8.jpg


SAM_1426_zps94fe6709.jpg


SAM_1427_zpsf60b911e.jpg


SAM_1428_zps0992abdf.jpg


SAM_1429_zpsb37a5fc3.jpg


SAM_1431_zps63ec9930.jpg


SAM_1430_zpsc93c6fa7.jpg


SAM_1432_zps3d3d5f3e.jpg


SAM_1433_zps7169f04c.jpg


SAM_1434_zpsbf18beaa.jpg


SAM_1435_zpse802a263.jpg
 
Oh man, now that is awesome. Thank you very much!
Great to see it come together.

Is there a good way to mend seems that just don't fit together 100%?
What I mean by this is: In your 1st pic of it finished, the top and bottom halves look like they kind've have gaps between them, and I was wondering what you need to do to get them to merge together perfectly. I'm genuinely curious, not trying to critique your work at all...


I can't wait till you make a tutorial for the chest. ;)


EDIT: Just FYI, I really want you to know, that your effort in making these tutorials has really REALLY made me started kicking myself to hurry up and start my own project. It's almost like you are teasing me or something. I will definitely be following these when I start my build.
I'm planning to do the Foam + PVA + Polyurethane method. Hardened armor is always the most awesome ;)

The only thing stopping me right now is the fact that I haven't given myself the time to sit down and determine how I plan on doing the undersuit. I plan on making one that will compete with the awesome ones our lady spartans have made haha.
Once I've determined the layers and approach I want to go with for the undersuit, I will definitely be trying to start working on my build.
 
Top view and arm slightly bent:

SAM_1434_zpsbf18beaa.jpg

Bottom view and arm straight:

SAM_1435_zpse802a263.jpg

Hey just to give a heads up Evakura, you have it on upside down i believe. the flat part in the second picture goes on top of your arm. so turn your arm in it and you will be good lol :)

Thanks for the awesome TUT by the way!!
 

Attachments

  • SAM_1434_zpsbf18beaa.jpg
    SAM_1434_zpsbf18beaa.jpg
    169.1 KB · Views: 377
  • SAM_1435_zpse802a263.jpg
    SAM_1435_zpse802a263.jpg
    169.8 KB · Views: 413
Thank you all for your comments :)

Is there a good way to mend seems that just don't fit together 100%?
What I mean by this is: In your 1st pic of it finished, the top and bottom halves look like they kind've have gaps between them, and I was wondering what you need to do to get them to merge together perfectly.

The seams there are merely tacked together with a couple drops of hot glue. One of the seams will require a strip of woven elastic to allow me to get my hand through the opening. I am testing out something today that I hope will advance this build to the next level :)

Hey just to give a heads up Evakura, you have it on upside down i believe. the flat part in the second picture goes on top of your arm. so turn your arm in it and you will be good lol :)

Thanks for the awesome TUT by the way!!

Bwaahahaha!!! You are so correct! The reference photos I had were not the best, and I misinterpreted them! Makes so much sense too!
 
Glad i could help :)
I do have a question for you and im sure you have probably covered this already in your other thread or with one of your videos but i have not had time to look so im going to ask here. Sorry just in case lol

But for your foam work that you do, do you pre-heat the sheet of foam with a heat gun before you cut out the pieces? or do you heat it after they are cut out??
or do you only heat certain ones if they need it?
Keep up the great work buddy
 
... for your foam work that you do, do you pre-heat the sheet of foam with a heat gun before you cut out the pieces? or do you heat it after they are cut out??
or do you only heat certain ones if they need it?

Excellent question as I have not addressed that before. I do not preheat the foam before cuts are made. However, every piece eventually gets heat applied to close the cells and make it more consistent in appearance and texture. I may have to try preheating to see how well that works, or if any problems arise. Thanks for the question :)
 
Wow, thank you so much for this detailed guide. I feel less daunted starting a new build with foam now. I will definitely refer back to this guide.
 
I am testing out something today that I hope will advance this build to the next level :)

Is it wrong of me to REALLY be hoping to see you trying the PVA + Polyurethane method that adds a hard plastic exterior shell to the foam? Haha.
Since you do heat all your foam up to seal it, I'd be curious as to how well it would still bond with PVA and Polyurethane.

Also, it is definitely interesting to hear about what you plan to do with the elastics. It'd be great if you added info and pics on it. Can't wait to ssee your results and to see if you like it.
It's always good to see how different individuals find ways to take their armor on and off, whether it be buckles, magnets, velcro, elastics, laces, or anything I haven't mentioned, or a combination of multiple elements.


In the assumption that you will be making a tutorial for all the Reach base armor, once you complete it all, I'd definitely think that getting a topic stickied that links to each of the tutorials would be awesome!!! Once you get to that point, definitely expect to see a sticky recommendation from me.
Also on that topic, if/when you ever get to the chest and thigh, it would be great to know which pepakura models you end up using and if you have a certain special method you use in order to scale them to meet your needs.

One of my favorite aspects of these tutorials is how you modify existing files and simplify them to meet your needs with foam.
 
Thank you for that detailed reply and compliments WandererTJ :) I am glad I could help Frozensnot!

As far as sealing, I can answer one question for you. PVA adheres just fine to sealed EVA. In fact, it sticks better than non-heat treated EVA. BUT, I am planning on skipping the PVA and going straight to Polyurethane Epoxy. I have done several test pieces and it seams that if you do a thin enough coating, it does not warp or eat away at the EVA at all, adheres just fine, and does not affect the High Temp hot glue I use. Why I am attempting this is because if I can skip the PVA step, then I don't need to worry about it cracking (PVA tends to do quite easily), which will leave me with the desired look of hardened armor, but it will still be semi-flexible. Using acrylic paint, or possibly spray paint meant for plastic should allow the paint to move with the epoxy without cracking. I will post the results when I get finished :)

I will also continue with this tutorial when I get to the elastics part as well (I have to purchase more since my Exo-suit used up all of what I had :)

I will see about how much more of this suit I will build and do tutorials on. It was requested that I do a quick tutorial on the H4 MC bicep and shoulders, so after that is done, I will probably pick this back up where I left off.

Also, I am not sure what to do with these armor pieces... I have built one of each for the tutorials, and have the other side cut out. Intriguing suggestions would be appreciated. Contest maybe? Random give-away? Help me come up with an idea please as I most likely will not be keeping these for myself... I simply don't need any more armor at this point :D
 
Excellent question as I have not addressed that before. I do not preheat the foam before cuts are made. However, every piece eventually gets heat applied to close the cells and make it more consistent in appearance and texture. I may have to try preheating to see how well that works, or if any problems arise. Thanks for the question :)

Well i am glad i asked it then lol. I only asked because i knew you heated all the peieces but to my brain it would make more sense to heat them before cutting this way you dont risk any size differences with the pieces and what not. Know what i mean? I am glad i was able to give you something else to experiment with as it seems you enjoying do that. :)
best of luck with the test!

Also, I am not sure what to do with these armor pieces... I have built one of each for the tutorials, and have the other side cut out. Intriguing suggestions would be appreciated. Contest maybe? Random give-away? Help me come up with an idea please as I most likely will not be keeping these for myself... I simply don't need any more armor at this point :D

Hmmm seeing as im sure some people wouldnt mind taking those off your hands (me included) I am thinking maybe random give-away. I know some others on the forums have done that before. What one person did was make a specific date that he would be pulling names out of a hat to select between the names of people who were interested. So pretty much if you did this method: You would have those that are interested let you know either here or in another thread or something that they are interested by a certain date and then pick a name and let them know they won then you guys could work out a way to ship it to them and whatnot.

A contest is not a bad idea either. The only idea i have on that is maybe giving everyone who is interested something to make and see which one you like best. For example, you tell everyone to build like a handplate or something and see which one you like more. Thats the only thing i can think of as for a contest. But that might not allow as many people to partisipate due to everyones financial status being different.

And there is also just selling them in the classified section too if you cant come up with anything. (although that doesnt seem as fun lol)

Well hope i have helped in any way at all and best of luck to what you decide :)
Stay awesome
 
Status
Not open for further replies.
Back
Top