HD Halo 3 MKVI, RVB's "Tucker" Pepikura Build FINISHED!

Status
Not open for further replies.

AsphyxiaOrange

New Member
Okay so.

I'm going to do a build.
I'm making a thread.
Boom

Basically, I have a few weeks of uninterrupted freedom (almost twelve hours a day for two weeks), and I have the time and patience to start my first build in that span. Being a spartan is my dreaaaaam.
I'm totally not rushing this, but I'm definitely working on it nonstop.


IMG_0001_zps51987bd7.jpg
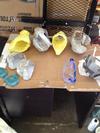
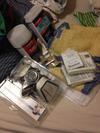
Day one- supplies. For real though, the first thing I did after this was take like ten selfies with the respirator on because my friends still don't know what the heck I'm building and it's great to mess with them.

IMG_0014_zpsa0e0e159.jpg
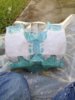
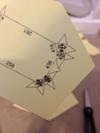
Day three- printing and cutting. I'll definitely figure out this piece.


Also day three: error.
IMG_0016_zps85a8409c.jpg
Even with pepping I don't think this piece is going to work without some resizing.
It was a cool hat though.IMG_0017_zpsf651a92d.jpg

Because if I wasn't laughing about it, I'd probably be crying.

I don't know.

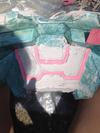
I ran out of paper ( it's now day... Four/five???)
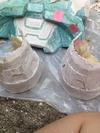
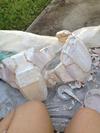
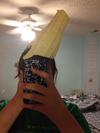
But I've actually successfully put the booty together, both hand plates, and half a thigh(???). I attempted the shoulder but it seems every measurement (save the hands) that had to do with my arms was botched. I remeasured my arm yesterday and I'm halfway through gluing a new forearm.

Tips are welcome and appreciated.

Note: I'll be out of town for the next week actually, then the two weeks of freedom kind of start. This was an early start, whoops.
 

Attachments

  • IMG_0014_zpsa0e0e159.jpg
    IMG_0014_zpsa0e0e159.jpg
    41.8 KB · Views: 358
  • IMG_0016_zps85a8409c.jpg
    IMG_0016_zps85a8409c.jpg
    85.4 KB · Views: 281
  • IMG_0001_zps51987bd7.jpg
    IMG_0001_zps51987bd7.jpg
    107.7 KB · Views: 324
  • IMG_0017_zpsf651a92d.jpg
    IMG_0017_zpsf651a92d.jpg
    61.7 KB · Views: 325
Looks good so far.

Re-sizing is a pain. It took me 3 tries to get my shins sized properly. There are a couple useful threads on the subject in the creation discution section, but apart from that it ends up being a lot of trial and error. I know how frustrating that can be. When it comes to resin coating, you're going to need a lot more chip brushes. Even if you're cleaning them after each batch, they still get ruined pretty fast. I found that I liked the 1" ones best. Good luck with the rest. Can't wait to see more progress.
 
Something that works for me on sizing, trace your arm, leg, foot, or whatever and measure it to get an idea of how thick your pieces need to be. A ruler doesn't really go through your body very well so its hard to get a point to point measurement. Use the increase/decrease by 10% until you get a more appropriate measurement when using the "measure distance between two points" feature in pepekura designer. It is a lot of guess work at first, but putting the time in your preparation will save tons of time in your build.
 
If you find that you seem to have a hard time measuring yourself so that you can scale your armor properly, take a peek at my thread: http://www.405th.com/showthread.php/31627-HaloGoddess-quot-How-To-Scale-quot-and-More-Tutorial It has helped LOTS of people. :)

Thanks everyone for your advice so far, and yeh I've heckled out yours and read a tooooon of stickies before wen starting this thing. The problem wasn't much with my method as much as I just had no idea how to work a ruler, haha. It probably would've been better if I wouldn't have read three different methods beforehand and I think I probably confused them.
I have been using your method the most though
Update though: after re scaling my forearm piece I was able to get it the perfect size (which is slightly large to allow room for the fiberglass to make it larger). I also decided to go ahead an work on the shoulder piece because when I re-measured my upper arm it ended up the same measurement I started with. I considered that maybe I just got confused and assumed it was too big when I started to build it, but I should've learned at the beginning that my judgement is not very good.

I'll put more brushes on my shopping list. Also I've has trouble finding the measure point to point tool in the designer program ( probably due to my limited experience with it) what does the icon look like?
 
Re: Ok cool lets do a build (noobiest mk vi with pictures)

Updateo:
Lots more cutting.
I have now more than half of my pieces cut and glued.IMG_0029_zpsc159fc7b.jpg

So now I have:
Helmet
Both thighs
Both Forearms
Both hand pieces
One shoulder piece
One shin piece
The belt/codpiece

But I have a question, sort of, about the shin piece.
It seems the correct length, but it's such a large piece that I can almost put both my legs in it.
IMG_0031_zps35fbb510.jpg
IMG_0032_zpsf4250eb9.jpg
(I mean, here it doesn't look that big, because my thighs throw off the proportions for everything- But my calves aren't that big.
I'm about to go search around a few of the sizing threads and see what I can find, but it is really supposed to be that big extending backwards? Should I alter the piece or what?
Well of course I'm going to have to alter the piece, but, any suggestions on how I could go about that without mutilating it too badly?

Edit: I circled a few threads and the only solution really is to cut it up(duh duh duh) Once I have the other one put together, I'll probably take off some space around the larger back seams. I'll update this again once I'm done with at least those and he chest piece.

Edit2: I forgot to mention the stream I'm putting a ton of photos on. I'm uploading to it from my phone directly, so it updates quicker than the thread here. So, by the off chance that you actually are following my progress you can check here: https://www.icloud.com/photostream/#A3JtdOXmG2tPRk

Also did I mention I'm building tucker? I don't think I did.
 
Re: Ok cool lets do a build (noobiest mk vi with pictures)

Actual Update

I'll probably take off some space around the larger back seams. I'll update this again once I'm done with at least those and he chest piece.

hahHAHAHA
when that's at least done?
Oh boy
I've got most my pieces now covered with resin on both sides
and about half my pieces (the smaller ones at least) layered on the inside with fiberglass.
Now I'm debating buying another quart of resin (my third) or stretching the second can out to finish fiberglassing the second half. I'm leaning more towards buying a third, since i expect to have leftover fiberglass anyways and just adding some of the extra fiberglass to places that's be weaker areas or areas that would have a lot of wear and tear (Back of the codpiece, shoes, and shoulder pieces mostly) and any extra resin could go towards adding more thickness to the pieces. Who knows, we'll see.

Pictures!
IMG_0050_zps3f5c14d4.jpg
IMG_0047.JPG
Here's my old workspace while I was still working with resin.
IMG_0053_zpsbc6c8b7c.jpg
everything drying UuU
IMG_0048_zps2abd3822.jpg
Some damages happened on these two. I fixed with hot glue and then went over the areas with resin while working on another piece because the hot glue didn't seem to like staying on the resin.
IMG_0062_zps76930168.jpg
When I'm avoiding doing resin work I often sit and pick at these... icicles.
Ive got some really angry ones in pieces with sharp corners. That being said, I don't want to accidentally stab my eyes out while putting on the helmet or cut myself getting into those forearm pieces.
IMG_0067_zpsf0b9d78d.jpg
Also making visual notes for me to find later about what I plan to do about cutting certain pieces.

Notes/ HELP:

I'm nervous about working with Bondo soon. I almost have no idea how to go about it ( I mean, I do– I've seen tutorials and references galore, but I'm still scared I'm going to mess up or run out wayyy too quickly.) If you have any advice, feel free to drop it here.

As for under suit, right now I'm working on gathering materials. I have a great, thin but opaque pair of leggings and a few turtleneck long sleeves that I plan to cut up and alter, but I haven't started planning out what I'm going to do with them yet. I'll put up pictures when I start to work on them. Also if you have under suit references, I would love to see them.

Lastly! I've seen This stuff right here used in a few builds, and I was wondering if anyone has tried light hardening or sealing to them so that they'd be able to be worn without another clear visor in front or behind it?
 

Attachments

  • IMG_0050_zps3f5c14d4.jpg
    IMG_0050_zps3f5c14d4.jpg
    91.7 KB · Views: 332
Re: Ok cool lets do a build (HD mkvi Tucker)

Bondo is an exercise in patience. If you have been watching the tutorials they are going to tell you the most about using it. Patience and thin coats and as smooth as you can put it on. Think icing a cake smooth. You are only using it to smooth and level things out so the less you put on the less you have to sand off to get things smoothed out. You may have to do multiple thin coats but its in some ways a lot less work.
 
Re: Ok cool lets do a build (HD mkvi Tucker)

Update

Okay so recently started using Bondo, planning an under suit, and finished up the resin process.

Added an extra layer to the inside of all the lower shoes pieces, and the back of the codpiece.
IMG_0072_zpsb4eb5167.jpg
So it can withstand the sheer monstrosity that is my rear.

I also took some time to cute the chest piece and codpieces into separate parts using a knife I found in the kitchen (that's a joke, but we really did store our razor blades in the kitchen so...)
IMG_0078-2_zps5ce4c99d.jpg
Speaking of the cheap things I do, I figured out a cute way to avoid buying bondo applicators because I didn't feel like driving 2 miles to the store again.
You know those plastic thingies that come with a quart of resin? It's like a lid but it's not a lid and there's almost no use for it?

IMG_0081_zpsda387cc0.jpg
Bam. Free Bondo applicators. If you can cut straight enough, they work like a charm.
(And I've been using the curvy edge piece as a scoop to grab it out of the Bondo container)
((TBH I feel like that easy of a solution is somehow going to backfire though.))
Cleaning them is okay, too. Once the Bondo is dry you can just peel it off the plastic (or if you don't feel like touching it, a screwdriver will get it off pretty quickly, too)
If you put foil in one, you can also use it as your resin cup (I learned that one in one of the Q&A forum posts that used to be stickies before the site got flipped turn upside down)

The fun thing is, I'm not nearly as good at using Bondo as I am at being cheap.
IMG_0084_zps8a1981a8.jpg
Exhibit A.
[SUB]I probably shouldn't have started with such a hard piece.[/SUB]

Don't worry, it got better!!
IMG_0095_zps94edf89c.jpg
I cut out those tiny details near the center while the filler was still warm. They're not precisely even, but they're close enough.
It just needs some serious sanding and a touch of spot putty... that part of it, at least. I still have more details to carve out.


Here's the back of the helmet:
IMG_0101_zps3ab52c65.jpg
I spent a lot of hand sanding on this lil guy.
I can say that I'm really happy about how it looks... so far.
IMG_0103_zpsb181a8f3.jpg
Here's the top. It needs some spot putty and a little bit of evening–out, but for the most part it's good.

A little work has been done on the side/front, but it needs more attention. Maybe tomorrow.
IMG_0096_zps735ce14f.jpg
IMG_0097_zps48e147fd.jpg

Bondo is an exercise in patience. If you have been watching the tutorials they are going to tell you the most about using it. Patience and thin coats and as smooth as you can put it on. Think icing a cake smooth. You are only using it to smooth and level things out so the less you put on the less you have to sand off to get things smoothed out. You may have to do multiple thin coats but its in some ways a lot less work.

Even though I tried to follow your advice, I think I had to get used to the material too. And the fact that its kind of applied in globs at a time. I definately got the wrong idea when I started anyways, haha.

[SUB]I dunno man, have you had a gigi's cupcake? The icing is like the exact mass of the cupcake.[/SUB]
 

Attachments

  • IMG_0094_zps26ec462b.jpg
    IMG_0094_zps26ec462b.jpg
    136.4 KB · Views: 282
  • ScreenShot2014-08-11at82209PM_zps33caee09.png
    ScreenShot2014-08-11at82209PM_zps33caee09.png
    113.6 KB · Views: 320
Re: Ok cool lets do a build (HD mkvi Tucker)

Looks great so far!! Ill be keeping an eye on this build.
 
Re: Ok cool lets do a build (HD mkvi Tucker)

Very nice work so far. I wish I had as much time as you to work on my project. Glad you are getting the sizing down.... it took me three tries.... Are you planning on doing a special color scheme or are you going with classic master chief scheme?
 
Re: Ok cool lets do a build (HD mkvi Tucker)

Looks great so far!! Ill be keeping an eye on this build.

Ooh Thankyou

Very nice work so far. I wish I had as much time as you to work on my project. Glad you are getting the sizing down.... it took me three tries.... Are you planning on doing a special color scheme or are you going with classic master chief scheme?

Thanks! I hope you get time soon!
Tucker.
tumblr_n40rbqNpfd1rxb7mmo2_500.gif


Update part:
IMG_0108_zps05653912.jpg
Low on bondo.
IMG_0107_zps01479a2d.jpg
worked on shoe fronts
IMG_0109_zpsee237050.jpg
What the heck is this stuff? Can i use it? I'm gonna try.
(It says it works on cars, and fiberglass so)
 
Re: Ok cool lets do a build (HD mkvi Tucker)

*Throws Accuracy out of the window*
IMG_0108-2_zps33916b87.jpg

IMG_0109-2_zps369cb034.jpg
IMG_0110_zpsb0a2c96d.jpg
IMG_0111_zpsab49c21a.jpg
[SUB]I kind of wish I would've made it more accurate (And I still have the opportunity to do so), but I really don't want to and I have no idea why that is.[/SUB]

IMG_0112_zpsb60fc5cb.jpg

Back of shoes. The one on the left has been sanded, the other hasn't.
IMG_0113_zps73d7f634.jpg
(After I sanded the one on the right)

IMG_0114_zpsdd3a0a48.jpg

Started on codpiece and worked on the thigh pieces a little more. These all need to be sanded.

IMG_0115_zpsa60b6673.jpg
I need to get new sandpaper and order some spot putty. I couldn't find any putty locally at all, so Amazon to the rescue.
I don't even know what grit sandpaper this is to be honest.
[SUB]It's going to be fun finding these.[/SUB]

Oh, and here's a really gross looking sketch of what I plan to do about an under suit.
amorplanning_zps6f65082b.png
Most of it is unintelligible.
[SUB]Why did I use that weird looking yellow green color nobody knows[/SUB]
 

Attachments

  • IMG_0108-2_zps33916b87.jpg
    IMG_0108-2_zps33916b87.jpg
    99.6 KB · Views: 297
  • IMG_0112_zpsb60fc5cb.jpg
    IMG_0112_zpsb60fc5cb.jpg
    132.4 KB · Views: 257
  • IMG_0114_zpsdd3a0a48.jpg
    IMG_0114_zpsdd3a0a48.jpg
    119 KB · Views: 228
Re: Ok cool lets do a build (HD mkvi Tucker)

The scratch remover is for clearcoat. That is only after you painted it and gave it a lacquer. (clearcoat)
If there are any scratches in this you would need to use this.
 
Last edited by a moderator:
Re: Ok cool lets do a build (HD mkvi Tucker)

Looking good so far, Very good start honestly keep going strong.
 
Re: Ok cool lets do a build (HD mkvi Tucker)

The scratch remover is for clearcoat. That is only after you painted it and gave it a lacquer. (clearcoat)
If there are any scratches in this you would need to use this.

I figured that out haha, it's definitely not a substitute for spot putty, which I still have yet to order.

Looking good so far, Very good start honestly keep going strong.

Thankee Thank Thank

Good luck! I just started my build too!

Thank you! Good luck to you too!


----
I dunno, college just started, so this project is going to slow it's pace a little more, sadly.
But I did a little bit more recent work that I can show, too :O
IMG_0116_zps31901b74.jpg

I worked on these side thingie things
IMG_0117_zps8d4c64b2.jpg
IMG_0118_zpscc6a3195.jpg
IMG_0119_zps030a3400.jpg

I also sanded down all those other pieces that I added filler to in the last post (The front and back of the belt/codpiece and the thigh pieces).

IMG_0117_zps8d4c64b2.jpg


IMG_0118_zpscc6a3195.jpg


IMG_0119_zps030a3400.jpg


IMG_0116_zps31901b74.jpg
 
Last edited by a moderator:
Re: Ok cool lets do a build (HD mkvi Tucker)

Surprise guys this build isn't dead! I'm just in school right now, so the pace is slowed.

IMG_0121.JPG
I actually have gotten around to sanding this piece, so it's almost done.
IMG_0120.JPG
Hah this chest piece will be the death of me.
IMG_0132.JPG
After doing like 2 layers of this stuff I love this helmet so much. After I sanded it it felt so smooth! I didn't know the spot putty would do that. :D
I decided last minute that I'm going to put in LEDs before I paint it, but I don't have a glue gun at the moment so that might be awhile. I can work on the other pieces though, since this one is at a stand–still.

looking good!!! keep it up the great work
Thankyouthankyouthankyouuu
 
Status
Not open for further replies.
Back
Top