Hey yall just wanted to post my DOT approved motorcycle helmet build based off the low res MkVI pep helmet. It took me a total of 6 months to complete despite being my 5th helmet i still learned alot from this project. The whole idea was to be safe on the road but look like a bad ass lol. Plus it matches the My motorcycle build found here: http://www.405th.com/showthread.php/41628-HELLJUMPER-S-Masterchief-Motorcycle-Build-(pic-heavy)
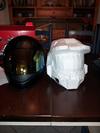
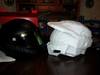
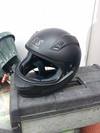
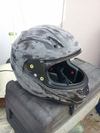
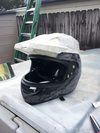
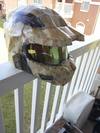
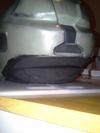
I started out with this speed and strength helmet at a cost of $80. As i purchased the helmet i had brought in my pep helmet to aid in the purchase and to get all the guys in the bike shop excited. (they were)


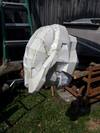
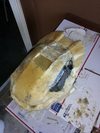
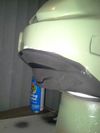
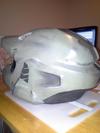
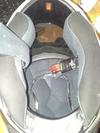
I disassembled the new helmet and removed all the inner padding and epdm foam. and began sanding the out side to rough up the surface to allow a good hold for the fiberglass resin that i was expecting on using.


After that i began applying the resin first coat to my pep helmet.


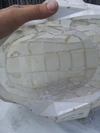
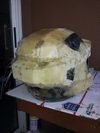
Once my pep helmet had been resined, i cut it into sections expecting to "graft" it onto the helmet using fiberglass cloth and resin.


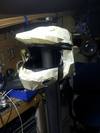
I then used a can of spray foam (the least expanding) and foamed in all the air pockets and space created between the dot helmet and the fiberglassed pep pieces.


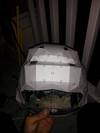
Once the foam was dry and completly done expanding, I trimmed the excess and began overlapping fiberglass cloth over and around the areas i had cut and where it needed to be strongly attached to the helmet.


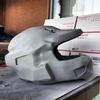
Then some bondo as i went along spraying primer to see the imperfections.


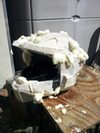
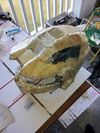
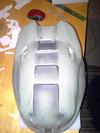
NOW AS YOU ALL MIGHT HAVE NOTICED....THERE WERE NOTICED BY MYSELF SEVERAL ISSUES....IT WAS HUGE! IT WAS UNPROPORTIONATE! IT WAS TO BE HONEST......RUSHED.....RIP IT OFF! LETS MAKE IT BETTER.....AND BADDER...
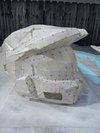
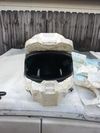
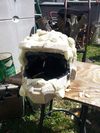
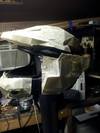
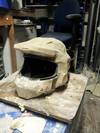
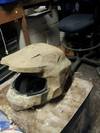
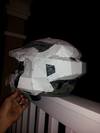
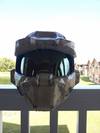
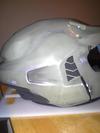
I decided to build a new pep helmet.....into the dot helmet. taking into consideration the helmet is ALREADY round. Notice i said INTO the helmet instead of ONTO the helmet.....that was my first mistake.


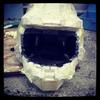
Now its time to glass this beautiful much more eye appealing helmet.


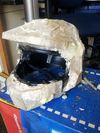
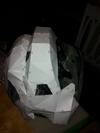
Bondo process. Smoothing out edges and fixing voids. Missing some photos.

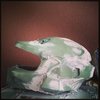
At the last few weeks i realized that i wanted more detail and begain making some pretty deep cuts into the helmet and making some modifications. as you can see the "ear slot" in the side was cut out longer. And there isnt a picture but i cut into the back of the helmet a long step down which you will see in later pics.

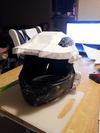
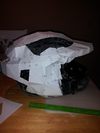
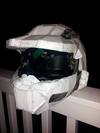
Paint and some detail foam.


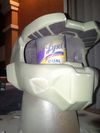
Some test fitting.

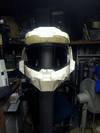
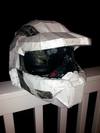
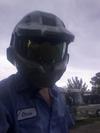
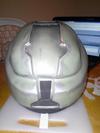
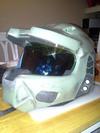
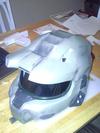
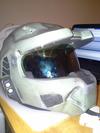
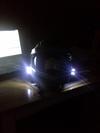
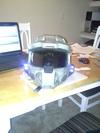
AND THE ALMOST FINISHED PRODUCT.


I started out with this speed and strength helmet at a cost of $80. As i purchased the helmet i had brought in my pep helmet to aid in the purchase and to get all the guys in the bike shop excited. (they were)


I disassembled the new helmet and removed all the inner padding and epdm foam. and began sanding the out side to rough up the surface to allow a good hold for the fiberglass resin that i was expecting on using.


After that i began applying the resin first coat to my pep helmet.


Once my pep helmet had been resined, i cut it into sections expecting to "graft" it onto the helmet using fiberglass cloth and resin.


I then used a can of spray foam (the least expanding) and foamed in all the air pockets and space created between the dot helmet and the fiberglassed pep pieces.


Once the foam was dry and completly done expanding, I trimmed the excess and began overlapping fiberglass cloth over and around the areas i had cut and where it needed to be strongly attached to the helmet.


Then some bondo as i went along spraying primer to see the imperfections.


NOW AS YOU ALL MIGHT HAVE NOTICED....THERE WERE NOTICED BY MYSELF SEVERAL ISSUES....IT WAS HUGE! IT WAS UNPROPORTIONATE! IT WAS TO BE HONEST......RUSHED.....RIP IT OFF! LETS MAKE IT BETTER.....AND BADDER...
I decided to build a new pep helmet.....into the dot helmet. taking into consideration the helmet is ALREADY round. Notice i said INTO the helmet instead of ONTO the helmet.....that was my first mistake.


Now its time to glass this beautiful much more eye appealing helmet.


Bondo process. Smoothing out edges and fixing voids. Missing some photos.

At the last few weeks i realized that i wanted more detail and begain making some pretty deep cuts into the helmet and making some modifications. as you can see the "ear slot" in the side was cut out longer. And there isnt a picture but i cut into the back of the helmet a long step down which you will see in later pics.

Paint and some detail foam.


Some test fitting.

AND THE ALMOST FINISHED PRODUCT.


Attachments
-
 1016806_10202728251741726_1272688052_n.jpg66.7 KB · Views: 267
 -
 1606834_10202728252501745_193758929_n.jpg46.7 KB · Views: 277
 -
 1932486_10202728257221863_737929731_n.jpg142.7 KB · Views: 264
 -
 1743729_10202728254141786_1113374743_n.jpg67.7 KB · Views: 286
 -
 1558448_10202728254581797_1954164308_n.jpg95.1 KB · Views: 295
 -
 1904103_10202728255341816_2026034976_n.jpg91 KB · Views: 266
 -
 539229_10202728259541921_1219163341_n.jpg107.6 KB · Views: 253
 -
 1533732_10202728258981907_996937771_n.jpg140.4 KB · Views: 262
 -
 1510560_10202729251006707_273489340_n.jpg59 KB · Views: 256
 -
 527129_10202728255901830_654657426_n.jpg72.9 KB · Views: 256
 -
 1978798_10202728260381942_58211213_n.jpg113.2 KB · Views: 263
 -
 1978854_10202732045156559_1207121179_n.jpg113.9 KB · Views: 245
 -
 1964834_10202732044516543_608746079_n.jpg153.4 KB · Views: 257
 -
 1549219_10202729251286714_223569284_n.jpg56.8 KB · Views: 262
 -
 1959453_10202729250806702_366678862_n.jpg66.3 KB · Views: 260
 -
 1016830_10202745813300754_1639186295_n.jpg140.9 KB · Views: 246
 -
 1512290_10202732045756574_188569922_n.jpg119 KB · Views: 250
 -
 10150637_10202745814580786_2120993631_n.jpg81.4 KB · Views: 240
 -
 1958047_10202732046556594_1016355015_n.jpg179.3 KB · Views: 251
 -
 10153689_10202851875112233_3375851515293742467_n.jpg73.8 KB · Views: 194
 -
 1506452_10202851875272237_5296411580609064429_n.jpg81.5 KB · Views: 265
 -
 1375831_10202745815820817_732817169_n.jpg66.4 KB · Views: 263
 -
 10171063_10202851876712273_8981503659105834560_n.jpg44.7 KB · Views: 181
 -
 10254023_10202851875552244_1498509352232883632_n.jpg46.3 KB · Views: 186
 -
 10168189_10202851875992255_1415126273621300132_n.jpg49.4 KB · Views: 199
 -
 10174784_10202851875752249_6055619395412376276_n.jpg51.5 KB · Views: 209
 -
 10154066_10202867641706388_7288990709020810462_n.jpg95.7 KB · Views: 216
 -
 10154108_10202867641226376_3372361794484824237_n.jpg132.4 KB · Views: 222
 -
 10171649_10202867641066372_2561507790922259456_n.jpg109.1 KB · Views: 197
 -
 10001312_10202851876872277_2157725692889352762_n.jpg44.6 KB · Views: 203
 -
 1972268_10202867641426381_8075536787462529743_n.jpg128.9 KB · Views: 253
 -
 1901733_10202867642786415_902767044851365232_n.jpg91.2 KB · Views: 258
 -
 10157163_10202867642466407_3405849009772542227_n.jpg51.6 KB · Views: 203
 -
 1604483_10202954370314549_3173321782179596738_n.jpg186.3 KB · Views: 263
 -
 attachment-24.jpe51.1 KB · Views: 258
 -
 attachment-21.jpe41.3 KB · Views: 283
 -
 attachment-12.jpe67.5 KB · Views: 250
 -
 attachment-9.jpe141.9 KB · Views: 288
 -
 20140713_224023.jpg60.5 KB · Views: 243
 -
 20140713_224013.jpg57 KB · Views: 243
 -
 20140713_224216.jpg118.9 KB · Views: 238
 -
 20140713_223955.jpg77.8 KB · Views: 248
 -
 20140713_224004.jpg75.8 KB · Views: 259
 -
 20140713_224031.jpg68.7 KB · Views: 248
 -
 20140713_224041.jpg58.2 KB · Views: 238
 -
 20140713_224050.jpg79.5 KB · Views: 257
 -
 20140713_224103.jpg74.1 KB · Views: 230
 -
 20140713_224141.jpg41.4 KB · Views: 230
 -
 20140713_224120.jpg77.5 KB · Views: 206
")


