HELP!!

Status
Not open for further replies.

jakeman20088

New Member
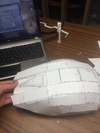
So this is my first build and before I get to into it I would like to hear some tips and instructions from someone. I'm just trying to build a master chief helmet, I think I got the scaling right but I'll find out when it's finished. Any one who has advice please feel free to comment and help out.


Sent from my iPhone using Tapatalk
 
Best of luck on the build =) Check the stickies at the top of the New Recruits page. There are lots of people who have posted very helpful videos that will cover anything and everything you want to do.
 
this is a quick video i made for scoring, folding and using superglue. it may help you out. sorry my baby is crying in the background.

 
Last edited by a moderator:
Couple of big questions that would help us in pointing you in the right direction beyond just looking at the stickies up top, and use the search bar are...
1. What material do you wish to use? Foam, pep, full modeling?
2. Have you ever done any craft work at all? If so, what types? Sewing, making modles as a kid, carpentry, welding, ect.
3. Look around at various builds. Which styles just make you all tingely, and make you want to try to make?
 
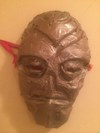
Thanks guys, that scoring video really did help, it's going to be a lot easier now that I saw that. I'm using pepakura, I know how to use paper mâché if that's anything like putting fiberglass on. I want to finish making the helmet with the paper and then fiberglass it to harden it and sand it down and paint it. I really like the styrofoam weapons, foam armor, and the pepakura armor, I really like the way they turn out on the end. My first "build" was last halloween, I made a dragon priest mask from skyrim. I got the clay and a normal white farce mask and molded the clay onto the white mask to give it a base, and I just formed the mask, mistakenly getting clay that shrinks as it dries I has to paper mâché it at the last second to be finished in time, it's was better than I expected at the time but looking at or now, I don't like it anymore
ebeqe8eq.jpg


Sent from my iPhone using Tapatalk
 

Attachments

  • ebeqe8eq.jpg
    ebeqe8eq.jpg
    127.5 KB · Views: 78
Jake, while this information has been mentioned SO MANY times before, I am in a really good mood, so I will go over just a few basics to help guide you along.

The Pepakura phase is THE MOST IMPORTANT! It is your foundation, the building block for the rest of the project. In order for it to come out correctly, it must be as close to perfect as you can get it. Pay particular attention to symmetry.

Leave the pepped visor in until later! It is a huge support, and removing it before the sealing/hardening phase will generally end in catastrophic failure.

Add supports on the interior where ever you feel they may be needed. This will help keep everything in alignment.

When you resin the outside, do it in quarters. Looking down from the top of the helmet, "draw" a "+" and divide the top into four pieces. You can either draw it, or keep a mental image; your choice. As you will see later, I will mention this again, but heed its importance! STICK TO THE QUARTERS. Do not try and go past that area, even if you have mixed resin left over. Just keep in mind that next time, mix less. When you do the quarters, start with one, then do the opposite. Let cure. Then go back and do the other two. If you feel the need to do just one at a time, that is okay too :)

Multiple thin coats are better than one thick coating. The purpose of the resin is to not only give you a hard and sturdier shell to work with, but also to permeate the cardstock. It is not used to build up layers.

Fiberglass should only be used on the inside of the helmet, and only where you feel it would need extra fortification. This is generally done around the opening only. The rest, I strongly advise using Rondo (a Resin and Bondo mix). The proportions you use is up to you, but I prefer a 50-50 mix of the two. You will then "slush cast" the inside of the helmet with this mixture. Using a paintbrush to aid this phase, pour the mixture into the helmet (don't forget the hardener to activate it... sounds silly that I would have to state that, but I figure I would cover that base to be safe!) and rotate the mixture to evenly coat the inside. Do not leave the helmet unattended until the Rondo has started setting (I have seen this done all too often, resulting in a thick pool of Rondo in the bottom of the helmet). Also, don't go too thick. This stage will create a lot of heat, and it is better to go thinner (less heat created) than to warp what you have with a thick layer. It is not uncommon to go over this phase twice as you will most likely notice thin areas if you hold it up to light. Once you have marked these thin areas, mix a small portion of Rondo again and use your brush to focus on those areas. Also, Rondo first, fiberglass after. If you choose to use the fiberglass (I recommend woven, not mat), be sure to Rondo first, as this will help smooth out sharp corners and deep indentations, allowing better adhesion for the fiberglass.

Okay, next, it is now safe to remove the visor if desired. Now is a good time because it will allow you greater access to certain parts of your build. I use a cut-off wheel with my Dremel at this phase, paying particular attention to stay either right on the line, or play it safe and cut more on the visor side. Use a needle file to clean up your cuts and to make everything nice and crisp.

Next will be details. This is done by adding Bondo in thin layers. To avoid mistakes done by so many previously, and as stated before, mark off a small section you want to work on (generally a 2"X2" area is perfect) and stay within that area no matter what. Do not do both sides at the same time. Doing only one side at a time will allow you to retain visual on the detail lines of the other side. This will aid in making sure that the detail is true to the design. Once one side is finished, then you can go to the other side and simply comparatively build up that side to match the completed one. If you have Bondo left over, scrap it. Learn from that mistake, and mix less next time. Doing this makes the lesson painful, thus, it sticks in your mind better. Also, if the Bondo mixture starts getting rubbery...STOP. Trying to work it past this point is futile and will result in having to do more sanding. Mix less Bondo :)

Great tools to have for this stage is: Mouse sander to knock down larger areas, 220 grit hand sandpaper, needle files, dremel, and either craft foam or balsa wood to create crisp and sharp detail pieces.

Don't forget to check out Cereal Kill3r's video tutorials on YouTube, as seeing it first hand (well, in a video at least) is far superior to simply reading about it.

I hope you have found this info helpful, and if you have any other questions, feel free to ask :) Just try to be as descriptive with your question as possible, and including pictures really helps too :p

There is little that i can add to what EVAkura has already posted. he covered many good tips that I am going to keep in mind as well. Evakura, thank you for your time that you took to post this.

Jakeman, the only thing I can really add is to have patience. You will need lots of patience with making your armor come out to the best of your ability. Do not be afraid to fail. You will learn more from failing then making it "perfect" the first time. You will learn there is no such thing as perfect, only "Good enough for now." Honestly you will likely come to hate how a piece looks, but like your mask, you have to say this is good enough for now. People will give you accolades for how wonderful something is, but as an artist, you will know every flaw. Be the flaws real, or only what you perceive. I know that each step, each piece is a learning tool. They are one more step in expanding your skills, knowledge, and confidence.

DO NOT GET DISCOURAGED. Every member here has failed, more often in making things then they have succeeded. Each and every one of us can look back on previous work and say this needs fixed, that could have been better, why didn't I do it that way instead.

I have also noticed through much snooping and looking around that each of us has their own tricks, methods, and ways of doing things. Find what works best for ~you~.
 
y5e7a5yv.jpg
ezy7e6ym.jpg
ne8evaju.jpg
ygepe3a7.jpg
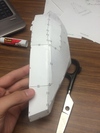
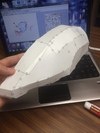
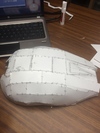
It's coming along pretty well, thanks for all the help guys.


Jake Stephan
 

Attachments

  • y5e7a5yv.jpg
    y5e7a5yv.jpg
    201 KB · Views: 78
  • ezy7e6ym.jpg
    ezy7e6ym.jpg
    219.8 KB · Views: 82
  • ygepe3a7.jpg
    ygepe3a7.jpg
    234.3 KB · Views: 88
  • ne8evaju.jpg
    ne8evaju.jpg
    195.1 KB · Views: 74
Status
Not open for further replies.
Back
Top