You are using an out of date browser. It may not display this or other websites correctly.
You should upgrade or use an alternative browser.
You should upgrade or use an alternative browser.
KevZone's Forward Unto Dawn (FUD) pepakura build
- Thread starter KevZone
- Start date
- Status
- Not open for further replies.
King of Gondor12
Member
Can't wait to see this completed!
Thanks!Sounds good cant wait to see some progress
Thanks!Can't wait to see this completed!
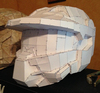
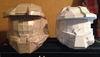
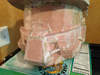
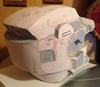
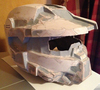
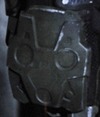
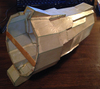
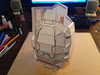
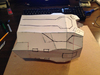
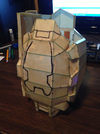
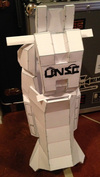
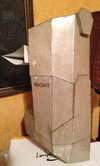
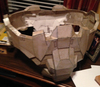
Here are some shots of the helmet that I took back in April 2014. I've since Rhondo'd the inside:
In this shot below you can see the comparison between the size of my FUD helment (on the right) and my Halo 3 Mk VI. I had the Mk VI scaled WAY TOO BIG and made some corrections with the FUD helmet.
AND, I know the visor is warped but I was able to fix that during the Rhondo stage with a lot of TLC while the Rhondo was setting up. On the next series of photos (once I get them posted) you'll be able to see that is better now!
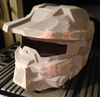
08/01/2014 Update
Got started with the Bondo and sanding last night. Here are some quick photos, not much to see yet....
08/04/2014 Update
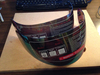
These are the visors I'll be using. You can't see it in the photo but they have the gold tinting on them and I plan to use them to create the dual layered effect.
08/27/2014 UPDATE:
More sanding on the helmet. Getting it ready to start adding Bondo to start the final stages of the shaping process, then comes more sanding...
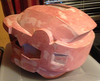
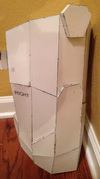
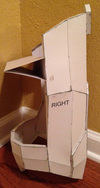
08/30/2014 UPDATE:
Bondo and shaping plus more sanding on the helmet...
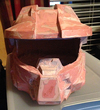
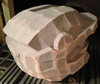
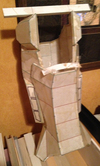
09/15/2014 UPDATE:
Been a while since my last update but I've been working on the helmet since I posted last. Here is a shot of the shaping and sanding work to date on the helmet...
Attachments
-
 20140427_helmet_01b.jpg191 KB · Views: 302
 -
 20140427_helmet_02b.jpg158.4 KB · Views: 341
 -
 20140427_helmet_03.jpg353.8 KB · Views: 331
 -
 20140801_helmet_01.jpg180.8 KB · Views: 328
 -
 20140801_helmet_02.jpg179.4 KB · Views: 326
 -
 20140804_c.jpg166.5 KB · Views: 364
 -
 20140827_5_helmet_2.jpg139.6 KB · Views: 332
 -
 20140915_helmet_2.jpg148.4 KB · Views: 294
 -
 20140830_2_helmet.jpg120.4 KB · Views: 327
 -
 20140830_1_helmet.jpg132.6 KB · Views: 298
 -
 20140827_6_helmet_1.jpg132.5 KB · Views: 333
 -
 20140915_helmet_1.jpg124.6 KB · Views: 337
 -
 20140915_helmet_3.jpg137.5 KB · Views: 327
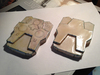
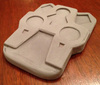
These are the handplates I built for the Mk VI, I may re-use them for the FUD suit until I get the new ones done.

The FUD plates are very similar...

07-20-2017 Update
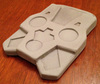
I went ahead an pepped out the FUD handplates today...

The pencil sketching is where I'll plan to use the dremel to add the missing details.
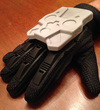
These are the paintball gloves I got online from Ultimate Paintball. They were pretty cheap and should do great for the FUD gloves. I'll paint the armor on the fingers to match my armor and won't have to build the finger armor from the pep files...they look way too tedious to bother with. They had a white logo on the wrist strap so I just hit that with a black Sharpie.

08/01/2014 Update:
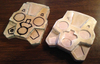
Got the plates resined:

08/07/2014 Update:
Got the plates Rhondoed. I'll use the Dremel router bit to remove material and lighten them up and cut in the details:

08/11/2014 Update:
Got the details on one of the plates cut in and the plate sanded and ready for primer:

08/20/2014 Update:
I shot a light coat of primer on the handplate that I've cut the details into:


Here is what it looks like on my glove:

The FUD plates are very similar...
07-20-2017 Update
I went ahead an pepped out the FUD handplates today...
The pencil sketching is where I'll plan to use the dremel to add the missing details.
These are the paintball gloves I got online from Ultimate Paintball. They were pretty cheap and should do great for the FUD gloves. I'll paint the armor on the fingers to match my armor and won't have to build the finger armor from the pep files...they look way too tedious to bother with. They had a white logo on the wrist strap so I just hit that with a black Sharpie.
08/01/2014 Update:
Got the plates resined:
08/07/2014 Update:
Got the plates Rhondoed. I'll use the Dremel router bit to remove material and lighten them up and cut in the details:
08/11/2014 Update:
Got the details on one of the plates cut in and the plate sanded and ready for primer:
08/20/2014 Update:
I shot a light coat of primer on the handplate that I've cut the details into:
Here is what it looks like on my glove:
Attachments
-
 plates.jpg146.1 KB · Views: 293
 -
 gloves.jpg173.4 KB · Views: 321
 -
 fud_plates_02.jpg157.9 KB · Views: 369
 -
 hand_plate_002b.gif87.3 KB · Views: 389
 -
 20140801_plates.jpg143.3 KB · Views: 335
 -
 20140812_plates1.jpg156.1 KB · Views: 313
 -
 20140807_plates.jpg70.4 KB · Views: 326
 -
 20140820_plates2b.jpg36 KB · Views: 341
 -
 20140820_plates1b.jpg37 KB · Views: 332
 -
 20140820_plates3b.jpg65.7 KB · Views: 340
BICEPS / SHOULDERS
07/22/2014
Got one of the shoulders pepped last night...I added extra card (cereal box) to the inside and outside of the large flat area to give it a little more stiffness.

08/01/2014 Update:
Got the one shoulder that I had already pepped out resined. The resin soaked into the cereal box so it really stiffened up the piece.

This shot shows the tongue depressor I added to the underside for support:

08/02/2014 Update:
Got the other shoulder pepped. I used more popsicle sticks to brace up the back to keep the card stock nice and straight when I resin the part.

The one on the left is the first one that has already been resined. The one on the right is the new one I just pepped

Here is a view of the extra popsicle bracing I used on this one to keep the card stock edges nice and clean when I resin this one.

08/03/2014 Update:
Got a bicep pepped out but unfortunately it is too big...DOH! Gotta rescale and try again.
08/04/2014 Update:
Ok, got the scaling issue resolved and am now happier with the pepped out bicep...


08/07/2014 Update:
Got the bicep resined, now gotta get cracking on the other one...

Also got one shoulder Rhondoed:

08/27/2014 UPDATE:
Got the one bicep that I've pepped out Rhondo'd...

07/22/2014
Got one of the shoulders pepped last night...I added extra card (cereal box) to the inside and outside of the large flat area to give it a little more stiffness.
08/01/2014 Update:
Got the one shoulder that I had already pepped out resined. The resin soaked into the cereal box so it really stiffened up the piece.
This shot shows the tongue depressor I added to the underside for support:
08/02/2014 Update:
Got the other shoulder pepped. I used more popsicle sticks to brace up the back to keep the card stock nice and straight when I resin the part.
The one on the left is the first one that has already been resined. The one on the right is the new one I just pepped
Here is a view of the extra popsicle bracing I used on this one to keep the card stock edges nice and clean when I resin this one.
08/03/2014 Update:
Got a bicep pepped out but unfortunately it is too big...DOH! Gotta rescale and try again.
08/04/2014 Update:
Ok, got the scaling issue resolved and am now happier with the pepped out bicep...
08/07/2014 Update:
Got the bicep resined, now gotta get cracking on the other one...
Also got one shoulder Rhondoed:
08/27/2014 UPDATE:
Got the one bicep that I've pepped out Rhondo'd...
Attachments
-
 fud_shoulder_1.jpg115.7 KB · Views: 334
 -
 20140801_shoulder_2.jpg143.5 KB · Views: 313
 -
 20140801_shoulder1.jpg160.5 KB · Views: 332
 -
 20140802_shoulder1.jpg111.1 KB · Views: 335
 -
 20140802_shoulder2.jpg98.3 KB · Views: 332
 -
 20140804_bicep_1.jpg156.7 KB · Views: 307
 -
 20140804_bicep_2.jpg148.9 KB · Views: 314
 -
 20140802_shoulder3.jpg118.8 KB · Views: 340
 -
 20140807_shoulder.jpg112.3 KB · Views: 329
 -
 20140807_bicep.jpg125.7 KB · Views: 338
 -
 20140804_bicep_3.jpg151 KB · Views: 332
 -
 20140827_1_bicep.jpg152 KB · Views: 337
Space reserved - SHINS / KNEES
08/20/2014 UPDATE:
Got one of the shins pepped out.


08/27/2014 UPDATE:
Got the shin that I've pepped out resined...

08/20/2014 UPDATE:
Got one of the shins pepped out.
08/27/2014 UPDATE:
Got the shin that I've pepped out resined...
Attachments
Space reserved - THIGHS
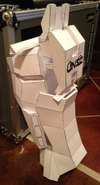
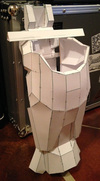
08/20/2014 UPDATE:
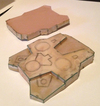
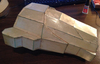
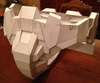
Got the right thigh pepped out. This file doesn't have all the detail of the actual armor so it will require quite a bit of fabrication and modification to get it to look exactly like the FUD thigh from the film. It also doesn't include the "louvered" inner thigh detail so I plan to fabricate that from EVA foam.


08/27/2014 UPDATE:
Got the thigh that I've pepped out resined...

08/20/2014 UPDATE:
Got the right thigh pepped out. This file doesn't have all the detail of the actual armor so it will require quite a bit of fabrication and modification to get it to look exactly like the FUD thigh from the film. It also doesn't include the "louvered" inner thigh detail so I plan to fabricate that from EVA foam.
08/27/2014 UPDATE:
Got the thigh that I've pepped out resined...
Attachments
Space reserved - COD / BELT
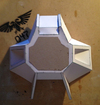
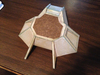
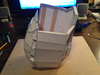
08/20/2014 UPDATE:
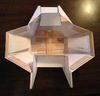
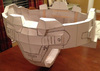
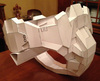
Completed pepping the cod/belt/butt. I plan to hack and cut this thing up a lot in order to fabricate the belt system that will hold it on and also support the garter style straps that will support the thigh armor. My design will allow me to unsnap the butt plate so I can sit down without undoing all the supports for the cod, sides and thighs. My Stormtrooper armor doesn't allow me to sit down, so I'm really looking forward to a costume where I can sit and take a break.


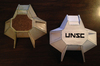
08/27/2014 UPDATE:
Got most of the cod parts resined but ran out of resin so I'll have to finish up later...

08/20/2014 UPDATE:
Completed pepping the cod/belt/butt. I plan to hack and cut this thing up a lot in order to fabricate the belt system that will hold it on and also support the garter style straps that will support the thigh armor. My design will allow me to unsnap the butt plate so I can sit down without undoing all the supports for the cod, sides and thighs. My Stormtrooper armor doesn't allow me to sit down, so I'm really looking forward to a costume where I can sit and take a break.
08/27/2014 UPDATE:
Got most of the cod parts resined but ran out of resin so I'll have to finish up later...
Attachments
Looking good! I should reserve space on my posts for updates! Your resining looks very clean!
MISCELLANEOUS SOFT PARTS
08/04/2014 Update:
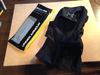
I'm going to use the same Under Armor long sleeved compression top and long legged compression bottoms for my undersuit that I use for my Stormtrooper costume.
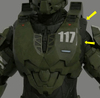
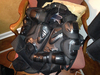
I also purchased a motocross jacket to add some extra details underneath. I'll probably end up modifying the motocross jacket quite a bit since I've swapped over the the Forward Unto Dawn armor. I originally bought the motocross armored jacket to go under my Mk VI Halo 3 armor.

My thoughts are to use foam for the padding that is visible on the arm openings of the torso (see the area indicated by the yellow arrows)...

I also purchased an Under Armor balaclava to go on my head and neck under the helmet so my skin isn't visible.

08/27/2014 UPDATE:
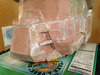
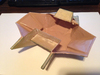
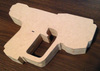
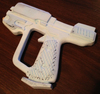
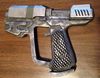
Just to take a break from the armor I decided to try my hand at cuting out a foam weapon. I was pretty pleased with the results but I've started a wooden version from MDF that will be a lot more durable and game accurate (photos of the wood version to come later). Here is a shot of the unpainted foam version...

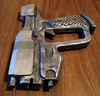
08/28/2014 UPDATE:
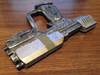
Here is a photo of the wooden blank made from MDF that I'll be using to create my Magnum from. It will be a lot more durable and game accurate than the foam version above. Here is a shot of the uncarved blank...

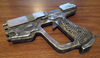
09/02/2014 UPDATE:
Got the foam pistol painted...


08/04/2014 Update:
I'm going to use the same Under Armor long sleeved compression top and long legged compression bottoms for my undersuit that I use for my Stormtrooper costume.
I also purchased a motocross jacket to add some extra details underneath. I'll probably end up modifying the motocross jacket quite a bit since I've swapped over the the Forward Unto Dawn armor. I originally bought the motocross armored jacket to go under my Mk VI Halo 3 armor.
My thoughts are to use foam for the padding that is visible on the arm openings of the torso (see the area indicated by the yellow arrows)...
I also purchased an Under Armor balaclava to go on my head and neck under the helmet so my skin isn't visible.
08/27/2014 UPDATE:
Just to take a break from the armor I decided to try my hand at cuting out a foam weapon. I was pretty pleased with the results but I've started a wooden version from MDF that will be a lot more durable and game accurate (photos of the wood version to come later). Here is a shot of the unpainted foam version...
08/28/2014 UPDATE:
Here is a photo of the wooden blank made from MDF that I'll be using to create my Magnum from. It will be a lot more durable and game accurate than the foam version above. Here is a shot of the uncarved blank...
09/02/2014 UPDATE:
Got the foam pistol painted...
Attachments
-
 torso_019.jpg84.8 KB · Views: 302
 -
 20140804_b.jpg186.9 KB · Views: 287
 -
 wooden_gun.jpg45.7 KB · Views: 257
 -
 20140804_a.jpg154.4 KB · Views: 306
 -
 20140827_7_pistol_2.jpg131.6 KB · Views: 292
 -
 20140902_1_pistol.jpg143.5 KB · Views: 276
 -
 20140902_4_pistol.jpg140.6 KB · Views: 255
 -
 20140902_3_pistol.jpg156.6 KB · Views: 299
 -
 20140902_2_pistol.jpg162.3 KB · Views: 278
Thanks! Funny thing is I think I'm gonna actually try to finish the Mk VI that I started after I get the FUD suit done! (I must be crazy!) I've already started working on the FUD handplates so I should have them to wear with the FUD suit. I've posted some photos in the section above on this thread.I think the handplates you made will be fine for this project
Helmet is looking pretty nice! good luck on the rest of the build")
Kev, don't forget that the FUD suit is the HALO legends suit as well, might be usefull to grab some shots from the animated video for reference

- Status
- Not open for further replies.