HaloGoddess - Hayabusa FOAM Build

Status
Not open for further replies.

HaloGoddess

Well-Known Member
Hey guys! For those of you that have been around awhile know that I originally started my Hayabusa build nearly 5 years ago. This is now my THIRD attempt, and this time, I intend on finishing it! ;)

I wasn't going to post this for awhile since it's going to be A VERY SLOW BUILD. With my 1 year old son keeping me busy and the fact that I work 7 days a week, I get only a small amount of time each day to work on this.

Anyway, since I may still run into small problems, I figured that posting here might be good so that I could get some advice and feedback. Those of you that are friends with me on Facebook may have already got a chance to see what I got so far. :p

I have been trying to take pictures along the way. ALL the stuff I had done during my 2nd attempt (also out of foam) is gone. The stuff from my 1st attempt is LONG gone. XD lol That one was being constructed with pepakura, resin, fiberglass, blah, blah, blah. :p


I will TRY to keep track of updates here AND post what page you can find it on to make looking and searching easier. :p

UPDATES:

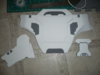
So, let's start off with some pictures! :D

Okay, how do I delete the NON armor pic? :\

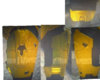
This is what I am going for in the end:

halo3_Hayabusa.jpg
 

Attachments

  • P1070567.JPG
    P1070567.JPG
    3 MB · Views: 354
  • mkvi_thigh_flipped.jpg
    mkvi_thigh_flipped.jpg
    618.7 KB · Views: 484
The picture that shows the backside of the piece with the gap, I actually used my soldering iron for that. XD haha I know they say that the fumes from the melting foam is bad, but the smell wasn't that bad and it worked! :p

I studied LOTS of reference pictures to get all my detail. My FIRST attempt with the foam, I was using black craft foam instead of white, but due to the color that it will be painted, I think the white will help the color MUCH better. :)

View attachment 1973View attachment 1970View attachment 1971View attachment 1972P1070571.JPG
 
As much as I want to make sure that my suit is as accurate as I can make it, I decided to semi scratch build the pouches on the side. Using the original template that I printed out, I sort of used it for a size reference, but then I referred back to the ingame images to create the pouches. :p

I wanted to make them so I could actually put something in them, but I don't have what I need and I can always go back and make changes later. :)

The first attempt on making the lid was a sort of prototype. It was just to get an idea of what it would look like once in place. I ended up not even liking it because it seemed too short. I eventually played around with my template enough until I settled on a look that I liked. :)

View attachment 1981View attachment 1982


View attachment 1976View attachment 1977View attachment 1978View attachment 1979View attachment 1980

How come my pictures are not showing up and are only listed as "attachment(random number here)"?

This is my first time posting with the site change and I seem to be having issues uploading images. :\
 
A few more pictures.......

The one on the left was the old one. Because of the craft foam being wrapped around, it didn't fit properly in place, plus I also decided that I didn't like how it turned out. I ended up making a new one (right) and made it a little thinner so it fit right and that one also turned out better. :)
View attachment 1991

And here it is now set in place. :)
View attachment 1992


Here is a test fit before the build of the belt was finished. If you notice, the pouch on MY right side does not have the lid yet. :p
View attachment 1993

Unlike my build for my Kat costume, I decided to add a buckle this time to the inside of the belt to make it easier to put on and take off.
View attachment 1994

Here is the belt 100% built. There IS still detail I need to add, but because of what I want to do, I will have to wait to add it AFTER it is painted.
View attachment 1995View attachment 1996View attachment 1997View attachment 1998
 
Sorry for the millions of posts, but I am just trying to get all my current progress shots uploaded and seem to be having issues with uploading images. :\ Anyway, here is where I am at with one of my boots so far.

B1.jpgB2.jpgB3.jpgB5.jpgB6.jpgB7.jpgB8.jpgB9.jpgB4.jpg

It seems like it might be too big, but my next plan is to try and get a shin built so that I can see what the boot looks like and HOPE that the size looks proportionate. XD
 
Wow, this is looking great so far!

Keep up the good work. I know you will!

So how much time do you think you have into it so far?
 
Very clean work. I love seeing the Mark 6 suits. The semi scratch build is the way to go, if you want to get all of the details right. Keep up the great work.
 
I think Spartan shoes would be cool in real life. Somebody get on that. Great work!

Sent from my 831C using Tapatalk
 
Can't wait to see this completed! Very crisp and clean! Do you use thin craft foam on the outside to cover the seams?
 
The Shooooooes! Better for kicking butt, my dear! 8D
*grabs popcorn and start watching thread* I'm so happy to see that craft foam has been paired with EVA on a lot of people's builds.
 
Status
Not open for further replies.
Back
Top