North Dakota RvB Agent North Dakota Build

Status
Not open for further replies.

PlayByMyOwnRule

Active Member
Red vs. Blue Agent North Dakota from North Dakota!

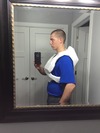
Hello 405th, it's been a while...I've started a few treads and build but quickly gave up on them. However, now that I'm no longer the little boy I was when I first joined the 405th, I now have plenty of experience and maturity to attempt a full suit. I am proud to say that I am one the very few proud North Dakotans on the 405th as well as a huge Red vs. Blue fan so..... what better than Agent North Dakota! He has never been done before so this was perfect.
North_Dakota_zps8400078b.jpg
North_atop_roof_zpsfeabcc9f.png
North_in_danger_zpsea1b136c.png
North_amp_Theta_work_together_zps5927e043.png
Maine_South_and_North_zpsed88403e.png

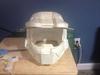
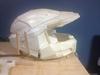
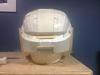
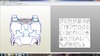
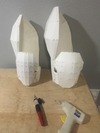
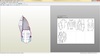
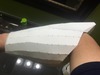
First things first, the helmet. I peped the Mark VI Helmet HD file from the 405th Halo 3 Database

2014-08-23205356_zps52ade267.jpg

2014-08-23205413_zpsbfbb5c59.jpg

As you can see however, I have a little problem with the top right of the sun visor being slightly higher than the left side which gives the helmet that crooked feeling (Any advise on how to fix this would be awesome by the way) but I'm sure I'll figure it out.
2014-08-23205347_zpsb47bc86e.jpg
My next step is to start the resin and fiberglass process of the helmet as well as the start of the chest pep.

Comments and criticisms welcomed, more to come soon.

North_Dakota_zps8400078b.jpg


North_atop_roof_zpsfeabcc9f.png


North_in_danger_zpsea1b136c.png


North_amp_Theta_work_together_zps5927e043.png


Maine_South_and_North_zpsed88403e.png


2014-08-23205356_zps52ade267.jpg


2014-08-23205413_zpsbfbb5c59.jpg


2014-08-23205347_zpsb47bc86e.jpg
 
Last edited by a moderator:
well no 1. my guess would be to look at the piece and where it leads to and to try to move the piece down so that it's level with the other side. I believe there is a way to detach glue but i'm not sure how. apart from that the helmet looks fantastic. and no 2. Good work going for north he and york are my 2 favourite freelancers (tex don't count, she a blue), so glad to see another rvb fan. i am looking forward to your process on the helmet.
 
I would totally by South Dakota except for the fact that I've got the wrong equipment. Great start!
 
Nice start! You should get a small action figure in the colors of Theta and attach him to your shoulder or something :D
 
If the helmet is crooked, I would suggest making the visor out of cardstock and putting it in if the file has one. This will give it the structure and shape that it needs, and all you need to do is cut it out and put in a real visor once you glass the thing. That's what I'm doing with my ODST helmet.

Otherwise, I might suggest making your supports out of something sturdier than cardstock and see if that makes a difference.

Best of luck to you [emoji4]
 
Update #1

Sorry it took so long but school and harvest started right after I started this progress so they required more priority than this. Be that as it may, I've resined the outside of the helmet as well as braced the outside of the helmet with pop sickle sticks which as you can see have helped fix the crooked shape of the helmet.
2014-09-21195049_zps91d49ae1.jpg
2014-09-21195101_zps4239b36f.jpg
2014-09-21195128_zpsce81a6a9.jpg
Thanks for your patience, more to come...eventually.
 

Attachments

  • 2014-09-21195049_zps91d49ae1.jpg
    2014-09-21195049_zps91d49ae1.jpg
    84.2 KB · Views: 362
  • 2014-09-21195101_zps4239b36f.jpg
    2014-09-21195101_zps4239b36f.jpg
    77.8 KB · Views: 378
  • 2014-09-21195128_zpsce81a6a9.jpg
    2014-09-21195128_zpsce81a6a9.jpg
    69.6 KB · Views: 382
That is amazing man. I am Irish and I love RVB and I am making either Texas (since I am a girl) or Church (just because he is epic) I hope it turns out all right for you :)
 
Update #2

So it's been a while, I apologize. I simply became busy and went through a maturity finding phase thing? Anyway to set that all aside I'm back at it and I'm going to restart, other than helping on the farm I have nothing from now until July where I leave for Basic Combat Training for 6 months...so lets get to it. This time though I'm going to be doing two sets of armor. What I mean by this is that I will be pepping out a low res test fitting armor piece before starting on the main armor.

As shown below, I am starting with the chest. Here I am using a modified version Robogenesis's Mark VI Chest:
Chest%20Test_zpsm6nenzdq.png
It shouldn't take me too long to pep this out, more pics coming shortly.
 

Attachments

  • Chest%20Test_zpsm6nenzdq.png
    Chest%20Test_zpsm6nenzdq.png
    275.9 KB · Views: 412
Update #3

I've finished pepping the low res chest file to test size, I believe it is good. I will now proceed with the test fitting of the arms.
IMG_0406_zpsekbnvv9r.jpg
IMG_0407_zps25qhqres.jpg
More coming soon.
 

Attachments

  • IMG_0406_zpsekbnvv9r.jpg
    IMG_0406_zpsekbnvv9r.jpg
    145.8 KB · Views: 385
  • IMG_0407_zps25qhqres.jpg
    IMG_0407_zps25qhqres.jpg
    141.9 KB · Views: 346
I really like it! North is one of my favorite of the Freelancers. I get so excited whenever I see any Red Vs Blue costumers. ^_^ I hope your costume comes out awesome!
 
Update #4

Seeing as the chest test fit was a success, I'm moving onto the arms...
Handplate%20Tester_zpsmg4o5gbi.jpg
Forearm%20Tester_zpsczhhtfio.jpg
Bicep%20Tester_zpsjvitkqpx.jpg

Seeing as I haven't told you about my plans for this build, it's going to go a little something like this...
Before Basic Training
1.) Arms
2.) Chest
After Basic Training
3.) Legs
4.) Helmet

Why in this order, I don't know but I think we can get it done.
Anyway back to build...

I made two mock-ups of the bicep and forearm. The forearm was way too big and the bicep was too small.
(Left: 1st attempt, too small Right: 2nd attempt, perfect)
IMG_0449_zpsyrqr2n7g.jpg

After the second attempt on both pieces, I think they fit just right. You be the judge.

IMG_0446_zpsbmhomh0q.jpg
IMG_0448_zps0ekli0sj.jpg
IMG_0447_zpszreavkeo.jpg
IMG_0443_zpsehwpwlx3.jpg
IMG_0445_zps0duphmay.jpg
IMG_0442_zpsavbjwwja.jpg
IMG_0441_zpsslh6tl0u.jpg

In order to meet my quota, I'm going to the higher detailed mock-ups which will move onto the next stages of production...more to come soon.
 

Attachments

  • Handplate%20Tester_zpsmg4o5gbi.jpg
    Handplate%20Tester_zpsmg4o5gbi.jpg
    66.9 KB · Views: 394
  • Forearm%20Tester_zpsczhhtfio.jpg
    Forearm%20Tester_zpsczhhtfio.jpg
    96.7 KB · Views: 378
  • IMG_0449_zpsyrqr2n7g.jpg
    IMG_0449_zpsyrqr2n7g.jpg
    170.3 KB · Views: 362
  • IMG_0446_zpsbmhomh0q.jpg
    IMG_0446_zpsbmhomh0q.jpg
    147.2 KB · Views: 369
  • Bicep%20Tester_zpsjvitkqpx.jpg
    Bicep%20Tester_zpsjvitkqpx.jpg
    90.7 KB · Views: 354
  • IMG_0447_zpszreavkeo.jpg
    IMG_0447_zpszreavkeo.jpg
    109.7 KB · Views: 362
  • IMG_0445_zps0duphmay.jpg
    IMG_0445_zps0duphmay.jpg
    112.5 KB · Views: 363
  • IMG_0443_zpsehwpwlx3.jpg
    IMG_0443_zpsehwpwlx3.jpg
    114.8 KB · Views: 389
  • IMG_0448_zps0ekli0sj.jpg
    IMG_0448_zps0ekli0sj.jpg
    101.9 KB · Views: 358
  • IMG_0441_zpsslh6tl0u.jpg
    IMG_0441_zpsslh6tl0u.jpg
    116.1 KB · Views: 387
  • IMG_0442_zpsavbjwwja.jpg
    IMG_0442_zpsavbjwwja.jpg
    124 KB · Views: 356
Update

Sorry there's been no progress, and there won't be anytime soon. A sort time after my last update I suffered a back injury. It was very minor and I've fully recovered but it kept me from doing any work on the armor. Also, while I wasn't working I took some time to reflect on what I had started on the chest... I didn't like it. The file wasn't what I thought it would be plus I had issues with it's construction, all for the best I suppose. So I scraped what little I had of the chest and found a better file and paper to work with. Now here's the thing I didn't even make an attempt to start again. I leave for Basic Combat Training on Wednesday and with everything going on over the fourth it wouldn't be worth starting. I'm afraid you will all have to wait until December when I get back. Wish you all the best, farewell for now.
 
Status
Not open for further replies.
Back
Top