HeedlessOfRuin
New Member
Hey there guys. We are Heedless Of Ruin, a group of three costumers from London who have decided to finally get off our collective rears and form a squad of ODSTs. Well, not quite a full squad, but definitely a fireteam. We've been planning on doing something like this ever since Mass Effect 1 came out, so I'm pretty sure you can agree with us that this is well overdue!
We are:
Livi: ONI specialist
Will be based heavily on Dare's armour from ODST
Will: Designated marksman
Based on Romeo from ODST
Zac: Trooper
Standard ODST armour
Planning:
This is mainly Zac's job, (currently typing). I have the most experience with armour, as in my other hobby I joust in medieval plate armour. Studying armour has been what I do for the last 10 years, so I'm prototyping my armour with the help of the others for building etc, and then we'll build the other two armours after that. We're going to be building the armours mostly out of foam, and they need to stand up to Convention conditions, plus give full movement and be comfortable. My experience tells me that means we won't be re-using too many templates, but getting the process sorted with the first suit will definitely help for the second and third.
For this build we'll be using the tutorials made by the lovely Frontline trooper, although I'll be making changes to the designs based on my experience in armour, and ease of build. One big change is that we will be using three different thickness of foam, rather than just one, which should make detailing a lot easier.
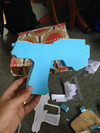
First, I watched through the entire build. I think it's important to know everything you can about something like this before you start, a bit like reading a whole recipe before you get started with the ingredients. I also sketched out the different parts of an ODST's cuirass:

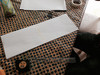
Then using the basic shapes given we drew out the patterns for the large pieces:

It was very important for me that the cuirass should end at the ribcage, as although foam is softer than steel I know from experience how uncomfortable things get if the cuirass goes onto the abdomen. We took loads of measurements at this stage, as a mistake with these pieces would be costly due to being the largest parts of the armour.
Progress
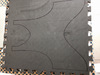
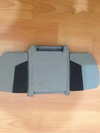
Yesterday we started working on the foam. Having tried on the paper template, here is the front piece drawn onto the foam.

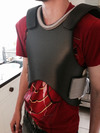
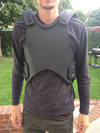
For the next harnesses we're going to change the side pieces where they meet the backplates to be further out at the top than the bottom. This will assist with pushing the chest further out, especially important if needing to run etc in the harness. For this suit the side connectors will be on adjustable straps to allow some in and out.

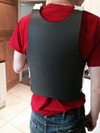
You can see from this test fitting that the back of the neck is really too low. We didn't catch this during this test fitting, but we will move it up on the other harnesses. For this one we will add some additional plates on the inside of the neck to look like an undersuit or something like that.


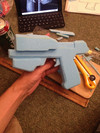
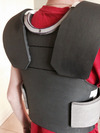
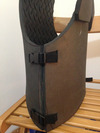
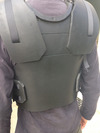
The progress as it is at the moment. We discussed how we want the armour to work, and we've decided we want it all to buckle together. As such the shoulder straps are hot glued to the backplate, but not yet attached to the front. they will velcro down over the shoulder seams which will be held together by small buckles.
The kidney plates will be similarly attached to the front plate, and velcro'd to the backplate , either over or in between the buckles.
So next steps are to pick up some buckles, straps and velcro, then move onto the armour plates. Off to the shops now, but any comments or criticisms will be greatly appreciated.
Thanks for reading! I hope my extra long post is made worth it by the pictures.
Zac
ODST stationed aboard UNSC Frigate Heedless of Ruin.
We are:
Livi: ONI specialist
Will be based heavily on Dare's armour from ODST
Will: Designated marksman
Based on Romeo from ODST
Zac: Trooper
Standard ODST armour
Planning:
This is mainly Zac's job, (currently typing). I have the most experience with armour, as in my other hobby I joust in medieval plate armour. Studying armour has been what I do for the last 10 years, so I'm prototyping my armour with the help of the others for building etc, and then we'll build the other two armours after that. We're going to be building the armours mostly out of foam, and they need to stand up to Convention conditions, plus give full movement and be comfortable. My experience tells me that means we won't be re-using too many templates, but getting the process sorted with the first suit will definitely help for the second and third.
For this build we'll be using the tutorials made by the lovely Frontline trooper, although I'll be making changes to the designs based on my experience in armour, and ease of build. One big change is that we will be using three different thickness of foam, rather than just one, which should make detailing a lot easier.
First, I watched through the entire build. I think it's important to know everything you can about something like this before you start, a bit like reading a whole recipe before you get started with the ingredients. I also sketched out the different parts of an ODST's cuirass:
Then using the basic shapes given we drew out the patterns for the large pieces:
It was very important for me that the cuirass should end at the ribcage, as although foam is softer than steel I know from experience how uncomfortable things get if the cuirass goes onto the abdomen. We took loads of measurements at this stage, as a mistake with these pieces would be costly due to being the largest parts of the armour.
Progress
Yesterday we started working on the foam. Having tried on the paper template, here is the front piece drawn onto the foam.
For the next harnesses we're going to change the side pieces where they meet the backplates to be further out at the top than the bottom. This will assist with pushing the chest further out, especially important if needing to run etc in the harness. For this suit the side connectors will be on adjustable straps to allow some in and out.
You can see from this test fitting that the back of the neck is really too low. We didn't catch this during this test fitting, but we will move it up on the other harnesses. For this one we will add some additional plates on the inside of the neck to look like an undersuit or something like that.
The progress as it is at the moment. We discussed how we want the armour to work, and we've decided we want it all to buckle together. As such the shoulder straps are hot glued to the backplate, but not yet attached to the front. they will velcro down over the shoulder seams which will be held together by small buckles.
The kidney plates will be similarly attached to the front plate, and velcro'd to the backplate , either over or in between the buckles.
So next steps are to pick up some buckles, straps and velcro, then move onto the armour plates. Off to the shops now, but any comments or criticisms will be greatly appreciated.
Thanks for reading! I hope my extra long post is made worth it by the pictures.
Zac
ODST stationed aboard UNSC Frigate Heedless of Ruin.
Attachments
-
 15209232552_c5814ff1d2_z.jpg130.5 KB · Views: 189
 -
 15209614805_d910e643e6_z.jpg134.1 KB · Views: 216
 -
 15023021337_6506bfcf96_z.jpg941.5 KB · Views: 210
 -
 15022997947_d77dcf36a0_z.jpg798.8 KB · Views: 201
 -
 15209158312_fec4d68d13_z.jpg755.3 KB · Views: 190
 -
 15206482451_2333a8397e_z.jpg103.5 KB · Views: 193


")