Reach UNSC Trooper WIP

Status
Not open for further replies.
looks awesome are you useing 2 different foam thickness?

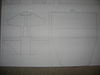
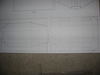
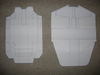
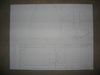
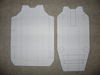
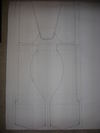
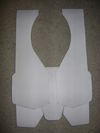
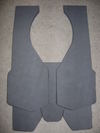
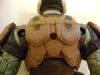
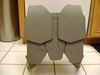
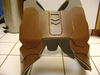
Thanks braytak! No, I'm only using one thickness which is 1/2" inch but what I've done is cut-out some areas to the shape of the piece that is supposed to be attached to it. So, if the piece is supposed to be raised a tad above the cut-out piece, let's say about 1/4" of an inch, I'll just glue that piece with 1/4" of an inch sticking out from the cut-out.
 
o i see very smart , i seen some other foam builds where the are using two different sizes , you can prob get thinner foam for details at a craft store
 
Thanks cfh935!

Here is a little bit of an update on the back part of the armor. I will probably get to detailing and assembling the back armor parts tonight since I will be out most of the day today.

I made a sketch of the armor first to serve as my templates.
DSC01265-1.jpg


Cut-outs of the template parts.
DSC01266-1.jpg


Cut-outs of the foam parts.
DSC01267.jpg


Action figure reference.
DSC01226.jpg
 

Attachments

  • DSC01265-1.jpg
    DSC01265-1.jpg
    55.4 KB · Views: 230
  • DSC01266-1.jpg
    DSC01266-1.jpg
    88 KB · Views: 220
  • DSC01267.jpg
    DSC01267.jpg
    71.8 KB · Views: 236
  • DSC01226.jpg
    DSC01226.jpg
    70.3 KB · Views: 232
I finally was able to finish the back armor and attached it to the front. Shoulder straps attach to the upper chest via industrial velcro but the bottom waist bands are super glued to the bottom of the back plate. So, I can put it on like a shirt. Also, I painted the front just to see if I got the right shade of brown and it seems to be pretty close. It should look better after I weather it by dry brushing silver scratches and dents in it. Here are some pics.

DSC01278.jpg


DSC01279.jpg


Need to add the detail lines in before painting.
DSC01280.jpg


DSC01274.jpg


DSC01272.jpg


DSC01270.jpg
 

Attachments

  • DSC01270.jpg
    DSC01270.jpg
    89 KB · Views: 219
  • DSC01272.jpg
    DSC01272.jpg
    98.8 KB · Views: 249
  • DSC01274.jpg
    DSC01274.jpg
    67.4 KB · Views: 219
  • DSC01280.jpg
    DSC01280.jpg
    74 KB · Views: 251
  • DSC01279.jpg
    DSC01279.jpg
    85.9 KB · Views: 218
  • DSC01278.jpg
    DSC01278.jpg
    92.9 KB · Views: 227
Wow, that's come out really nicely! Only problem I can spot is that the paint makes it look quite plastic-ish. Then again, since your only point of reference is actually a plastic model...
 
Looking good man!! I think I should have done something like you because I'm finding that the reach ODST and the standard trooper have almost the same armor in Reach.
 
Wow, that's come out really nicely! Only problem I can spot is that the paint makes it look quite plastic-ish. Then again, since your only point of reference is actually a plastic model...

Thanks Sean! LOL! I agree, the plastic figure is the best thing I have for now as far as 3 dimensional reference is concerned.

I'm sure he'll add more paints to it later, weathering and such.

Nice work man!

Thanks Sumofl! Yeah, some weathering should make it a bit more realistic.
 
Thanks for all the nice comments and cool tips guys! Next up will be the ab and drop leg thigh plates hopefully.
 
looking nice
heres all the reach pep files http://www.405th.com/showthread.php...lo-Reach-Pepakura-Files-Thread?highlight=Ruze there is no body armor yet but heres the reach soldier helmet files(i would check out this thread every once in a while to see if someone updates the armor)
http://www.4shared.com/file/vESINUXK/halo_reach_marine_helmet.html
http://dawnunderheaven.com/?page_id=29

Thanks for the links but I already have them printed out including the EOD shoulder armor. Just wanted to get the scratched built parts out of the way first then I'll start pepping.:)
 
Thanks guys! No, foam isn't hard to work with but it's less time consuming than cutting and folding pep parts. It's just a different perspective and approach to building armor. If you're building something from scratch, and you are using a 6" inch figure as reference for scaling to 1:1, you'll have to closely eye it like looking at the figure's hand then look at your hand to get an idea of the measurements or dimensions of the part that you are trying to model. That's how I did it for my Reach UNSC trooper armor.
 
Thanks Bradinator! Here is a little bit of an update on the drop leg thigh attachments and the upper and lower ab plates. I just finished the sketches and then cut-out the pieces as templates for the foam rubber.

Here they are all in one 24"x24" poster board.
DSC01281.jpg


Here is a closer look on the ab parts.
DSC01282.jpg


Here is a closer look on the drop leg thigh attachments.
DSC01283.jpg


Here are the pieces cut-out and assembled.
DSC01284.jpg


The drop leg thigh attachment in two parts.
DSC01286.jpg
 

Attachments

  • DSC01282.jpg
    DSC01282.jpg
    34.6 KB · Views: 204
  • DSC01283.jpg
    DSC01283.jpg
    47.6 KB · Views: 193
  • DSC01284.jpg
    DSC01284.jpg
    67.7 KB · Views: 182
  • DSC01281.jpg
    DSC01281.jpg
    39.9 KB · Views: 197
  • DSC01286.jpg
    DSC01286.jpg
    68.9 KB · Views: 204
This is looking really great! I bet the foam is going to make armor much more comfy to wear! hehe

Now one thing I am curious to know since you didn't mention it is, what kind of paint did you use? The reason I ask is because I have seen threads where people are testing various paints and checking to see how they hold up when the foam is bent and checking for any signs of cracking or wrinkles. Have you encountered any such problems?
 
Status
Not open for further replies.
Back
Top