ODST for my kids WIP Completed (more photos Page 13)

Status
Not open for further replies.

CoolC

Well-Known Member
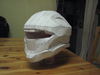
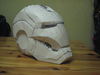
I've started working on my kids' ODST costumes for next year. Kinda slow because been really lazy. Having some experience I'm sure I can get this done a lot quicker.

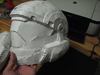
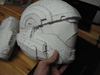
Here is some progress.

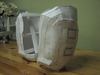
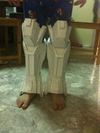
I did not fold all lines, especially those that are smooth. Hopefully less bondo required.
ODST3.jpg


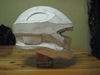
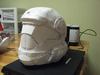
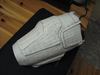
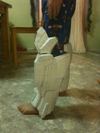
Side view of the chest piece.
ODST4.jpg


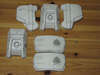
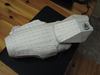
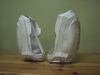
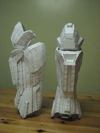
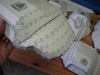
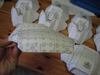
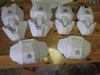
Chest pieces and shoulder pieces prepped.
ODST2.jpg


Will continue to soldier on.
 

Attachments

  • ODST3.jpg
    ODST3.jpg
    80.1 KB · Views: 281
  • ODST4.jpg
    ODST4.jpg
    84.8 KB · Views: 278
  • ODST2.jpg
    ODST2.jpg
    129 KB · Views: 280
That was a good idea to leave some of those folds out. I peped the same chest piece and wish I would have done the same after seeing yours. Good progress so far. Keep up the good work.
 
haha thanks for the support on my epic post ginger :D but great work so far pepping coolc. I love seeing armor for kids. Can't wait to see this done.
 
Here is a quick update of the project. I can only prep the files at night, once I'm done with housework and my kids are in bed.

Most of the stomach and crotch plates are done. I'm making two pairs.
ChestPlates.jpg


My 9 year old son wants to wear the Recon helmet. Took me 4 days - 2 hours each to finish this.
ReconHelmet1.jpg


Another view of the helmet.
ReconHelmet4.jpg


I'm also going to try to complete Iron Man VI costume. I plan to spend 3 years on it. The helmet is a little tight and it is one of the hardest helmet that I've done. I need to make another helmet that is a little bigger.

IronMan2.jpg
 

Attachments

  • ReconHelmet1.jpg
    ReconHelmet1.jpg
    143.4 KB · Views: 273
  • ChestPlates.jpg
    ChestPlates.jpg
    160.1 KB · Views: 267
  • ReconHelmet4.jpg
    ReconHelmet4.jpg
    137.5 KB · Views: 270
  • IronMan2.jpg
    IronMan2.jpg
    138.2 KB · Views: 268
If these ODST's turn out as awesome as the spartans did for your kids then I would have to say that you are probably one of the coolest dads on the planet. I can't wait to see them dressed up in ODST gear. Keep up the good work.
 
Another quick update. Took me a while to get the helmet done. Before that I prepped a left gauntlet. Now I noticed that it is too big for my son. Need to do another one.

I tried not to fold all pieces. Any sides that are bend or rounded are left off.
Here is the right side of ODST helmet with the cheek folded.
ODSThelmet1.jpg


Here is the left side that are not folded. You could tell it is a lot smoother.
ODSThelmet2.jpg


The front side of the helmet. Notice the top is not folded.
ODSThelmet3.jpg


Here is the gauntlet and a lot of the pieces are not folded.
LeftArm2.jpg


Another shot.
LeftArm1.jpg


Wish I could do more, but been busy with work. I can only spend 2 hours a night on prepping these pieces.
 

Attachments

  • ODSThelmet2.jpg
    ODSThelmet2.jpg
    108.4 KB · Views: 263
  • ODSThelmet1.jpg
    ODSThelmet1.jpg
    98.1 KB · Views: 261
  • ODSThelmet3.jpg
    ODSThelmet3.jpg
    111.6 KB · Views: 268
  • LeftArm2.jpg
    LeftArm2.jpg
    114.1 KB · Views: 265
  • LeftArm1.jpg
    LeftArm1.jpg
    123 KB · Views: 271
That's a lot of work! Your kids are lucky to have a dad like you, they're gonna be the best costumed kids in your neighborhood when you're finished!
 
wow! so smooth! i bet your going to use about 1 cup of bondo on the whole thing cause its so smooth :O

~fathers are the best craftsmen~
 
That looks really good, hopefully they wont try to do something to it a year or two later. Kids tend to mess with their old toys and see what can happen.
 
wow! so smooth! i bet your going to use about 1 cup of bondo on the whole thing cause its so smooth :O

~fathers are the best craftsmen~
Agreed. That pep work is some if the best I've seen. You also do it pretty fast I see too. I'll be looking out for this thread. A good sanding on the fibre glass and some bondo will do wonders.
 
wow! so smooth! i bet your going to use about 1 cup of bondo on the whole thing cause its so smooth :O

~fathers are the best craftsmen~

That's the whole point. Plus it makes the armor less angular and more fluid. I'll apply bondo sparingly to smooth some of the surface. Instead of fiberglass, I will use Rondo on the inside.

That looks really good, hopefully they wont try to do something to it a year or two later. Kids tend to mess with their old toys and see what can happen.

I know this sounds kinda waste of time. I build the armor for their halloween. I wouldn't mind if they break them as long as they have fun in them. After the halloween, the armors go into storage in my garage. What I do with them? I may have my 6 year old son wear my 9 year old armor in 2 years time. If not I may put them up for sale.
 
Hey there, this is amazing :D I'm 13 and i wish someone like you could be my dad, getting something like that would be amazing to me :) your kids are lucky to have you!
i love the way you haven't folded parts of the build as well, i heard once before "wish i didn't fold it" and wondered why, then seeing this i realized why!
hopefully i will start an odst build, like the recon helm as well, i was looking into making one, went with a carted helm and its too small because i don't know how to scale properly -.-

i also like the look of your iron man helmet, i have one but its low def, could you direct me to a download link if possible? (and also could you explain how you scaled it, im 1.58 meters / 62.5 inches (thats my actual height, i havent added any more on for scaling))

keep up the good work, i know your kids will be proud! :D
 
just wanna say this is very nice but 1 small critasizm its pepped not prepped but yeh your kds are gunna be so happy good work
 
just wanna say this is very nice but 1 small critasizm its pepped not prepped but yeh your kds are gunna be so happy good work

Actually I know what I was referring to. I was referring to preparing "prep" the pieces.

Here is another quick update.

Both belts are done.
Belts2.jpg


Both pairs of thighs are completed.
LeftRightThighs1.jpg


Decided not to work on the inner thighs pieces. I can't seem to find a way to attach them.
LeftRightThighs2.jpg


Took me a while to complete these two shins. Need to do two more.
Shins.jpg
 

Attachments

  • Belts2.jpg
    Belts2.jpg
    73.3 KB · Views: 265
  • LeftRightThighs1.jpg
    LeftRightThighs1.jpg
    78 KB · Views: 249
  • LeftRightThighs2.jpg
    LeftRightThighs2.jpg
    87.6 KB · Views: 252
  • Shins.jpg
    Shins.jpg
    63.5 KB · Views: 270
Another quick update. Finally finished another pair of legs. Here is my son testing them.

20b20903.jpg


Side view of the legs. They look rather large. Hopefully my son will grow tall by an inch or two by Halloween.

5c9ce40c.jpg


A few more pieces to pep than on with resin.
 

Attachments

  • 5c9ce40c.jpg
    5c9ce40c.jpg
    90.6 KB · Views: 277
  • 20b20903.jpg
    20b20903.jpg
    107 KB · Views: 282
wow!!! great job on this build man, they are both looking awesome so far and you really are getting a lot done and fast!!!!! very nice clean pep work too well keep up the fantastic work :)
 
Status
Not open for further replies.
Back
Top