Are yoga mats and EVA floor tiles made from the same material as camping mats? It would seem logical, and camping mats are significantly cheaper and come without the interlocking edges.
You are using an out of date browser. It may not display this or other websites correctly.
You should upgrade or use an alternative browser.
You should upgrade or use an alternative browser.
Noble Spartan(mod's/add-on's begin)
- Thread starter thorn696
- Start date
- Status
- Not open for further replies.
I was able to put my armour on by myself last night, though it was very awkward taking it off. I know I won't be able to buckle any straps by myself once those are installed. But hey, like you said, just like a real spartan.
It's looking really good man. It's gonna look great painted.
Thanks, I've keeping an eye on you're build also.
Wow, can't believe I haven't seen your thread! This is some great work Thorn, looking forward to seeing it complete, it's so close!
Thanks, It's so close I can feel it

Looking pretty much perfect! Can't wait to see that helmet
Hehe, you and me both. thanks for the vote of confidants
Are yoga mats and EVA floor tiles made from the same material as camping mats? It would seem logical, and camping mats are significantly cheaper and come without the interlocking edges.
Eva mats are allot more dense. As for camping mats yes there the same thing as Yoga mats.
Looking great buddy!
Thanks vshore100, Finely catching up to you, just a few more parts. Well ok then all the elc. stuff, and fine tuning. Dang...I'll catch up to you yet :cool
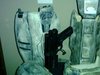
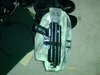
Ok and here is the last few pic's of the day. The Quick Draw rig. I made it a little long being I want the weapons immobile (They still work).


That's it for pic's for about two weeks I need to start hammering out the helmet. Once that's done then I'll finish paint and Start the boots.
Almost there and the clock is ticking. And as always, Please feel free to leave any and all input, comments, criticisms, or suggestions. For they are most welcomed and appreciated. (they also keep me from triple posting.) Thanks for watching my build.
Attachments
Starvinartist80
Well-Known Member
What type of camera are you using? I may be able to diagnose why all your images are coming out with that sickly green tint. I think I know the prob but the solution depends on the camera.
Oh yeah.... Great Fraggin work man. I love the updates as always.
Oh yeah.... Great Fraggin work man. I love the updates as always.
Jamesbulls
New Member
great work you put so much detail into your work cant wait for the next update
What type of camera are you using? I may be able to diagnose why all your images are coming out with that sickly green tint. I think I know the prob but the solution depends on the camera.
Oh yeah.... Great Fraggin work man. I love the updates as always.
Here's the info requested.
File Name: IMAG0631.jpg
File Size: 92 kb - 1024 x 768
Camera Make: ViviCam
Camera Model: T328
Date/Time: 2011:08:15 02:39:07
Resolution: 1024 x 768
Flash Used: Yes (manual)
Focal Length: 6.5mm
Exposure Time: 0.040 s (1/25)
Aperture: f/4.2
ISO Equiv.: 60
Whitebalance: Auto
Light Source: Flash
Metering Mode: center weight
Exposure: program (auto)
I'd love to figure out what up with the camera, So here's the info. And thank you for taking the time to help.
great work you put so much detail into your work cant wait for the next update
Thanks. I'll try to get something up within the next two weeks.
Starvinartist80
Well-Known Member
Okay so I'm not really familiar with Vivicam but I think I can see the problem. Your whitebalance is not metering correctly. If you're unfamiliar with what this setting does, it controls what your camera sees as "pure" white light. Each light source casts a unique color spectrum that is often invisible to the human eye but picked up by light sensitive equipment like cameras. Currently your's is set to auto. See if you can change the setting. If so then you want to make sure that you set the balance for the type of light being cast over the scene you're shooting. For example the last set was taken outside so you would look for "sunlight" setting. This is usually represented by an icon that looks like a sun. Flouresent(sp?) usually looks like a bar and standard bulbs are typically represented by a bulb shape.
So sorry if the explanation is a bit simplistic but with out actually having the camera here it is the best I can do. My suggestion is to take a few test shots each time you change lighting situations. Just set the whitebalance to what you think it needs to be take a test shot and if it is wrong move on the next setting until you find one that gives you the color your looking for. If that doesn't solve the problem then PM me and I'll see if I can troubleshoot it further.
So sorry if the explanation is a bit simplistic but with out actually having the camera here it is the best I can do. My suggestion is to take a few test shots each time you change lighting situations. Just set the whitebalance to what you think it needs to be take a test shot and if it is wrong move on the next setting until you find one that gives you the color your looking for. If that doesn't solve the problem then PM me and I'll see if I can troubleshoot it further.
Spitfire22V
Well-Known Member
I'm not really a camera expert, but a properly working WhiteBalance filter set on Auto should give you good, usable photos (i.e. without the greenish tint). I rarely manually change the WhiteBalance settings on my cameras since the Auto setting does a good enough job most of the time. Maybe your camera is defective or damaged? How long have you had it, and is it still under warranty?
I'd go ahead and make sure everything is in Auto mode at first to make sure the camera is working well and there isn't some wrong color setting giving the green tint. Also, try changing the metering mode to Evaluative instead of Center-Weighted.
I'd go ahead and make sure everything is in Auto mode at first to make sure the camera is working well and there isn't some wrong color setting giving the green tint. Also, try changing the metering mode to Evaluative instead of Center-Weighted.
Starvinartist80
Well-Known Member
I'm not really a camera expert, but a properly working WhiteBalance filter set on Auto should give you good, usable photos (i.e. without the greenish tint). I rarely manually change the WhiteBalance settings on my cameras since the Auto setting does a good enough job most of the time. Maybe your camera is defective or damaged? How long have you had it, and is it still under warranty?
I'd go ahead and make sure everything is in Auto mode at first to make sure the camera is working well and there isn't some wrong color setting giving the green tint. Also, try changing the metering mode to Evaluative instead of Center-Weighted.
Often times with "consumer grade" cameras the White balance can be "tricked" by ambient light in a room. While in most cases the Auto setting is more than sufficient for the typical photograph, there are tricky situations that can throw it off. The most common of these situations is what I believe Thorn is running into. The overarching color in his armor is so similar to the color of the wall in the background that the auto setting has trouble telling which is to be considered "pure" white. The result is that it chooses something between the two and the resulting color brings out the green of the ambient light cast by incandecent bulbs. Situations like this can be solved through many means but the easiest is simply to "force" the camera to read the light a certain way.
Also, the metering method has more to do with the camera's auto focus, rather than the color balance of the final image.
Spitfire22V
Well-Known Member
Often times with "consumer grade" cameras the White balance can be "tricked" by ambient light in a room. While in most cases the Auto setting is more than sufficient for the typical photograph, there are tricky situations that can throw it off. The most common of these situations is what I believe Thorn is running into. The overarching color in his armor is so similar to the color of the wall in the background that the auto setting has trouble telling which is to be considered "pure" white. The result is that it chooses something between the two and the resulting color brings out the green of the ambient light cast by incandecent bulbs. Situations like this can be solved through many means but the easiest is simply to "force" the camera to read the light a certain way.
Yes, I'm aware of all this. However, so far I don't think I've experienced an Auto WhiteBalance setting fooled by the situations in Thorn's photos, which seem to be varied enough in background and locations that I think it's odd they all suffer from the same color issues. Granted, this may just be because pretty much all my camera experience is limited to one brand only...
Also, the metering method has more to do with the camera's auto focus, rather than the color balance of the final image.
This was more a general setting tip, rather than being about the color balance issues.
But we digress, as this is not a photography forum.
Starvinartist80 and Spitfire22V after a few min of trying out both you're theory's, I can now say yes. You're both right By changing the White Balance I was able to get a better, more vivid color pic. But at the same time the colors being so close I was unable to get a clear close up of any part as of yet. I will be trying a few combinations of scene and white balance and edge ( soft, normal, hard). I will probably post a few new pic's this week end just to show the colors off a little better. I'll be really happy if I can get a close up to show up with the grainy textures on a part to show the details. Till then I still have some pepping to do :cool
The following is the REF PIC's for Starvinartist80 please do not confuse with my build
REF. Pic's ARE Taken from the forum and the web. They are reference only, and are some one else's work.


 [URL=http://s1090.photobucket.com/albums/i376/thorn696/?action=view¤t=nig_noble_six04.jpg]
 [/URL]
There are more in my Photobucket under the thorn696's album. Please DO NOT Confuse with the Halo project album that is MY BUILD.


The following is the REF PIC's for Starvinartist80 please do not confuse with my build
REF. Pic's ARE Taken from the forum and the web. They are reference only, and are some one else's work.


 [URL=http://s1090.photobucket.com/albums/i376/thorn696/?action=view¤t=nig_noble_six04.jpg][/URL]
There are more in my Photobucket under the thorn696's album. Please DO NOT Confuse with the Halo project album that is MY BUILD.
Last edited by a moderator:

you, my friend, are a god. please except this sacrificial cookie:

Hhmmmm Coookie .....oh ..sorry. thanks
Holy..... This build is awesome Thorn!!! Envious!!!!!
Hay I'm just trying to catch up to you. I still love you're lighting set up.
Yeah, I guess I didn't read everything. I thought that one chest pic that was posted was yours.
Sorry about that. If you were looking at the light blue and silver one that was from a film. But thanks for stopping by. :$
The helmet's looking great Thorn. Nice work.
Thanks vshore100 I'm glade you liked the the ref. helmet. I'll post pic's of mine next weekend. I should be done with the pep by then. who knows I might even get a coat of resin on too. :$
Now were did the cookie go I know it was here somewhere.
Attachments

Lol you passed me a while ago! I don't even have a belt or chest anymore
Suit 1 or 2. I'll have to go over you're build's again to see what happened. Sorry to hear it tho. As for were I cut my suit. I cut out the lower belt, witch I will be replacing with foam shortly. It just slides right on over my head. Most people looking at my pic's don't even notice that gone tho. :cool
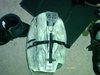
Latest Update. The Mark V(B). Finished pep.


With any luck I should be able to give it coat of resin this weekend yet.
And as always, Please feel free to leave any and all input, comments, criticisms, or suggestions. For they are most welcomed and appreciated. (they also keep me from triple posting.) Thanks for watching my build.
Well I last told you that I was going to try hitting the MV(B) helmet with a coat of resin....I was wrong. I hit it with 3 coats resin, 6 coats rondo, sanded outer shell, and cut out face shield and vents.
Mark V(B) there are many like it but THIS ONE IS MINE


Now I have a question for you. The ear pieces would it function/look better to cut out the holes on them? It would allow sound and more air floe. Ok well thats it for this weekend.
Please feel free to leave any and all input, comments, criticisms, or suggestions. For they are most welcomed and appreciated. (they also keep me from triple posting.) Thanks for watching my build.
Last edited by a moderator:
- Member DIN
- S091
That helmet looks great! (wait....that is yours, right?) jk. If you were to cut the holes out you could always put some screen in behind them to get that finished look and still have sound air flow. Keep it up buddy. You're making me want to finish my suit so bad.
- Status
- Not open for further replies.