You are using an out of date browser. It may not display this or other websites correctly.
You should upgrade or use an alternative browser.
You should upgrade or use an alternative browser.
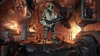
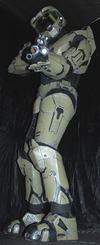
Mark VI high-def foam armor WIP
- Thread starter Gamemaster
- Start date
- Status
- Not open for further replies.
Gamemaster
Member
to much crotch armor imo lol
It never fails, everywhere I go, everything I do, someone, somewhere... is looking at my crotch

I agree, as soon as I get enough pictures of the Halo 4 Master Chief armor I plan on doing a scratch build from foam.
Gamemaster
Member
This suit is up for auction: http://cgi.ebay.ca/ws/eBayISAPI.dll?ViewItem&item=120744684101&ssPageName=STRK:MESELX:IT
you guys have any tips for painting eva foam? I made a simple hand plate for my first try at foam armor and wanted to test how it took to paint.... not well
Yup... We used Plasti-dip as the sealant
Check me out, I'm the new (extremely unofficial) poster spartan for Halo 4.

I figured that you would try this. Nice work on super imposing "Intimidator" over top of John.
Attachments
vulture pilot
New Member
plasti paste? if u look at mine its jagged a lil bit and messy. i d say just spread it thin and keep working at it even when drying to ensure its not jagged cuz that will lead to bubbles with later coats. im a noob so i learned that the hard way. also make sure to mix the stuff well mine is still flimsy even now after i used it =.=
Gamemaster
Member
Before you work with foam I advise heat sealing your good side first, I've added a tutorial video to the how-to page here: www.squidoo.com/how-to-make-halo-armor When you do this you only need 2 light coats of plasti-dip to seal it for paint.do you sand down the plasti dip after? or just spread it on very thin?
thanks
We did some more photos and took Spartan Intimidator to a party with kids for a durability test, it passed. Here is a photo I did for a lark, you can see the nice ones I put up for the finished armor section of the how-to page.
Attachments
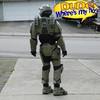
Were still testing out the HD camcorder and figured that I should post at least ONE sample of our testing and learning.
It's not often that you see a MKVI Spartan doing the laundry.
Cheers!
It's not often that you see a MKVI Spartan doing the laundry.
Cheers!
Last edited by a moderator:
Toacrabman
Well-Known Member
XD just think about how much laundry he could do compared to a MK V model
Toacrabman
Well-Known Member
Theres a spartan VI doing laundry, and you notice that....Wouldn't it be more convenient to place the drier on the right side of the washing machine, so that the door isn't in the way when putting the wet stuff in there? :-D
anyway, where would I get an undersuit like that?
The undersuit is a nylon track suit that we found at a local thrift store. If I recall, it was 10 bucks.
Gamemaster
Member
9 bucks, including platform shoes
The nylon is only good because it is breathable, it is baggy and does nothing for moisture. It only looks good in some of the pictures, if you have the cash to spend I would personally go with summerwear underarmor, tightfitting and black, like what a football player would wear, or go with a black Morphsuit (like the greenmen, only black)
I found some of these items on Amazon and posted the links on my squidoo pages, this lens has some undersuit options on it: www.squidoo.com/halo-armor-challenge
As for me, I've been raiding the local thrift stores on pirate treasure hunts, looking for tight fitting black sportwear (like underarmor) and other goodies to go with this armor... I will post some pics when I have done a few mods, see how it looks.
Gamemaster
Member
Ahoy me matey's! Dave the pirate has finished looting all 3 thrift stores in the area and for under $10 he found:
-Tight black biker shorts (breathable and stretchy)
-Black coolmax t-shirt (short sleeve, breathable and wisks away moisture)
-A duo-dry longsleeve T, only the sleeves were black so I cut em off and attached them to the black T.
-Long sleeve black "morph" gloves (ultra breathable and stretchy)
-kids size black backcatcher chest shield (fits perfect for a spine protector)
-kids size black backcatcher kneepads (with the padding torn out they made awesome elbow armor)
-a padded hockey neckseal (padding to be removed and soft black fabric added)
-a square yard of soft black fabric for under sports pads
-about 8 feet of velcro
-sewing supplies
-nylon/spandex capri's and black knee tights (I might look for something better)
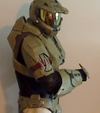
Here are some progress pics of the undersuit modifications for the spartan Intimidator. I've also been adding to the armor parts for extra detail. So far I have the abdomen and lower back done and the right arm finished. Left arm is cut out and awaiting assembly.


I will be finishing the left arm and the neck seal next, and also on the list:
-Add inner thigh armor
-Upgrade the helmet lights to 4x superbright LEDs
-Make foam boot expanders
-Add a foam sole and tread to the boots
-Add some custom details
-Tight black biker shorts (breathable and stretchy)
-Black coolmax t-shirt (short sleeve, breathable and wisks away moisture)
-A duo-dry longsleeve T, only the sleeves were black so I cut em off and attached them to the black T.
-Long sleeve black "morph" gloves (ultra breathable and stretchy)
-kids size black backcatcher chest shield (fits perfect for a spine protector)
-kids size black backcatcher kneepads (with the padding torn out they made awesome elbow armor)
-a padded hockey neckseal (padding to be removed and soft black fabric added)
-a square yard of soft black fabric for under sports pads
-about 8 feet of velcro
-sewing supplies
-nylon/spandex capri's and black knee tights (I might look for something better)
Here are some progress pics of the undersuit modifications for the spartan Intimidator. I've also been adding to the armor parts for extra detail. So far I have the abdomen and lower back done and the right arm finished. Left arm is cut out and awaiting assembly.
I will be finishing the left arm and the neck seal next, and also on the list:
-Add inner thigh armor
-Upgrade the helmet lights to 4x superbright LEDs
-Make foam boot expanders
-Add a foam sole and tread to the boots
-Add some custom details
Attachments
Very sweet indeed, Gamemaster!
I think we need to get you over to my studio/workshop for some nice UBER shots.
I think we need to get you over to my studio/workshop for some nice UBER shots.
Gamemaster
Member
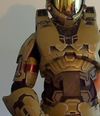
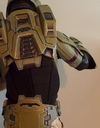
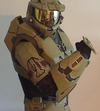
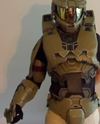
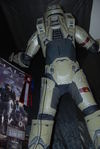
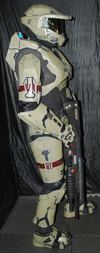
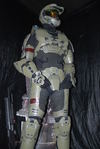
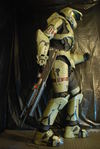
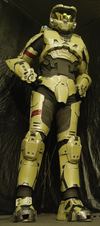
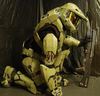
After some undersuit and underarmor mods we did a photoshoot in Longshot-X's Workshop. Here are some pictures so far


And some with the flash off (better color)


I still have some tweaking before I am video ready... more to follow soon.
And some with the flash off (better color)
I still have some tweaking before I am video ready... more to follow soon.
Attachments

Gamemaster
Member
Wow..just wow. the pic's came out great. Now I do have a question for you tho. On you're ankle, is the a foam spacer? I was wondering about how I was going to work out my placement on shines. As for Vid oh ya bring it on.
Yes, that is a piece of foam, shaped with the heatgun and mounted to the bottom of the shins. It still needs detailing and the boots will have an "ankle sleeve" that tucks under the spacer.
- Status
- Not open for further replies.