Sarlume's first Spartan Build W/Custom Undersuit (pic heavy)

Status
Not open for further replies.

sarlume

Member
Okay, so I went to RTX for the first time this year with my boys, and we saw about eight pretty awesome spartans. I had been toying with the idea of making a suit for a while, but never knew where to start. Worbla?...

In any case, we had the chance to talk to a couple of the spartans there, and they directed me here after pointing me toward EVA foam and plasti-dip. I lurked for a bit, then started my armor. Slowly. Finally made an account, and I figured I ought to go ahead and put my progress into a thread so everyone could watch me stumble through the trial and error part of learning a new medium. Support can be crucial too, and this awesome community has it in spades. May I just say that you all rock? So, if you have anything at all to add, I am all ears. ^^

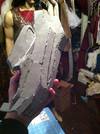
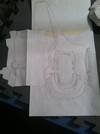
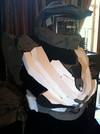
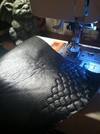
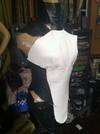
I was going to start by pepping the recon chest just to get my feet wet. Yeah, I know...but I figured hey, might as well start on the part I'm most excited about. Yes, I learned a lot. Heh...^^; So, the pepakura didn't get very far before I jumped right into the foam build using modified pep templates. I'm spastic like that.
WIP1-ReconChest.jpg

WIP2ReconChest.jpg

WIP3ReconChest.jpg

WIP4ReconChest.jpg


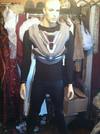
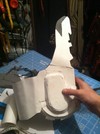
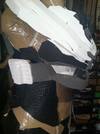
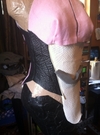
One of the first things I began to notice was that the piece was faaaaaaar too big. Still, I wanted to plug on so that I wouldn't have two failed beginnings. I had gotten this far, maybe I could alter it later....either way, it was a learning experience.

WIP5ReconChest.jpg

WIP1-ReconBack.jpg


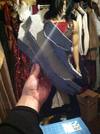
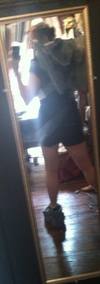
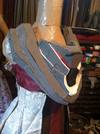
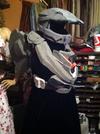
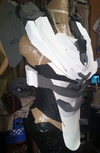
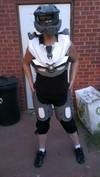
And here is the piece actually being worn; not as huge as I'd feared when I had it on the mannequin, though still quite huge. The boot I'm wearing is really just a tester. Sorry about the bad quality; selfies in my workroom...
5163baea-3a14-4d10-81a1-29c8ca8ac686.jpg

WIP2-Fitting.jpg


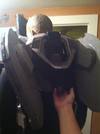
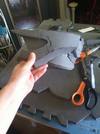
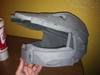
By this point, I was just happy to have a wearable chest piece started even if it was too big and largely unfinished. I moved on to the helmet at this point, because I suppose I'm a glutton for punishment, intending to return to the chest piece to fix it up some before moving on again. I will update again shortly to bring you up to date. Then I have orders to fill, after which I will continue the suit again. As I'm working at home, I may be updating pretty often depending on my workload. (Halloween is approaching SO fast!) My intention is to have a full suit by then, but we shall see. It will probably be all Halo 4 parts, and my color scheme will eventually be white with red accents.

See you guys later!
 

Attachments

  • WIP1-ReconChest.jpg
    WIP1-ReconChest.jpg
    62.2 KB · Views: 292
  • WIP2ReconChest.jpg
    WIP2ReconChest.jpg
    58.5 KB · Views: 269
  • WIP2-Fitting.jpg
    WIP2-Fitting.jpg
    25.3 KB · Views: 278
  • 5163baea-3a14-4d10-81a1-29c8ca8ac686.jpg
    5163baea-3a14-4d10-81a1-29c8ca8ac686.jpg
    51 KB · Views: 276
  • WIP1-ReconBack.jpg
    WIP1-ReconBack.jpg
    36.6 KB · Views: 279
  • WIP5ReconChest.jpg
    WIP5ReconChest.jpg
    54.1 KB · Views: 256
  • WIP4ReconChest.jpg
    WIP4ReconChest.jpg
    62 KB · Views: 274
  • WIP3ReconChest.jpg
    WIP3ReconChest.jpg
    57.7 KB · Views: 261
Okay, sorry for the double post...Errands are now taken care of, so here is the rest of what I have so far. I'll go ahead with what was completed chronologically as opposed to by the piece. So, the helmet came next. I want - eventually - to make an EVA helmet from Halo 4. That's for a later date, however, so I went with a Mark VI classic. I accidentally started out making the Mark VI from Halo 3, then slapped my forehead and modified it to this one.
WIP2-MarkVIHelmet.jpg

WIP5-MarkVIHelmet.jpg


So, here's what I had so far:
WIPSuit1.jpg


I now have the visor and intend to go back to it just like the chest for details, fixes, and whatnot later. I went to thighs next, starting again with pep templates that I tried modifying for foam. I decided on the XG-89 thigh, and it took a while to get to this point:
WIP-Venatorthighpepversion.jpg

So I switched gears and started drawing my own template:
WIPVenatorThightemplate.jpg

WIP1-VenatorThigh-Copy.jpg

WIP2-VenatorThigh.jpg

I was pretty happy with how much cleaner it was. ^^ Couldn't take looking at the chest the way it was any more, so I went ahead and went back to it using the scratch method...
WIP6-ReconChestrevisit.jpg

WIPSuit2.jpg

I shortened the top (where the shoulders are), changed the middle, took the LilTyrant method of foamies to cover those lovely seams, and shortened the wings in the back. Much happier with the chest now. Though it is still pretty big.

Okay, moving on to the bodysuit. Since I'm a seamstress, I had hoped this would be the part I'm most friendly with, but meh... To get the texture, I tested out a few different ideas before settling on this.
WIP1-Bodysuit.jpg

Using one of the decorative stitches on my sewing machine, with a lot of practice and ruined vinyl, I was able to come up with a vaguely similar texture to the bodysuit in Halo 4. I used the method of taping the pattern pieces on the mannequin (keeping in mind that my mannequin is a bit smaller than me) and then textured each piece as I went. Time. Consuming...but cheaper than hexagonal lycra from the internets..
WIP2-Bodysuit.jpg

bd5630d9-971b-446d-be16-dc1624d2f858.jpg

c091f4aa-a1a8-48b7-ac54-b8baf4d6a58e.jpg

This is where the bodysuit currently sits on my mannequin...
WIP4-Bodysuit.jpg

And here is the armor as it is now, without the bodysuit (as it has no closure yet)
WIPSuit3.jpg


Hoping to get more work done PDQ, but work calls. I will let you guys see how the next bits turn out once I get to em!

<3
 

Attachments

  • WIP2-MarkVIHelmet.jpg
    WIP2-MarkVIHelmet.jpg
    48.7 KB · Views: 275
  • WIP5-MarkVIHelmet.jpg
    WIP5-MarkVIHelmet.jpg
    44.6 KB · Views: 275
  • WIPSuit1.jpg
    WIPSuit1.jpg
    59.4 KB · Views: 256
  • WIP-Venatorthighpepversion.jpg
    WIP-Venatorthighpepversion.jpg
    83.5 KB · Views: 266
  • WIPVenatorThightemplate.jpg
    WIPVenatorThightemplate.jpg
    30.5 KB · Views: 263
  • WIP1-VenatorThigh-Copy.jpg
    WIP1-VenatorThigh-Copy.jpg
    40.2 KB · Views: 297
  • WIP2-VenatorThigh.jpg
    WIP2-VenatorThigh.jpg
    84.4 KB · Views: 283
  • WIP6-ReconChestrevisit.jpg
    WIP6-ReconChestrevisit.jpg
    43.3 KB · Views: 259
  • WIPSuit2.jpg
    WIPSuit2.jpg
    37.6 KB · Views: 260
  • WIP1-Bodysuit.jpg
    WIP1-Bodysuit.jpg
    69.2 KB · Views: 283
  • WIP2-Bodysuit.jpg
    WIP2-Bodysuit.jpg
    47.4 KB · Views: 304
  • bd5630d9-971b-446d-be16-dc1624d2f858.jpg
    bd5630d9-971b-446d-be16-dc1624d2f858.jpg
    162.2 KB · Views: 286
  • WIP4-Bodysuit.jpg
    WIP4-Bodysuit.jpg
    48.6 KB · Views: 265
  • WIPSuit3.jpg
    WIPSuit3.jpg
    36.1 KB · Views: 260
  • c091f4aa-a1a8-48b7-ac54-b8baf4d6a58e.jpg
    c091f4aa-a1a8-48b7-ac54-b8baf4d6a58e.jpg
    138.7 KB · Views: 297
Awesome. I'm looking forward to seeing more updates. I've decided to go with foam myself since I don't have much time for pepakura right now.
 
Thanks, you two!

@Ragnar - Oh, I can definitely see that. Color me impatient, I guess. ^^; I usually wind down with pencils or wire work, myself.
 
Yeah I noticed the improvement in cleanliness as you progressed onto the thigh pieces as well, it does seem like you are more adept to building the pieces from scratch. It looks really good - and that under suit is awesome, I really like the texturing.
 
Looks like your off to a good start. Loving that texture your using for the undersuit.
Looking forward to your progress. Keep it up
 
Yeah I noticed the improvement in cleanliness as you progressed onto the thigh pieces as well, it does seem like you are more adept to building the pieces from scratch. It looks really good - and that under suit is awesome, I really like the texturing.

I'm definitely interested to see where it goes building from scratch from here on out. ^^

Looks like your off to a good start. Loving that texture your using for the undersuit.
Looking forward to your progress. Keep it up

Thank you much!


Allllrighty...


As a corset maker, I went into this build wondering if my crazy mind would try and incorporate a corset somehow. Don't give me that look. Well, I was trying to figure out the best way to make the neck seal. Sooooo not wanting vinyl on my neck all night/day. I decided to use spandex (cheapie Halloween spandex-like fabric, anyway) and fleece. The fleece gives it that padding that makes it bubble when I stitch the texture in.

Anyway, figured I'd work with a neck-corset kinda pattern and just miniaturize one of my own corset-making methods...with cheapie Halloween spandex-like fabric.

Did I mention that the texture I am adding to each individual piece is extremely time-eating? Meh, I'll say it again for good measure. Spent a good three-ish hours just adding texture to make this darn thing:
ba42f46d-face-4066-919d-19616d2d7c68.jpg


Started out with a rough mock up using pink felt
e9bd79e6-71b0-418a-86cf-bb15e07cb206.jpg


Then copied the pattern that worked, altering as needed
null_zpsaf540763.jpg


The details always take more time than anything... I added some corset boning (not much...) to this thing to keep it from wrinkling too much with movement, and to keep it on my chin where it should be.


Had a hard time deciding where to go from there because I still need to make everything. Went to the back of the undersuit to prepare it for some kind of closure. Didn't get far because I knew I would need a plan of attack for a spine first, since it would be covering the way in and out of the suit. Made a spine.
null_zps1894202d.jpg

null_zpsacc032ad.jpg


I made it in sections from the EVA foam wrapped in the same vinyl as the suit. Not sure how to put it on either, but leaning toward snaps on one side, permanent application to the other.

I'm not sure how I feel about it...not as clean as I'd hoped. Used high melt hot glue instead of stitching it like I wanted, so that may be part of why I'm not fond of it...What do you guys think?

Also, when I was getting a picture of the spine I realized I hadn't put up a picture of the back after "alterations".
aad81427-ca63-4be4-b862-bf7cee2d90c7.jpg

Though it still needs quite a bit, I'll probably move down the legs once the undersuit is done.

Next time, I hope to have the undersuit wearable with some sleeves!

ba42f46d-face-4066-919d-19616d2d7c68.jpg


e9bd79e6-71b0-418a-86cf-bb15e07cb206.jpg


null_zpsaf540763.jpg


null_zps1894202d.jpg


null_zpsacc032ad.jpg


aad81427-ca63-4be4-b862-bf7cee2d90c7.jpg
 
Last edited by a moderator:
Before scrolling down, I looked at the first picture for about a minute wondering how the piece fit on you, and why you looked so... plastic. :)

Anyways, this is looking really cool! I love how you put your own flair on things and don't necessarily follow all the rules. Keep it up!

-Java
 
Before scrolling down, I looked at the first picture for about a minute wondering how the piece fit on you, and why you looked so... plastic. :)

-Java

Haha! Yeah, that's George...when I first got him I realized I had no guys costumes in my collection yet, so he got a butt-flap. Hence the name. ^^

And thank you! I try to stick to the rules, but that doesn't always happen.
 
This is looking so cool! I think the time its taking for the texture on the suit is worth it. It's really looking awesome!
 
Wow, I'm glad I spotted this one. That chest piece is awesome, and I love your idea for the neck. Since you added some boning, can you turn your neck much? Definitely looking forward to seeing more from this. Soon fem-spartans'll be dominating this site. ^^
 
Your armor is really well done so far. Huge points to you for all the custom sewing and fabrication.
 
I am so jealous of that undersuit, it looks AWESOME. Nice work with the foam too, it is quite a learning curve.

Can't wait to see more!
 
Status
Not open for further replies.
Back
Top