Sepheus 13's Forging of a Mk V. (Foam)

Status
Not open for further replies.

Sepheus 13

Active Member
First off! This thread has been re-named! It was originally "Sepheus 13's NEW Halo Reach Foam Build"
(I didn't like it) The NEW inferred that you had known about my previous work.

Hey there guys and gals, I've started a new build a while back. I just wanted to get some progress before posting anything.

'Teaser picture' On page 7, Post #62
IMG_9808.jpg


My goal with this costume is accuracy and cleanliness. I always rush my costumes, normally for PAX, (alas this year I couldn't make it) but I said enough! I will take my time, and when it is done (which is never) it is done! I hope to really wow people this time around. I have been lurking around the forum for the past year or so. Learning all I can, putting all of it in my arsenal of techniques until I felt comfortable enough to resume my passion.

Now before I bore you with words, (there will be time for that later)

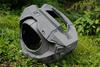
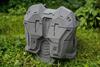
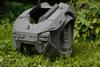
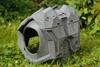
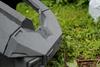
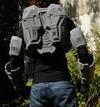
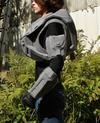
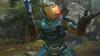
what I have done: 9/2/2013
IMG_9093.jpg

IMG_9089.jpg

IMG_9101.jpg

IMG_9102.jpg

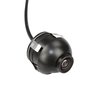
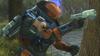
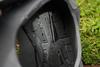
with my Halo Reach MA37 (has seen better days)
IMG_9098.jpg

I need to give these pieces a nice detail go through with foamies, I just need to find some first (i'm trying locally first)

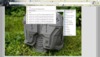
More progress to come shortly, I am currently cutting out the pieces for the right bicep.

Thanks for viewing!
Please leave any questions, comments, and suggestions. I would greatly appreciate any creative criticism.

Josh/Sepheus 13

IMG_9808.jpg


IMG_9093.jpg


IMG_9089.jpg


IMG_9101.jpg


IMG_9102.jpg


IMG_9098.jpg
 
Last edited by a moderator:
I'd say you're sure off to a good start; that does look pretty darn clean (as in, really, really clean). It makes me wonder just how much foam I truly need to ruin to get such clean seams and indents like that in the future. Are you using foamies at all? On a side note, I know that those are paintball gloves and that they are commonly used for suits, but where did you find yours? They are perfect!
 
Thanks Sarlume, you helped me remember a few details I was going to put in my post. I do plan to use foamies, quite a bit in fact. They are such a great small detail builder. I just need to find a place locally that sells them, or I'm going to have to make an order online soon.

After I finish the right bicep in the next few days, I'll start working on the torso, where I'll go into detail on my workflow and the techniques I use to build it. but in short the smooth edges are created from taking two pieces and taping the seam with packing tape, this creates tension on the pieces which merge together very nicely. and then any hot glue that seeps through the gap gets blocked by the tape and creates a nice flush surface with the rest of the piece. (i'll include pictures later)

and for the gloves, I couln't find the original posting on amazon. But here are the exact same gloves.
http://www.amazon.com/Rap4-Paintbal...d=1378147009&sr=8-8&keywords=paintball+gloves
 
You're awesome. I'll definitely be subbing this thread to school myself. Heh. I will be trying that packing tape method for seams; the thought hadn't even crossed my mind.

I am loving how those arm pieces look even without the foamies. Great stuff, sir. Now I'm off to buy those gloves...
 
I would suggest going to joanns fabrics website. you can by rolls of 36" by 24" black 2mm foamies for 7$ a piece. Otherwise you are going to need to buy many small sheets.
 
Quick Late night teaser
IMG_9109.jpg
So I finished the main work on the right bicep. this is just the teaser picture. I'll have much better pictures in the morning.

thanks for viewing, please feel free to ask any questions etc..
Josh/Sepheus 13


IMG_9109.jpg
 
Last edited by a moderator:
Hey guys and gals!

I'm back with a bit more work completed. I started working on my torso piece, and as promised I have a picture tutorial of how to use packing tape to make nice clean seams with foam. let's call it "Packing tape method" Cause, That's original and all.

Okay to begin you're going to get your two pieces that are going to join together Don't forget the packing tape!
IMG_9110.jpg

Next you're going to take a piece of tape and lay it on one of the foam pieces. making it tight.
IMG_9113.jpg

Now attach the other piece of foam and make sure its snug against the joining edge. And I mean snug. when you bend it, the edge should round out a little. like this
_MG_9115.jpg

Now apply your hot glue, giving a thick bead all the way down it.
_MG_9116.jpg

Now set the pieces in their final resting positions.
_MG_9119.jpg

After a few minutes (to let the glue cool) peel off the tape, and enjoy your nice new smooth edge.
_MG_9122.jpg

Pros:
Clean,
Easy,
Great looking results
Avoids messy hot glue eyesores.

Cons:
Time consuming,
cost for tape? (it's worth the investment though)
I'm having a hard time coming up with cons..

So, this is what I was able to accomplish by the time I posted this post! (minus the time I worked on my VW bus engine)
_MG_9126.jpg
_MG_9127.jpg

and I'm now settling in to make much more head way! So I guess I'll have progress for you all tomorrow!
But before I go, Check out this comparison of my work from three years ago (PAX 2011) to Now! It's almost comical.
_MG_9129.jpg

Well That's it for now! Please ask questions, leave suggestions, and constructively criticize me! I would love to hear all of it!
Cheers,
Josh/Sepheus13

IMG_9110.jpg


IMG_9113.jpg


_MG_9115.jpg


_MG_9116.jpg


_MG_9119.jpg


_MG_9122.jpg


_MG_9126.jpg


_MG_9127.jpg


_MG_9129.jpg
 
Last edited by a moderator:
That chest piece is certainly lookin pretty promising!

Great little tutorial! I will certainly take it to heart after I finish my undersuit and get back to the actual armor pieces. Gotta go stock up on packing tape. With cultivating, improvement is inevitable. The comparison pic is a great one. ^^
 
Brilliant idea, if i try foam i will have to keep that method in mind. Looks great, and that is a bit of a difference from a few years back to now.
 
I'm just going to drop this off here for the night, I'll have a nice descriptive post tomorrow. I'm off to bed now.
IMG_9134.jpg
 

Attachments

  • IMG_9134.jpg
    IMG_9134.jpg
    46 KB · Views: 438
Hey gals and guys!

Welcome back, so, I finished the foam work my torso piece, well.. 92% finished. I've got a few more things to do with it. I'll present pictures now.

_MG_9197.jpg


_MG_9199.jpg


_MG_9201.jpg

_MG_9202.jpg

_MG_9205.jpg


Here it is all together.
_MG_9190-2.jpg

_MG_9162-2.jpg

_MG_9156.jpg

_MG_9165-2.jpg

I think it's a touch too big, I may have to cut more out! yes more! I already took out 16mm to make it smaller. But I'll wait until I have the abs/back pieces all together.
_MG_9178.jpg

and a shot where I can show off as many different angles as I can!
_MG_9181.jpg

Continued below.
 

Attachments

  • _MG_9202.jpg
    _MG_9202.jpg
    105.6 KB · Views: 419
  • _MG_9201.jpg
    _MG_9201.jpg
    87 KB · Views: 366
  • _MG_9197.jpg
    _MG_9197.jpg
    91.6 KB · Views: 439
  • _MG_9199.jpg
    _MG_9199.jpg
    74.2 KB · Views: 432
  • _MG_9205.jpg
    _MG_9205.jpg
    70.7 KB · Views: 320
  • _MG_9156.jpg
    _MG_9156.jpg
    97.7 KB · Views: 434
  • _MG_9165-2.jpg
    _MG_9165-2.jpg
    113.6 KB · Views: 424
  • _MG_9178.jpg
    _MG_9178.jpg
    130 KB · Views: 441
  • _MG_9190-2.jpg
    _MG_9190-2.jpg
    102.4 KB · Views: 420
  • _MG_9162-2.jpg
    _MG_9162-2.jpg
    167 KB · Views: 408
  • _MG_9181.jpg
    _MG_9181.jpg
    101.3 KB · Views: 448
I never posted what I wanted my spartan to look like

1stspartan.png

I've noticed a lot of similar builds popping up around here, and mine if one of them. Blue and orange, Gungnir.. etc.. I hope I don't "overstep my boundaries" and upset any of you with a similar build.

And I think I have a genius idea for how I'm going to see out of my gungnir helmet.


SO, I'm going to take this! (20$ rear reverse camera on Amazon)
_MG_9127-1.jpg

and I'm going to put it here!

Screenshot2.jpg

secondly, I'm going to take this 4.3" monitor. (about 20$)
41otZLB7-tL.jpg

and I'm going to place it in the helmet
sidebadass.jpg

and I'm going to link both 12v DC connectors with this (this is going inside the helmet as well)
517-UCcdNsL_SL1100_.jpg

A 12V DC cord will run down to this battery pack (9800mA, It can be smaller as long as it can give power throughout the day.) I might use a second one of these to run all my lights.
41pxSDOZ8EL.jpg

AND this battery pack is located in my Mjonlir Mk. V "nuclear" power pack. HERE!
_MG_9207.jpg

That chest piece is certainly lookin pretty promising!

Great little tutorial! I will certainly take it to heart after I finish my undersuit and get back to the actual armor pieces. Gotta go stock up on packing tape. With cultivating, improvement is inevitable. The comparison pic is a great one. ^^

Absolutely, I took about a year off of costuming, and just lurked around the forums when they went haywire, and I just learned all I could. when I came back, I could put to use a bunch of knowledge that I scavenged.

and you really don't need all that much packing tape, I'm still on my first roll, and I've made all of these pieces here.


Very nice work. Thats an interesting method for clean lines I may have to try!

Thank you sir CrazedOne1988, I appreciate it. and the tape really pays off, it gives me much better results, also I don't have to hold the pieces together waiting for the glue to cool. This keeps it in place.

Well, that's all for now!
PLEASE post comments, questions, criticism. ANYTHING! I want to hear your input!


Thanks for viewing,
Josh/Sepheus 13
 

Attachments

  • 1stspartan.png
    1stspartan.png
    835.3 KB · Views: 465
  • _MG_9127-1.jpg
    _MG_9127-1.jpg
    36.3 KB · Views: 424
  • Screenshot2.jpg
    Screenshot2.jpg
    80.2 KB · Views: 425
  • 41otZLB7-tL.jpg
    41otZLB7-tL.jpg
    19.7 KB · Views: 430
  • sidebadass.jpg
    sidebadass.jpg
    87.3 KB · Views: 431
  • 517-UCcdNsL_SL1100_.jpg
    517-UCcdNsL_SL1100_.jpg
    39.7 KB · Views: 438
  • _MG_9207.jpg
    _MG_9207.jpg
    90.2 KB · Views: 452
  • 41pxSDOZ8EL.jpg
    41pxSDOZ8EL.jpg
    16.7 KB · Views: 422
That foam work looks really nice and clean. I'm genuinely impressed.

As for the screen, are you absolutely certain? I've a feeling it's not designed to go so close to your eyes, and if it doesn't blur from the proximity, it'll certainly give you headaches and ruin your eyesight if used for prolonged periods.

If you can get it to work, I'll eat my words, but I'm concerned that it might cause more issues than it solves.


I thought of that, but I guess I didn't think too much about it. When I placed my cell phone approx. 4" from my eyes it clears up, and isn't that disorienting. but I still have all the space behind my cellphone that keeps me oriented. When I start closing it off. It gets more disorienting, I'll have to test this fully before I dedicate myself to the idea. I think I just got excited and jumped the gun a little.

and it's the same principle of why a HUD wouldn't work.

and thanks, I like feed back.
 
My point was more the 'prolonged periods of time' comment - your eyes are designed to focus at the mid-distance. Putting something right up in front of them, especially something like a backlit screen, will just damage your eyesight.

RoxyRoo's foam GUNGNIR build might give you some ideas - the helmet build begins HERE.
 
This is a good build, I have noticed a lot more detailed foam build lately. Also, Arcanine is correct on the fact that this screen will be too close to your eyes, this monitor will cause permanent eye damage and you would not be able to wear it long without your eyes being in pain ad taking it off anyways. It is a cool idea, but not practical. Good luck.
 
My point was more the 'prolonged periods of time' comment - your eyes are designed to focus at the mid-distance. Putting something right up in front of them, especially something like a backlit screen, will just damage your eyesight.

RoxyRoo's foam GUNGNIR build might give you some ideas - the helmet build begins HERE.

Yeah, hmm, That's a disappointment.. Thanks, I'll be saving a lot of time, money and tears now. haha. And Roxy has an amazing build! she was a great influence to this build,

Untitled-1.png


This is a good build, I have noticed a lot more detailed foam build lately. Also, Arcanine is correct on the fact that this screen will be too close to your eyes, this monitor will cause permanent eye damage and you would not be able to wear it long without your eyes being in pain ad taking it off anyways. It is a cool idea, but not practical. Good luck.

Thanks, maybe there's another creative idea on how to see out of this bucket.
and thanks for the support!
 

Attachments

  • Untitled-1.png
    Untitled-1.png
    706.1 KB · Views: 450
I Believe the helmet cam is possible. that said you need to make sure it has little if no lag. I have attempted the gungnir helm with a wireless cam. Because of lag and the fact that their is only one cam my depth perception is almost zero when using it. I hope you have better luck because it is a sweet concept.
 
I Believe the helmet cam is possible. that said you need to make sure it has little if no lag. I have attempted the gungnir helm with a wireless cam. Because of lag and the fact that their is only one cam my depth perception is almost zero when using it. I hope you have better luck because it is a sweet concept.

What did you use for a screen? and how much space do you have in your Gungnir helmet? To me it looks like there are a few inches of space from where your face would be.
 
Status
Not open for further replies.
Back
Top