GenericCola's Halo: Reach Scout/Recon Build (WIP - Pics Included)

Status
Not open for further replies.

GenericCola

Jr Member
This Post is Reserved for Progress/Recent Images

Have something to say? Let me know! Feedback and criticism is ALWAYS appreciated!

Build Status:


Recon+Progress.png


Boot #2 is fiberglassed and bondoing is underway
2013-09-30_02-21-33_861.jpg


Finished Pieces Gallery:

1383533_10202192595360545_1047045962_n.jpg


Recon+Progress.png


2013-09-30_02-21-33_861.jpg


1383533_10202192595360545_1047045962_n.jpg
 
Last edited by a moderator:
Some Background

For those who are unaware, the Scout and Recon armor variants were developed in tandem to research stealth capabilities for Mjolnir armor, and had initially been intended to be merged into a single suit. The methods taken by each armor set, however, differ greatly to achieve the same goal: Scout armor relies more on advanced materials to enhance stealth capabilities, while Recon armor relies on reducing the armor's radiation signature to avoid detection. After research was completed, the armor variants were kept separate to allow for greater variability in the field.

And the more you know!

Once I complete the armor, I'll build gear to match. The setup should look something like a Sniper/Spotter pair.
(Any thoughts on which variant should be the Sniper and which should be the Spotter? Input appreciated!)

I've decided to start with some simpler base parts for now and get into the variant-specific pieces as they arrive, since this is my first build in several years.
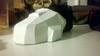
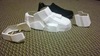
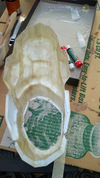
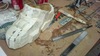
First up: Boots

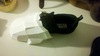
I bought a pair of black slip-on sneakers from a local shoe outlet to use as the base. I chose slip-on shoes so that I wouldn't need to worry about lace accessibility in the final build, as I plan on making a pair of dedicated boots rather than a shoe-cover.

2013-09-16_01-38-45_838.jpg


Hopefully the lighting isn't too bad for you to see-- one of my lamps went out and I've not gotten a new bulb yet.

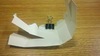
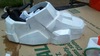
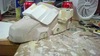
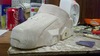
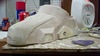
I just took the measurements of the shoe from heel to toe using a tape measure and scaled my Pep files (thank God-- the boot would have been 7 cm too short) and began pepping.

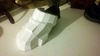
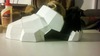
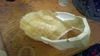
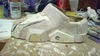
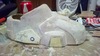
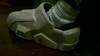
Right now, all I've finished is the frontal toe region. As you can see, it fits the shoe nicely, so I'm definitely satisfied with that.

2013-09-16_02-06-47_160.jpg


2013-09-16_02-06-59_674.jpg


I'd like to finish the rest of the boot tonight, because my girlfriend is driving down to visit me tomorrow (we live 200 miles apart) and I'd like to have something assembled to show her, however small it may be.

Thanks for looking, I'll post more updates as they come :)

And, as always, any feedback/criticism/advice is appreciated!
 

Attachments

  • 2013-09-16_01-38-45_838.jpg
    2013-09-16_01-38-45_838.jpg
    142.5 KB · Views: 252
  • 2013-09-16_02-06-59_674.jpg
    2013-09-16_02-06-59_674.jpg
    95.8 KB · Views: 290
  • 2013-09-16_02-06-47_160.jpg
    2013-09-16_02-06-47_160.jpg
    94.5 KB · Views: 290
Those boots are off to a clean start, and you've found the perfect shoes! I've always been amazed at those who pep with no ID tags on the pieces; I'd get lost so fast...

If I were to guess, I'd put the scout as the spotter (more stealthy) and the recon as the sniper (less chance of detection). Maybe I'm way off, but that's where I'd put em.

You can actually edit your thread title by editing your first post and clicking the "go advanced" option at the bottom of the box...I had to do the same. ^^;
 
Those boots are off to a clean start, and you've found the perfect shoes! I've always been amazed at those who pep with no ID tags on the pieces; I'd get lost so fast...

You can actually edit your thread title by editing your first post and clicking the "go advanced" option at the bottom of the box...I had to do the same. ^^;

Thanks a lot for the tip, mate! And I know, I lit up when I found them! They're JUST the right size, so they're very snug without being uncomfortable or difficult to put on, and their coloration/shape is perfect for pepping the boots over. As for pepping without edge IDs, I actually find it easier. When you get into the smaller folds, the numbers get very cluttered and it becomes difficult for me to see the pattern lines.

Plus, having a background in 3D modeling helps to understand the way the polygons should mesh. ^-^

Edit: Update

I've managed to finish the frontal ankle guard, as well as the heel. The plan is to build the front half, the rear half, and the surrounding frame separately and then mount them together when assembling the completed boot. This way, I can make sure everything fits properly after fiberglassing, etc, and make any necessary adjustments that may be needed. It shou;dn't be much of an issue, though. As it is, all of the parts fit nearly perfectly over the shoes I bought.

2013-09-16_04-01-27_10.jpg


2013-09-16_04-02-03_956.jpg


It's getting late, so I'm unfortunately off to bed, but I will try to have the boots fully pepped in the next day or so.

Thanks for looking, and feedback is always appreciated :)
 

Attachments

  • 2013-09-16_04-02-03_956.jpg
    2013-09-16_04-02-03_956.jpg
    77.3 KB · Views: 266
  • 2013-09-16_04-01-27_10.jpg
    2013-09-16_04-01-27_10.jpg
    95.5 KB · Views: 282
i think it's better scout as sniper,it's bigger and it need to not be viewed, and the scout have the sunshade, the recon is more light so can move fast and with reduced emitions it can get nearer the enemies and not been detected by radars. so i think scout with sniper, recon with DMR
 
i think it's better scout as sniper,it's bigger and it need to not be viewed, and the scout have the sunshade, the recon is more light so can move fast and with reduced emitions it can get nearer the enemies and not been detected by radars. so i think scout with sniper, recon with DMR

Yeah, that makes sense-- good thoughts. Luckily I won't really have to worry about it until we start making the weapons xD

Going to try to post an update tomorrow with the pepped boots.
 
Update:

Sorry for the delay-- life happened, so it took longer than expected to find time to work on this. I've only managed to finish pepping one boot-- I'm going to try to finish the other one tonight, and resin them tomorrow.

2013-09-20_21-47-05_597.jpg


Hopefully things will move along smoothly and I'll have a finished pair of boots before too long!

Any recommendations on which piece to build next? I'm thinking of just working my way up and doing the shins.

Edit: Update

Working through the second boot as quickly as I can manage. These office clips work wonders holding things in place to dry while I move ahead to other sections.

2013-09-20_23-24-52_323.jpg


I've also found that, when working with rubber cement, applying it to both surfaces and allowing it to slightly dry before pressing them together helps them retain their position much better.
 

Attachments

  • 2013-09-20_21-47-05_597.jpg
    2013-09-20_21-47-05_597.jpg
    185.5 KB · Views: 266
  • 2013-09-20_23-24-52_323.jpg
    2013-09-20_23-24-52_323.jpg
    99.1 KB · Views: 274
its a great start. keep it up. and just a little advise: with hotglue you will be done in a fractional amount of the time ;-)
 
its a great start. keep it up. and just a little advise: with hotglue you will be done in a fractional amount of the time ;-)

Thanks :) I'm hoping to have at least one boot bondo'd by the end of the weekend. I know hot glue is quicker, but I prefer the rubber cement for most areas. I actually use a combination of rubber cement, hot glue, and super glue throughout, depending on the fold.

Anyway, boot #2 is about 70% pepped, but it's 6 a.m. here, so I think it's time for a break. Both boots should be at LEAST resin'd today, with photo updates coming this evening. I plan to start pepping the shins while they cure.
 
Update

2013-09-21_14-16-54_213.jpg

2013-09-21_14-19-43_99.jpg

Safety first!

2013-09-21_14-46-44_726.jpg

The boot is resin'd with the shoe inside in case the cardstock warps-- this way I can ensure the shoe will still fit, regardless.

2013-09-21_15-36-18_661.jpg

I begin fiberglassing by using rubber cement to secure each strip. This way I'm not racing against the clock to get each piece secured before the resin starts to congeal, and I can ensure that each strip is fit snugly and securely to the inside of the pep.

2013-09-21_17-19-39_190.jpg

The inside of the boot is fully fiberglassed. I left the side protrusions empty because of the small detail. I plan on filling them with rondo.

The sun has gotten low, though, and this coat of resin isn't curing as quickly as the other coat. I'm nervous that I didn't add enough hardener or that the temperature is getting too low for it to cure properly :S Thoughts?

I'll keep an eye on it, and if it cures properly, I'll be bondoing tonight, using my Legendary Edition Reach statuette as a reference, along with a few screenshots.

Thanks for looking, and feedback is always appreciated :)
 

Attachments

  • 2013-09-21_14-16-54_213.jpg
    2013-09-21_14-16-54_213.jpg
    147.6 KB · Views: 261
  • 2013-09-21_14-46-44_726.jpg
    2013-09-21_14-46-44_726.jpg
    112.3 KB · Views: 245
  • 2013-09-21_14-19-43_99.jpg
    2013-09-21_14-19-43_99.jpg
    94.3 KB · Views: 274
  • 2013-09-21_17-19-39_190.jpg
    2013-09-21_17-19-39_190.jpg
    94.1 KB · Views: 263
  • 2013-09-21_15-36-18_661.jpg
    2013-09-21_15-36-18_661.jpg
    125.2 KB · Views: 253
The boot is looking really good and the fiberglass looks very clean. I never would have thought to use the rubber cement to hold down the cloth before applying the resin. Filling in that extruded feature with rondo will make etching in the details much easier. I'll be keeping an eye on your build, great start!
 
The boot is looking really good and the fiberglass looks very clean. I never would have thought to use the rubber cement to hold down the cloth before applying the resin. Filling in that extruded feature with rondo will make etching in the details much easier. I'll be keeping an eye on your build, great start!

Thanks! I hope you'll like the finished product!

Update:

2013-09-21_21-42-26_420.jpg

Added a second layer of fiberglass to the inside

2013-09-21_23-18-54_1.jpg

Filed away most of the sharp edges

2013-09-22_00-36-20_829.jpg

Then patterned the various details and began my first attempt at bondoing!

Thanks for looking, hope you enjoy :)
Feedback is always appreciated!
 

Attachments

  • 2013-09-21_21-42-26_420.jpg
    2013-09-21_21-42-26_420.jpg
    108 KB · Views: 260
  • 2013-09-21_23-18-54_1.jpg
    2013-09-21_23-18-54_1.jpg
    127.9 KB · Views: 278
  • 2013-09-22_00-36-20_829.jpg
    2013-09-22_00-36-20_829.jpg
    117.2 KB · Views: 268
Update:


Still wrapping my head around some of the bondo process, but so far it's coming along well :)

2013-09-22_19-20-59_127.jpg

2013-09-22_19-21-10_468.jpg


Thanks for looking! Feedback is always appreciated :)
 

Attachments

  • 2013-09-22_19-20-59_127.jpg
    2013-09-22_19-20-59_127.jpg
    138.8 KB · Views: 263
  • 2013-09-22_19-21-10_468.jpg
    2013-09-22_19-21-10_468.jpg
    117 KB · Views: 262
Got some clean pep work there, good job so far. Keep it up!

Thanks, man :)

Update:

I've nearly finished the rough bondo on the first boot. I still have a lot of cleaning up to do, but it's not as bad as it looks in this picture-- something about the lighting makes it look worse than it is.

2013-09-22_21-55-15_800.jpg
 

Attachments

  • 2013-09-22_21-55-15_800.jpg
    2013-09-22_21-55-15_800.jpg
    116.3 KB · Views: 267
Update: Boott #1 - bondo

Boot #1 is nearly completely bondo'd! I've got some more sanding/cleaning to do, and then I need to carve some of the details on the toe, but then the boot itself is finished! After that, I'll move on to the ankle/heel guard, and then onto the next boot.

Here is the boot with the unfinished guards attached:

2013-09-23_03-15-32_917.jpg


And I couldn't resist doing a test fit. The shoe still fits inside, and I couldn't believe it when I found out I could slide my foot in without issue! I thought I was going to have to modify the boot by hinging the heel, or something. Getting the shoe OFF, however, wasn't quite as easy.

2013-09-23_04-15-35_585.jpg


Thanks for looking, hope you enjoyed :)
Feedback is always welcome!
 

Attachments

  • 2013-09-23_04-15-35_585.jpg
    2013-09-23_04-15-35_585.jpg
    73.2 KB · Views: 256
  • 2013-09-23_03-15-32_917.jpg
    2013-09-23_03-15-32_917.jpg
    117.6 KB · Views: 263
Looking good so far. What pep file did you use for the boot?

Btw, sub +1 :)

Woo, first sub (I think) on my first build!

I used ReachBoot.pdo, which is the original model ripped from Reach, unfolded by fat-hi555. I prefer using the original models whenever I can, since they're usually medium-resolution, and garunteed to be accurate. I hate hi-res models-- I'd rather sculpt all the detail by hand than try to spread bondo over something that's only 4 cm sq and 2 mm high.

Here's my last update for the night-- I sculpted in some more of the detail around the toe.

2013-09-23_05-15-00_720.jpg

2013-09-23_05-15-10_25.jpg


I'll finish the rest tomorrow hopefully, then hit it with a coat of primer and upload new pics which should show a lot better on screen, but for now, it's 5:30 am and time for bed xD
 

Attachments

  • 2013-09-23_05-15-00_720.jpg
    2013-09-23_05-15-00_720.jpg
    124.9 KB · Views: 254
  • 2013-09-23_05-15-10_25.jpg
    2013-09-23_05-15-10_25.jpg
    123 KB · Views: 255
Boot looks good! Having just spent the majority of the weekend working on my MkVI boots, I wanted to ask if you were able to effectively walk in these... or more specifically, what were your plans for the footbed? It seems like a single-piece rigid boot cover would impede typical movement.
 
Boot looks good! Having just spent the majority of the weekend working on my MkVI boots, I wanted to ask if you were able to effectively walk in these... or more specifically, what were your plans for the footbed? It seems like a single-piece rigid boot cover would impede typical movement.

I'm not entirely sure what you mean by "impede." To what extent? I mean, I was definitely able to walk around. Right now, they just slide over the shoes I'm using for the build. Once it's complete, I plan on fabricating a sole out of either linoleum and rubber, or fiberglass with several applications of plasti-dip for tracrtion. Keep in mind that these boots are flat-footed, so some awkwardness is to be expected. I'm going to see what I can do about that when the time comes, however.
 
Status
Not open for further replies.
Back
Top