You are using an out of date browser. It may not display this or other websites correctly.
You should upgrade or use an alternative browser.
You should upgrade or use an alternative browser.
Custom Halo 4 Armour Build+Lightrifle+Magnum [Commander Button Fox now a musical!]
- Thread starter Zoogami Snowfox
- Start date
- Status
- Not open for further replies.
why did you use so much body filler? this isnt even necessary and is now a lot of work :-( but good luck with that
I'll second this. You're going to have one hell of a job getting the detail back out of such a thick coat - the idea of bondo is that it's there to remove surface imperfections, and as such it should be applied in thin, easily-managed layers. Whacking an entire pot on in one go will only make you lose those nice, crisp lines from the pep work, and you'll be wasting time, money and effort trying to regain them. More often than not it just ends up with the piece looking sub-par.
If you want a solid tutorial on how to properly apply bondo, I'd look at Cereal Kill3r's build progress, specifically THIS video. You'll never look at bondo in the same way twice.
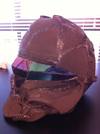
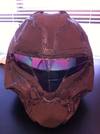
After doing a bit of sanding back today, I realised that I have put too much bondo on.
Listening to what you guys said (Harican89 and Arcanine) I decided it was best to remove it and try again.
I had an idea of how to use bondo but when I used it for the first time, I may have gotten a little carried away.
Having a look at Cereal Kill3r's bondo tutorial has given me a better understanding of how to reapply it.
Trial and Error... this time its going to work a lot better.
Wait how did you remove it?
Wait how did you remove it?
I was wondering the same thing...
Chainsaw ninja
Jr Member
It was all that tape, I believe with resin and cardstock it would be much more attached to the paper. With all of that tape though and its smoother surface the Bondi didn't firmly attach
(Just a guess anyways.)
it's lookin like a pretty good build so far man! Keep it up!
(Just a guess anyways.)
it's lookin like a pretty good build so far man! Keep it up!
Generally with pep builds you build it (paper stage), lightly paint the outside with resin (resin stage), add fiberglass to the inside (fiberglass stage), usually building up two or three layers if using the cloth, or about 1/4 to 1/2 inch using the loose mat for structural support and to give yourself ample wiggle room when sanding or etching out details on the outside (which is why quite a few pep builders make their helmets slightly larger than the expected measurements). Some start sanding a bit here to eliminate and rough spots, build up, or other flaws from the paper stage, such as a rough or overly sharp fold that creates an angled surface where it should be smooth and seamless. After that comes the bondo stage, which is a "do and do again" step that involves adding a layer of bondo (not nearly as much as your first go, obviously), sanding it smooth, adding another layer, and sanding it smooth, until all cracks, gaps, pitting, and other surface blemishes are filled in and leveled off to make the outside as smooth as possible. If you used fiberglass mat, it's probably a good idea to lightly sand and/or bondo the inside as well to get rid of the strands.
Since you used felt instead of cardstock, things could get complicated. You didn't mention doing a resin stage, maybe I just missed it, but with the felt it's going to soak up the resin and stay wet for a while, so warping is going to be something you'll really need to keep an eye on with this approach. It's also going to be a pain to deal with when sanding the outside smooth. The tape, as others have mentioned, you kinda shot yourself in the foot with that. Bondo doesn't stick to tape very well, and cn (and likely will) flake off before long. Tape also doesn't get along very well with resin, as the resin causes the adhesive to deteriorate, which only makes the potential for pieces flaking off that much more likely (which means more wasted bondo). Thirdly, tape and sanding don't do well, either.
All in all as much as I hate to say this it might be best to chalk this one up as a learning experience and start again. You could probably salvage your work with the visor at least, but your approach with the rest might be more trouble than it's worth at this point.
Chainsaw ninja
Jr Member
Don't worry man if u decide to redo the helm you wouldn't be the first, and you have the 405th if u need help! By the time your done you'll have one sweet helmet!
Wait how did you remove it?
I was wondering the same thing...
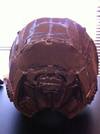
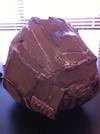
After I had sanded it back a bit, I was able to break some pieces off,
eventually all of it.
I have put a new thin coat on today, but will have to sand it back tomorrow (working).
It was all that tape, I believe with resin and cardstock it would be much more attached to the paper. With all of that tape though and its smoother surface the Bondi didn't firmly attach
(Just a guess anyways.)
it's lookin like a pretty good build so far man! Keep it up!
I believe Chainsaw Ninja was correct about the tape, but when I did this coat it was fine.
......................................................................................................................................................................................................................................
All in all as much as I hate to say this it might be best to chalk this one up as a learning experience and start again. You could probably salvage your work with the visor at least, but your approach with the rest might be more trouble than it's worth at this point.
Don't worry man if u decide to redo the helm you wouldn't be the first, and you have the 405th if u need help! By the time your done you'll have one sweet helmet!
Thanks guys for your views on the matter.
......................................................................................................................................................................................................................................
Well after a bit of consideration I have decided to remake the pathfinder helmet.
I am working towards making the armour now out of foam instead of fibreglass.
Using the old helmet I have as a 3d reference and pictures of the in-game helmet I am slowly creating a new helmet from scratch out of foam.
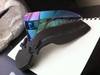
I plan to still use the visor I made for the old helmet in this new one.
When I get a few more pieces put together I will upload some pics.
Meanwhile I have been creating from scratch a costume of my own design.
At the moment I am calling the race 'Livian'.
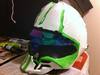
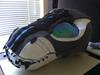
I am nearing the completion of the head piece and thought due to the fact I haven't had any pics up in a while of my halo armour, I would show you this:


......................................................................................................................................................................................................................................
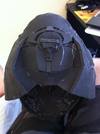
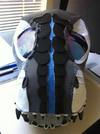
Ok I thought it was time to show how the new pathfinder helmet is going.
Using the old helmet and reference pics, I have been creating the helmet piece by piece.
Here is some of the front part thus far:


......................................................................................................................................................................................................................................
Between the time playing Gta 5 I have added some more to the helmet.
The front is nearing foam completion.


More to come...
Attachments
-
 IMG_0786_zps5787e1a4.jpg98.8 KB · Views: 205
 -
 IMG_0785_zpsda945435.jpg77.5 KB · Views: 194
 -
 PathfinderHelmetProgress21_zpsc4448a4d.jpg70.8 KB · Views: 206
 -
 PathfinderHelmetProgress24_zps4eb40d51.jpg107 KB · Views: 208
 -
 PathfinderHelmetProgress23_zpsb4843f51.jpg81.9 KB · Views: 206
 -
 PathfinderHelmetProgress22_zps80226da0.jpg65.4 KB · Views: 205
Chainsaw ninja
Jr Member
Lookin toward to seeing it done man that helmet is gonnan be sweet! Also you have an interesting side project there, i wonder how that'll turn out. 
JayOneSeven
Jr Member
I love the rifle! Good luck on the build!
Looking smexy keep up the updates
Lookin toward to seeing it done man that helmet is gonnan be sweet! Also you have an interesting side project there, i wonder how that'll turn out.
Fingers crossed it will work out... for both the helmet and the head.
I love the rifle! Good luck on the build!
Thanks, most likely going to make the rifles next.
I am going to be building 3 of them...
Why? Cause some friends would like one too.
Plan to keep the best one
Looking smexy keep up the updates
Will do.
......................................................................................................................................................................................................................................
So far I think it is working quite well (Already liking it more than the old one).
I have been working on the top of the helmet today and here are some pics.

At the moment it looks a little off centre, but I plan to fix that once the helmet is mainly complete.
......................................................................................................................................................................................................................................
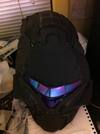
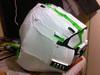
Ok its been a while since my last update so here we are.
The helmet is mainly foam finished.
It still requires some more detail and fixing up but its starting to look pretty good.
Here are some pics:


Next update soon
Attachments

Keep on picking away at it
Keep on picking away at it
Slowly but surely it will be touched up.
Great helmet!
Thanks
......................................................................................................................................................................................................................................
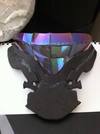
The helmet is now ready to have its first layers of paint put on, followed by more detail, and paint.
Here are some pics of the helmet un-painted but finished:


Attachments
Great effort mate, I thought building a commander helmet (from reach) out of foam was brave. This is crazy!
Did you think about filling the gaps with decorators chaulk? Works wonders when you get the hang of it. Its what I have done on my suit in a lot of places.
If you want to get better crisper detail, you could cover the helmet with 2mm foam piece to hide joints? I did something similar on my thighs.
I basically sanded the bits that were sticing out, filled bits that were deep and then applied a 2mm craft foam sheet over it all. I went from having like 20 joints to having about 4. The finish was very nice too.
Just something worth a thought
Great effort mate, I thought building a commander helmet (from reach) out of foam was brave. This is crazy!
Did you think about filling the gaps with decorators chaulk? Works wonders when you get the hang of it. Its what I have done on my suit in a lot of places.
If you want to get better crisper detail, you could cover the helmet with 2mm foam piece to hide joints? I did something similar on my thighs.
I basically sanded the bits that were sticing out, filled bits that were deep and then applied a 2mm craft foam sheet over it all. I went from having like 20 joints to having about 4. The finish was very nice too.
Just something worth a thought
Thanks for the tips U513.
I will use some decorators chaulk next time for the gaps (a bit too late to do it on the helmet, used hot glue and the glue gun end to smooth it)
With the gaps I require some of them to be a little visible though. (ie: The helmets indentations)
I may use some more foam for extra detail, but at the moment am just adding layers and layers of paint onto the helmet to make it base white (can still see the foam through it)
......................................................................................................................................................................................................................................
As for the rest of the armour, for now I am just waiting to see how the helmet turns out before I continue making pieces...

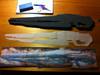
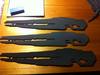
Because I am waiting for the helmet, and still want to make something else at the same time, I decided to begin work on my lightrifle's.
In an earlier post I mentioned I was making 3, and I still am planning to. (Making them at the same time).
To begin I took reference pictures from the game of the rifle, and after a bit of work used them to make a good scaled template.
I am thinking it will be best to make the lightrifle in layers starting in the middle.
Here are some pics of what I have been working on today.


More to come
Attachments
silverskyhigh
New Member
The light rifle looks like it's going to be pretty bad a$$
The light rifle looks like it's going to be pretty bad a$$
Hoping it will look fine when its finished...
......................................................................................................................................................................................................................................
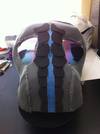
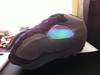
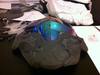
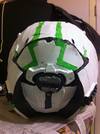
Ladies and gentlemen, today is the day I have completed my first part of many.
Alas the helmet has been painted and done.
It may not be the best there is, but in the end I am happy with it.
The back part isn't the best, but even so, there's no point me nit picking it.
To add some little battle damage, some of the paint peeled off so I used a Silver pen to make it seem like the paint had worn back to the metal below.
Personally I didn't want it to look really damaged, hence just minor stuff.
Enjoy.


More on this project to come soon...
EDIT: Still got to touch up some paint detail, and add lights in...
......................................................................................................................................................................................................................................
Hey all,
I haven't posted in a while so I thought I would.
Ok here some things:
Light rifle: Working out the electronics before I begin adding too many layers.
Pathfinder Helmet: Finished, but plan to touch it up a bit later on.
Recon Chest: Haven't started on it yet but plan to work on it next.
Duct-tape Mannequin: Got the stuffing and the tape, just got to wait on the Zentai-style Onesi to arrive.
Undersuit: Planning on also using a Zentai-style Onesie (ie its a suit to cover you from head to toe) and use foam for the undersuits detail.
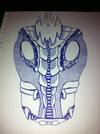
My Livian Design: I have been working on detailing it a bit more and thought I may as well put some pics up.
The drawing shows the idea somewhat of the overall design concept:
I still have alot more detailing to do to it...


More stuff to coming soon...
Attachments
-
 PathfinderHelmetComplete3_zps13313b65.jpg88.7 KB · Views: 188
 -
 PathfinderHelmetComplete4_zpsd6a50cf1.jpg91 KB · Views: 179
 -
 PathfinderHelmetComplete2_zpsbf22ea6a.jpg84.2 KB · Views: 182
 -
 PathfinderHelmetComplete1_zps58022d27.jpg92.2 KB · Views: 180
 -
 IMG_0923_zps3bc53d06.jpg97 KB · Views: 176
 -
 IMG_0911_zpsc6c5f9df.jpg104.2 KB · Views: 189
 -
 IMG_0922_zps3ca6022b.jpg107.2 KB · Views: 180
 -
 IMG_0695_zpsd3fbf535.jpg115.7 KB · Views: 175
- Status
- Not open for further replies.
Similar threads
- Replies
- 8
- Views
- 479