Hey guys,
a long time ago in a country far, far away.... from the USA xD
I want to make my third and hopefully the last halo armor i will build. The Halo 4 Recon is my upcoming project and will include all the solutions for the damn issues my brain stuck on the last sets of armors.
After building an ODST from Halo 3 (in fiberglass) and the Jun Mod from Halo Reach (in Foam) i want to mix up my expierences with foam and fiberglas.
This build will include all the solutions for the halo 4 spartan armors problems ive considered of.
UPDATE
I just bought a new CTC Printer and iam going to print the Battle Rifle (H4). The File i use is really great.
http://www.405th.com/showthread.php/36190-Release-Halo-4-Battle-Rifle-(For-CNC-Machines)
i edited some of the parts and slice the battle rifle to fit in my printer.
Here is the UStream Livestream of printer.
http://www.ustream.tv/channel/ctc-3d-printer---workflow


Watch the latest post to get further Updates.
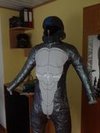
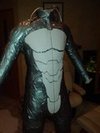
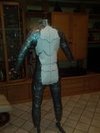
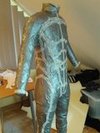
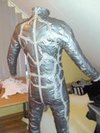
Here are my last two armors:
http://i1183.photobucket.com/albums/x463/harican89/finished armor/P8200129.jpg
http://i1183.photobucket.com/albums...151230026927866_1463650410_o2_zps9632b92a.jpg
i will subdivide the build in 3 stages.
Tutorials:
Undersuit:
The Undersuit is a little tricky and i want to explain my solution. Most of the armor plates will be screwed on the undersuit directly and i want the sew the armor strapping directly inside the undersuit, hidden beneath the foam padding.
I will use some foams, fabrics in diffrent colors, some perfect gloves by O'neil, an 2 pieces thermo underwear and some hex-pattern foam padding. most of the foam pieces will be carved in the shape of muscles and get covered with the fabric and a black mesh to get the right look.
another 405th used this method one year ago and its mostly perfect.

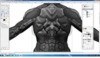
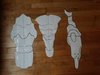
instead of his build, i want to reduce the abount of muscle padding. within these foam padding i want to implement some hard foam (eva foam) details like the one in this build:

This will help me to get the perfect spartan muscle look and the correct details without any hard circumstances. but the idea, inspired by myself, is the strapping. i want to screw all the armor pieces directly on the undersuit without any visual strapping belts. but i will come to this point when iam ready ^^
The basic idea of this build is to get one "ideal" method for the halo 4 spartan builds, because until now, there is no perfect way to get the armor AND the undersuit looking great. i want to help you out and will offer many tutorials for the "way i want to build it".
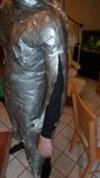
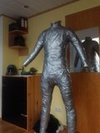
First Step:
The Undersuit
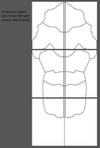
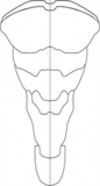
I will create a duct tape dummy and draw the template for the undersuit on it. after that i will create the pattern. the next image shows my undersuit pattern design in red lines, the hex foam in orange and the eva foam details in blue. the zippers are marked with yellow.

Next week i will order all the materials i need for the undersuit and the first bucket of fiberglas resin and fiberglas cloth. the armor i want to make is the halo 4 recon.

BTW: i want to thanks fat-hi555 for most of the files i want to use and the great work he has done for me")


a long time ago in a country far, far away.... from the USA xD
I want to make my third and hopefully the last halo armor i will build. The Halo 4 Recon is my upcoming project and will include all the solutions for the damn issues my brain stuck on the last sets of armors.
After building an ODST from Halo 3 (in fiberglass) and the Jun Mod from Halo Reach (in Foam) i want to mix up my expierences with foam and fiberglas.
This build will include all the solutions for the halo 4 spartan armors problems ive considered of.
UPDATE
I just bought a new CTC Printer and iam going to print the Battle Rifle (H4). The File i use is really great.
http://www.405th.com/showthread.php/36190-Release-Halo-4-Battle-Rifle-(For-CNC-Machines)
i edited some of the parts and slice the battle rifle to fit in my printer.
Here is the UStream Livestream of printer.
http://www.ustream.tv/channel/ctc-3d-printer---workflow


Watch the latest post to get further Updates.
Here are my last two armors:
http://i1183.photobucket.com/albums/x463/harican89/finished armor/P8200129.jpg
http://i1183.photobucket.com/albums...151230026927866_1463650410_o2_zps9632b92a.jpg
i will subdivide the build in 3 stages.
- The Undersuit (Duct-Tape Dummy)
- The Fiberglas Armor Plates
- The Armor Strapping & Electronics (led, fan for the helmet, helmet Com with microphone, speakers and so on. maybe a cooling solution)
Tutorials:
Undersuit:
The Undersuit is a little tricky and i want to explain my solution. Most of the armor plates will be screwed on the undersuit directly and i want the sew the armor strapping directly inside the undersuit, hidden beneath the foam padding.
I will use some foams, fabrics in diffrent colors, some perfect gloves by O'neil, an 2 pieces thermo underwear and some hex-pattern foam padding. most of the foam pieces will be carved in the shape of muscles and get covered with the fabric and a black mesh to get the right look.
another 405th used this method one year ago and its mostly perfect.
instead of his build, i want to reduce the abount of muscle padding. within these foam padding i want to implement some hard foam (eva foam) details like the one in this build:
This will help me to get the perfect spartan muscle look and the correct details without any hard circumstances. but the idea, inspired by myself, is the strapping. i want to screw all the armor pieces directly on the undersuit without any visual strapping belts. but i will come to this point when iam ready ^^
The basic idea of this build is to get one "ideal" method for the halo 4 spartan builds, because until now, there is no perfect way to get the armor AND the undersuit looking great. i want to help you out and will offer many tutorials for the "way i want to build it".
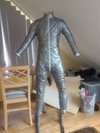
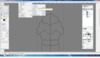
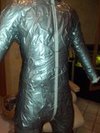
First Step:
The Undersuit
I will create a duct tape dummy and draw the template for the undersuit on it. after that i will create the pattern. the next image shows my undersuit pattern design in red lines, the hex foam in orange and the eva foam details in blue. the zippers are marked with yellow.
Next week i will order all the materials i need for the undersuit and the first bucket of fiberglas resin and fiberglas cloth. the armor i want to make is the halo 4 recon.
BTW: i want to thanks fat-hi555 for most of the files i want to use and the great work he has done for me
Last edited by a moderator: