Nephtis Projects

Status
Not open for further replies.

Nephtis

New Member
Hi!
I decided instead of posting different thread for different projects I would put everything into one thread that I update with progress-posts.

My first finished project, the Dragonscale armor, can be found here: http://www.405th.com/showthread.php/40866-Finished-Skyrim-Dargonscale-Armor-(freestyle-colors)
My tutorial on the Worbla on Pepakura Technique that I use is located here: http://www.405th.com/showthread.php/40880-Worbla-on-Pepakura-(foam-free)-Tutorial


And now on to new projects:

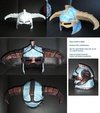
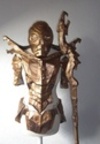
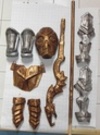
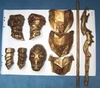
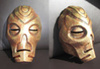
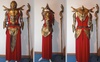
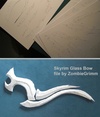
I currently started a Skyrim Dragonpriest Mask and staff (they have a dark base coat so far and will need a proper paint job) and had been eyeing the complete armor. So on a whim I decided to try. Files are - unless mentioned otherwise - by Zombiegrimm. The one exception is the Mask, that file was done by jtm

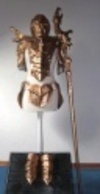
Scaling was difficult, because I had to build different parts of the torso on different scales. The hip-shoulder ratio for women is just different and if I build it for the hip width the shoulder part was just ridiculously wide.
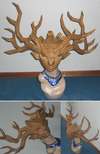
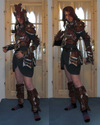
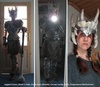
The arms were broken down in two parts, upper arm and bracers (not seen here). Sadly the mask seems rather large for the body armor but I notice that a lot of game characters seems to have a slightly different body-head ratio, making a figure 8 heads tall which I am not. This will fit me so it will have to do. I hope with the shoulders more massive it will be more balanced. Decoration is - as always - free style.

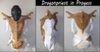
So far the parts are all done, got some layers of wood glue to smooth out the texture but not loose it completely and are currently in the garage, with their first layer of primer drying.

pragon10.jpg
 

Attachments

  • pragon10.jpg
    pragon10.jpg
    4.6 KB · Views: 367
Skyrim armor brought to life. Awesome. I will have to try the Worbla. Would like to make the Ebony set some day. Great tutorial by the way. Thankyou for taking the time to explain how to use it. Seems easier to use than the resin and fiberglass I use for projects. Will be watching for updates.
 
Ok, new update:
Primer & base color finished, will need a lot of weathering, I want this to look old!

base_c11.jpg

Details (bad lighting) base_c10.jpg
 

Attachments

  • base_c11.jpg
    base_c11.jpg
    4 KB · Views: 389
  • base_c10.jpg
    base_c10.jpg
    5.8 KB · Views: 374
Progress!

I made the sprayed-on base look a bit more stained by sponging/drybrushing on two kinds of gold, one more reddish, one more yellowish. After that I started weathring it. This is by far my favorite part of working on armor props. That's when they stop looking like whatever material you build them of and turn into something else.

So far, I like where that Dragon Priest is going, it starts to look like something that has been burried for a long time.
As for masks... I am thinking Krosis which looks like a bronze mask with some greenish oxidation to me - which would also look great for the staff but I am a bit afraid of going at it with green though...
Also, bonus carved nordic boot covers and female orcish bracers to go with another costume.

weathe10.jpg

Another one that got finished this week: The Jagged Crown
(Holidays, you gotta love all that free time, though I probably could be playing Elder Scrolls online instead. When you spend more time building props from a game than actually playing it something is strange...)

jagged11.jpg

I am still a bit undecided about the bone parts.. darken and yellow them some more or keep them white? They are not quiet as white in daylight as they are on the picture with the flash but still rather bright. Opinions?
Once I make up my mind I can seal the paint.
 

Attachments

  • weathe10.jpg
    weathe10.jpg
    7.4 KB · Views: 355
  • jagged11.jpg
    jagged11.jpg
    3.5 KB · Views: 378
Thanks for your input!
Making good progress: Weathing finished and I did add the green oxidation. I was a bit scared but I do like the effect a lot. It might be just a little bit too dark for Krosis but it turned out a lot better than expected so I used it for the staff and the whole armor as well.

Next step: make sure it's really dry (I usually give it at least 48 hours), then seal it. Oh and decide if I want to keep the staff in 2 parts for easy transport & storage or join the 2 parts permanently.


krosis10.jpg

armor_10.jpg

torso10.jpg
 

Attachments

  • armor_10.jpg
    armor_10.jpg
    8.9 KB · Views: 371
  • krosis10.jpg
    krosis10.jpg
    10.4 KB · Views: 359
  • torso10.jpg
    torso10.jpg
    3.4 KB · Views: 353
I love your stuff! That oxidisation look is excellent, the the bones on the crown are very realistic. Do you bondo all your amour, or if it just layers of wood glue on top of the pep?

Second question - are you female? I think you mentioned earlier that you are, and I'm just here to moan about the dearth of female armour files. I'm about the make some iron banded armour using the Volpin instruct able and not sure how to sculpt the boob section. Any ideas?

And i know what you mean about ESO - I've spent most of my holidays crafting, not playing!
 
@GooseJ
I don't use bondo at all. I use papermachè followed by a layer of Worbla's finest Art and Worbla Decoration on top. The bones on the Crown are sculpted with a product equal to Friendly Plastic.

I do have some WIP pictures of the Crown and I use that technique for most of my builds: http://fc00.deviantart.net/fs71/i/2014/012/d/4/jagged_crown_by_nephtis-d71vf56.jpg

I can't really complain about lack of female armor for Skyrim - compared to other fandoms, Zombie often includes a female and male version in his releases. Though in some cases you have to adjust. There is no female Dargonpriest in game (or maybe when worn by a skeleton/mummy it doesn't make a difference ;p) - so what I did is I build the upper torso parts and the tassets on different scales because of different male/female shoulder/hip ratios. And since I work with papermaché, I was able to warp the chest to my mannequin while it was still wet and pin it in place to dry, so it has a slight curve for the chest without any obvious 'boob armor' which works just fine.
 
Thanks for that Nephitis. I'd love to try and use Worbla/Wonderflex but in Australia the price is so prohibitive. I don't want to order some and then mess it up as I'm getting used to working with the material. That probably answers my second question though - how do you get such crisp lines on your mask?
 
@GooseJ - not sure how to aswer that, it depends on the file you start out with and taking your time cutting and folding it, I guess?
The decoration on the forehead was cut out from Worbla based on the file by jtm and attached on top.

Painting/Shading can help making the lines stand out some more. I am not taking it as far as Kamui Cosplay with her armor props (http://reeljungle.com/wp-content/uploads/2014/01/KamuiCosplay-011.jpg - see how she double lines the edges in white?) because I like a less artificial and more organic look but paint can do wonders for the finished product and you shouldn't rush there.

Also: FINISHED!!!
finish10.jpg


I am glad that - with the shoulders and arms attached - and the matching paint the mask doesn't look that bad out of proportion as it did during some of the stages of building the set.
 

Attachments

  • finish10.jpg
    finish10.jpg
    164.5 KB · Views: 389
Thanks!

Holidays are coming to an end so updates will be a lot slower from now on. Started on the 'build from hell':

Skyrim Glass Bow.
This involved a lot of trimming flaps that were larger than the part they were supposed to be glued to, cursing because overlapping numbers were unreadable, more cursing because I had used too much glue on too small a flap and glued the part to my finger instead...

And swearing I'd never build anything with parts this tiny and complicated to fold cleanly ever again.

To be perfectly honest, I certainly would have given up after the first part if I hadn't cut out the whole set already. (I cut them all first and do the preparation for folding but leave one flap connected. That way I can get each part with one snip but I can't loose or missplace any parts.)

glas_b10.jpg


Now, being stubborn I'll get through with it - but it's certainly not as clean as my other builds.
I know covering it with papermaché will smooth things out some more and depending on how it looks at that stage I'll decide if it's worth going all the way.
 

Attachments

  • glas_b10.jpg
    glas_b10.jpg
    201.8 KB · Views: 367
Ok, I have a few questions taht I could use some input on since some of you have way more experience with armor than I do.

I spend my sunday doing the final test of my Dragonscale armor - with all the padding and straps in place and the tunic finally *knitted* (crazy, but I wanted texture but a material that was more breathable than faux leather and that moved smoother) I just put everything on and moved around a bit to see where it might need additional padding or adjusting of the straps.

All in all I am pretty pleased with it and it#s pretty comfortable to wear and move in (though I need to remember how large those boot covers are and walk a little more wide legged).

My main problem is keeping the shouldern in place when I move. Their position to the left and right is ok, I got that fixed securely but they tend to shift forward and backward.
Image 1 has more or less the desired position, image 2 shows how they tend to shift / stay in front when I take my shoulder back.
test_w10.jpg


Any ideas how to fix that?

So far I considered sewing velcro to the shoulders of the tunic and glue some on the inside of the shoulder pieces. It doesn't need to hold any weight that's taken care of, mainly secure the position.

Also the final version will definitively not have striped socks, maybe some leggings and some blood and gore makeup... ;p
 

Attachments

  • test_w10.jpg
    test_w10.jpg
    216.4 KB · Views: 367
Another set that I finally finished (needed to add the fur, straps and the skirt)

It's a summer costume so more skin than I usually do for an armor set.
It's composet of the Jagged Crown, Savior's Hide, female Orc bracers & Carved NordiC boots. My weapon of choice for this set is the Dragonbone war hammer. All pepakura files by Zombiegrimm.
Hair & makeup ideas included but I am not entirely sure about those...

barbar10.jpg
 

Attachments

  • barbar10.jpg
    barbar10.jpg
    169.7 KB · Views: 491
Both armor sets look cool. Did you make real chain mail? Sorry, I don't have an experienced answer for your shoulder question. Maybe a small piece of velcro, like you said, at the lowest point, attached to the sleeve of the tunic.?.?
 
@reiseman: It is real chain mail, but it was bought, I just tried to age it a little bit (more or less successfully) because it was too shiny to go with the armor set. It is still too shiny compared to the weathering I did on the armor parts.

However, long term I do plan to do some project with chainmail and already did buy a loooot of rings. But no starting new projects before I haven't finshed all of my current ones.
 
Armor is looking really good :)
Makes we want to try and build some skyrim parts and actually try the game.
as far as your shoulder question, how is it strapped to the armor currently? Is it attached to just the armor and not your arm at all? if that is the case then you could always make something that wraps around the top of your arm in the position you want that way it might have less chance to move front and back. if that doesnt make sense let me know and ill see if i can explain better :)
best of luck and keep up the good work.
 
Alright, long time since I updated. I got to wear several of my armor sets:

Dragonscale: http://animexx.onlinewelten.com/cosplay/mitglied/595369/472309/12357621/
Savior's hide: http://animexx.onlinewelten.com/cosplay/mitglied/595369/478051/12514495/
Dragonpriest: http://animexx.onlinewelten.com/cosplay/485663/12657621/
NOt Pepakura based but also Skyrim: http://animexx.onlinewelten.com/cosplay/mitglied/595369/443663/11692977/

I don't have future plans for complete armor sets, but I realized how much I do love the different helmets so I plan to build 1 or 2 more to complete my collection (they also look great on the shelve.
Started on the Stahlrim helmet. (file as always: Zombiegrimm)
While I am not too fond of the mateial in-game itself (magic ice??? just as ridiculous as glass, though glass at least has a certain elder scrolls tradition...) I do love the overall shape of the helmet - and I had an idea that I wanted to try for the look of the ice.
Progress from Pepakura to Worbla to Painted:
stahlr12.jpg


And another side project: Spriggan Matron sprigg13.jpg
 

Attachments

  • stahlr12.jpg
    stahlr12.jpg
    212.5 KB · Views: 294
  • sprigg13.jpg
    sprigg13.jpg
    98.8 KB · Views: 373
Status
Not open for further replies.
Back
Top