ODST Build!

Status
Not open for further replies.

quick221

Member
Hey 405th,
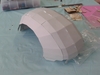
I'm finally starting my ODST costume build tomorrow! I just need to pick up the replacement ink cartridge from my Mum's (I Know Right?) workshop along with some 120 gsm card stock so I can print out this pep:
Capture.PNG
The file is found here in the Halo costuming wiki's database. I know it's just a tester but It's an easy start for a noob like me.
Once it's printed I'll take the uncut pep back to 'The Shed' to work on it. I'll douse it in epoxy resin to strengthen it. I'm still deciding on the colour scheme, I'll do some mock-ups on Vanity and of course, I'll welcome suggestions.
This costume is for the Armageddon Expo (a big convention of various things) in Mid-July 2015. The particular venue is in Wellington, about 50 km (30 odd miles) from where I live. Obviously I've plenty of time but I want to make not a single mistake (heh, good luck I say to myself).

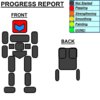
Official Progress (updated frequently)
m0cEXUc.jpg

Regards, 221
 

Attachments

  • Vanity_635509060786015620.png
    Vanity_635509060786015620.png
    825.6 KB · Views: 346
  • ODSTProgress.jpg
    ODSTProgress.jpg
    76.6 KB · Views: 358
Another Helljumper build? Good to see I'm not the only Trooper in the works. I, too, started with the Tester helmet, and mine came out... kinda ****ty, and way too small. What scaling method are you using, and how are you gluing it? I assume this is your first run-in with pepakura, but there's a trick to the final assembly I haven't quite figured out yet. I started at the top and things started to get a little sloppy as I put the back collar pieces on. I then took the entire chin piece (everything below the visor and forward of the ears) and built it in one section. Don't do this, it's almost impossible to get your hands in there and get things done cleanly.

I haven't actually started on my shin yet (I have it all printed out - I'm starting with the shin because I can live with it being imperfect) but what I did was broke it up into managable sections in Pepakura by selecting the relevant pieces and recolouring the edges (I have nine, which took some creativity; Light Blue, Light Green, Dark Blue, Dark Green, Red, Pink, Purple, Turquoise, and Orange). I then initialed each piece's colour on the print out (because it was already printed, and my printer doesn't do colour anyway - the codes were, respectively, LB, LG, DB, DG, R, P, V, T, and O). I'll cut out and build each of these sections and then assemble them all together. I haven't tried it yet, but I figure it certainly can't make things worse, so I recommend it.
 
Hmm. alright. Cool. Have you finished your build?

Anyhow, Update time!
Here's a picture of the printed, uncut peps.
20141107_085640 (1).jpg
Here's something I found flipping confusing...
20141107_085901.jpg
If you look closely, you can see that this sheet (along with two others) is covered in numbers. I believe this is a mirror of some other sheets, just without the lines. Any suggestions as to why this has occurred? Anyhow, I think I have a solution to this; once I've cut out the first side, I can use the cut pep as a master to mirror it.

I was planning to work on it today at 'The Shed' but my sister needs to get her morning nap and I have to leave for my Dad's at 1500.
'Til next time,
ODST-7221 signing off.
 
Don't do this, it's almost impossible to get your hands in there and get things done cleanly.
I'm not sure if I should be ashamed to say this on the internet but I kinda have tiny hands and it can be a pain sewing up plushies (it was gaming related so VERY manly hand-sewing). I'm not saying I disagree though.
 
I'm not sure if I should be ashamed to say this on the internet but I kinda have tiny hands and it can be a pain sewing up plushies (it was gaming related so VERY manly hand-sewing). I'm not saying I disagree though.
Nothing wrong with it. I have big hands, yes, but I was also trying to get a glue gun inside the helmet. The real problem isn't necessarily space, it's really a case of trying to join two large objects, because they both have mass and in trying to rotate the thing into the places you need it to be, it can be a pain.
 
I'm not sure If I Should be Ashamed of Saying This On The Internet But I have Tiny Hands."
I saw this in your signature and nearly covered my keyboard in coke. Not to worry, I too have done plenty of sewing, and I'm the manliest guy I know.
 
Semi-Half-Update Thing!

I almost got to work on my helmet but alas... I dunno. Anyway I picked up three A2 sheets of 225 gsm card stock so I can start building in a week!

Regards, 221
P.S. Next update will be a about a week away.
 
Well glad to see you're getting started, I look forward to it. In my opinion, the tester helmet is invaluable for getting your feet wet without getting too serious.
 
Well glad to see you're getting started, I look forward to it. In my opinion, the tester helmet is invaluable for getting your feet wet without getting too serious.

Haha, I prefer the measure once cut twice methodology.

Sucks to have to wait a week but hopefully that just garners excitement. How are you finding the process thus far, quick221?
 
Haha, I prefer the measure once cut twice methodology.

Sucks to have to wait a week but hopefully that just garners excitement. How are you finding the process thus far, quick221?

I've found it pretty good... Knowing I'm getting into HALO costuming. I might finally be able to do some pepping tomorrow (MIGHT). I get the chance to go to the workshop, but there's a book fair on (It's not a HUGE workshop but a book fair'll fill it up) so I have to help... Lot's of crossed fingers for this ODST-to-be.

My current plans are:
Step 1: Helmet
Step 2: Chest-plates
Step 3: Shoulders + Greaves
Step 4: Thighs
Step 5: Shins + boots
Step 6: Any under armour stuff
Step 7 (convenient): Be Awesome!

Steps (per section)
1: Pepping (dur)
2: Model Strengthening (to be decided)
3: Bondo time
4: Sanding
(4.5: If helmet, fit visor)
5: Prime (for painting)
6: Spray paint pieces (for a later step)
7: Spray paint colour scheme on
(7.5: paint on second colour)
8: Stencil paint emblems and designations etc.
9: Weathering! (sand corners/edges to reveal silver)
(10: Install visor)

Okay. This was a long and ugly post. These 'steps' are up for revision, please noble members of the 405th, I gladly accept all advice and tips from you guys, I humbly look at heaps of threads for armour and props and think it's all SO beautiful and hope desperately I can make anything anywhere as cool as what I've seen here.

Regards, 221
 
I hate to double post but it's... Update time!

Pepping has officially begun:
20141115_152620.jpg
Baby steps though...

Might have more tomorrow, so that's 221, signing off.
 
well even though your half a world a way us Helljumpers need to stick together looks like you have a good plan and know what you need to start with so good luck and take your time that's the key wit doing pep
 
Hey guys, an official update will be tomorrow but for now I think I'll upload a progress marker to the start of the post. I've seen these on heaps of other threads and thought it would be a good move.
It'll be a simple graphic but it'll look nice.

Regards, 221
 
I'm been thinking of revising this thread... Maybe even re-threading. I would like to know the 405th's advice.
Also:
Hopefully an update tomorrow! I've done lot's of pepping and I keep forgetting to take photos! Anywho/how I hope people still care about this lil' costuming noob from NZ (me)!.
 
Interested! care!
haha, what are your reasons for a potential revision? Unless you're deciding to go a whole new direction (new suit) it probably isn't necessary, I'm sure those pics will get some traffic through here and help get the ball rolling.
 
Thanks m00sem4n. That helps.

Anyway... Update time!

I used Tinypic for the image upload this time:
30k4nso.jpg


The helmet is coming along nicely, I almost did a selfie but it felt wrong. I'll do more tomorrow, maybe another update. I've applied for a job so hopefully soon materials (like bondo or visor material for example) will be more within my grasp. From what I've been doing so far even a good hour seems to do little but I enjoy seeing the progress myself.

Well until next time... 221, signing off. ;)

Edit: I just realized how pretty that image is. I'm using tinypic from now on...
 

Attachments

  • 30k4nso.jpg
    30k4nso.jpg
    960.3 KB · Views: 316
  • 30k4nso.jpg
    30k4nso.jpg
    960.3 KB · Views: 286
Careful on your cuts there, I see they are a bit off here and there. You cut straight a little bit then the next cut you are going down and then it curves back up to the corner. I might suggest using a rule to help guide your cuts a bit. Not trying to be mean or anything but if you do not try to keep your cuts straight as possible it will warp the overall appearance of the helmet which can be taken care of bondo. However bondo is money and if you can avoid a couple hours of sanding by taking a little extra time on the cuts it is really worth it.
 
Interested to see how this turns out. This may be a really stupid question, but is the card stock you are using grey? Or is my screen brightness just terrible? Haha.

Good luck with the job bro!
 
Careful on your cuts there, I see they are a bit off here and there. You cut straight a little bit then the next cut you are going down and then it curves back up to the corner. I might suggest using a rule to help guide your cuts a bit. Not trying to be mean or anything but if you do not try to keep your cuts straight as possible it will warp the overall appearance of the helmet which can be taken care of bondo. However bondo is money and if you can avoid a couple hours of sanding by taking a little extra time on the cuts it is really worth it.
Hmm. Thanks. I do try ruling but, well...
 
Status
Not open for further replies.
Back
Top