You are using an out of date browser. It may not display this or other websites correctly.
You should upgrade or use an alternative browser.
You should upgrade or use an alternative browser.
Halo 4 BR85HB SR (Pic heavy!) - First Major Project
- Thread starter RobTC
- Start date
- Status
- Not open for further replies.
CCx Killa Days
New Member
Looks really good!
Redshirt CCx Killa Days Thanks! ")
Noble 10 thanks! First run of five kits should be $230 + shipping.
foxleader the bolt/charging lever will ship loose, yeah. How people animate it will be up to them, though at some point I should be able to offer an animatronic kit to retrofit it.
RiBeck Thank you! I try. I'll add you to the list of interested parties, there are three of you "definites", I believe. Aiming at casting sometime late February to March. Well before the summer con season kicks into gear.
Noble 10 thanks! First run of five kits should be $230 + shipping.
foxleader the bolt/charging lever will ship loose, yeah. How people animate it will be up to them, though at some point I should be able to offer an animatronic kit to retrofit it.
RiBeck Thank you! I try.
I'll add you to the list of interested parties, there are three of you "definites", I believe. Aiming at casting sometime late February to March. Well before the summer con season kicks into gear.
Last edited by a moderator:
realmasterchief
Jr Member
omg that's a work of art dude, stunning work
@Noble 10 Cool, though I can't promise any of the first run will be available, nor even that there'll be a second run. If I do end up doing more than a single run, I don't know if it'll be normally-priced kits (around $350 or so) or fully finished and assembled units (probably more like $900). I have no market research or overwhelming popular demand right now, so I can't really state anything definitively.
@realmasterchief Thanks!
Yeah, my entire system is going to be run from a microcontroller so each part will be modular and self-contained, simply triggered appropriately. The charging lever is going to be electro/permanent-magnetic rather than sprung, so I can control it completely as well as allow operator interaction when applicable (mag change) while minimising power consumption. The charging lever/bolt cover itself will be in multiple screw-together parts for casting and assembly.
In other news, the wife got me a bandsaw for Christmas, so hopefully the rest of the build will go significantly faster!
@realmasterchief Thanks!
reason I asked is most of the weapons I do I have a cambering system only thing is from what can see the charging handle won't reach.
Yeah, my entire system is going to be run from a microcontroller so each part will be modular and self-contained, simply triggered appropriately. The charging lever is going to be electro/permanent-magnetic rather than sprung, so I can control it completely as well as allow operator interaction when applicable (mag change) while minimising power consumption. The charging lever/bolt cover itself will be in multiple screw-together parts for casting and assembly.
In other news, the wife got me a bandsaw for Christmas, so hopefully the rest of the build will go significantly faster!
So a few details left undone here and there, but mostly good progress for the last four days, I think. Let's have a "3,300 views update"!
Framed up a couple of my digital paintings for family Christmas presents (I was worried it'd be "cheap" and narcissistic, but they went over well):

Which meant that I had a ton of matte board which is WAY easier to work with than styrene:

I also found a geometry set in Five Below for $1 and makes life much easier than doing everything with only a protractor.


Superglue the edges and it sands nicely:

With a couple clamps and a length of 2" square poplar, I can mill down stock to any thickness I require! Muahahah:


Bolt cover is 1/2" PVC:

Once rotocast, this part can be routed out from inside if you want a moving charging handle:


Friction fit:

All together:


That's not the end of this section, but I didn't feel like attacking all the fiddly little details and wanted a break while I figured out exactly how to proceed with the bottom half of it. So I started the top of the stock:


4x8 tileboard and a 5ft octabank are the only way to dwarf this thing:


That's it for now. Back to the chamber today, which involves a little bit of grip area addition. Got it all sorted out in my head now!
Also, if anyone wants their kit for ECCC (and I manage to start casting in time, which theoretically should be the case), let me know so you can be the first shipments. I made a quick list of enquirers for easy-tag updates:
DEFINITE
@Arcanine @Harri51 @RiBeck
MAYBE
@FoxtrotX146 @Noble 10
If you're on the wrong list, or don't want to be on either list, or aren't on the list but want to be, just let me know. Obviously "definite" and "maybe" have a closer and more fluid relationship than I've made it look there. I'll include a slimline version of this list with all the important updates. Or all updates, if you prefer, though I assume everyone's subscribed who wants to be.
Framed up a couple of my digital paintings for family Christmas presents (I was worried it'd be "cheap" and narcissistic, but they went over well
):Which meant that I had a ton of matte board which is WAY easier to work with than styrene:
I also found a geometry set in Five Below for $1 and makes life much easier than doing everything with only a protractor.
Superglue the edges and it sands nicely:
With a couple clamps and a length of 2" square poplar, I can mill down stock to any thickness I require! Muahahah:
Bolt cover is 1/2" PVC:
Once rotocast, this part can be routed out from inside if you want a moving charging handle:
Friction fit:
All together:
That's not the end of this section, but I didn't feel like attacking all the fiddly little details and wanted a break while I figured out exactly how to proceed with the bottom half of it. So I started the top of the stock:
4x8 tileboard and a 5ft octabank are the only way to dwarf this thing:
That's it for now. Back to the chamber today, which involves a little bit of grip area addition. Got it all sorted out in my head now!
Also, if anyone wants their kit for ECCC (and I manage to start casting in time, which theoretically should be the case), let me know so you can be the first shipments. I made a quick list of enquirers for easy-tag updates:
DEFINITE
@Arcanine @Harri51 @RiBeck
MAYBE
@FoxtrotX146 @Noble 10
If you're on the wrong list, or don't want to be on either list, or aren't on the list but want to be, just let me know. Obviously "definite" and "maybe" have a closer and more fluid relationship than I've made it look there. I'll include a slimline version of this list with all the important updates. Or all updates, if you prefer, though I assume everyone's subscribed who wants to be.
More progress on the chamber area. Not quite as fast as I'd like, but it took an entire day to figure out the geometry of the magazine, apply it to stock, and lay it out on paper as "blueprints". Now that that's out of the way, it's constant building for a while.


Bandsawing the grip curve to shape:


The chamber area, designed to be big enough to take whatever mechanism I come up with to drive the charging lever motion.

Cutting out matboard inserts is easy:


Bondo workflow, ish:


Fun pics:


Going good! I'd estimate I'm about two weeks or so from completion, so everything's still on schedule.
Bandsawing the grip curve to shape:
The chamber area, designed to be big enough to take whatever mechanism I come up with to drive the charging lever motion.
Cutting out matboard inserts is easy:
Bondo workflow, ish:
Fun pics:
Going good! I'd estimate I'm about two weeks or so from completion, so everything's still on schedule.
Thanks man.
I think I have a definitive solution to the trigger switch question. I want to be able to mount it within the grip, but I want it to be a standard part that other people can buy independently of my "electronics package" (whatever that ends up being). Sticking with the idea of the power tool switch, but making it more simple and less proprietory, I need a solder tag/surface mount SPST momentary plunger switch- which is basically the switch in a power tool trigger. It's another form of limit switch, but a plunger instead of a little lever arm for more realism.
Currently I'm looking at the Omron Electronics C4V-811M-D, which looks like this:

...and is about $3 or so from DigiKey, maybe less from elsewhere. Much better than $15 for a power tool replacement part, and doesn't require modifying for use. Whatever I end up using should maintain vaguely similar specs to this one. I'll try to find something that's fairly widely available (eBay!) if possible.
Next I need to find a 20/22.5 degree rotary switch for the safety selector, but so far I haven't found one for under $30 and usually they're about $150. I don't need an encoder, but that's not so easy to find. If I can't find a cheap rotary switch, I'll make a little PCB panel that contains an axle for the switch with a lever to a simple $0.30 SPDT slide switch.
I'd rather have something that everyone can find independently and install easily, but if I have to do it as an aftermarket thing for realism than I'll go that way. Of course, that doesn't prevent anyone from independently seeking their own solution, assuming they even want the safety selector to be moving (I want it to change the ammo counter display, it looks like there are notification options for "safety on/off", battery condition and scope status. Seems like there should be a "no ammo" icon, but I guess that's what the counter itself is for).
I think I have a definitive solution to the trigger switch question. I want to be able to mount it within the grip, but I want it to be a standard part that other people can buy independently of my "electronics package" (whatever that ends up being). Sticking with the idea of the power tool switch, but making it more simple and less proprietory, I need a solder tag/surface mount SPST momentary plunger switch- which is basically the switch in a power tool trigger. It's another form of limit switch, but a plunger instead of a little lever arm for more realism.
Currently I'm looking at the Omron Electronics C4V-811M-D, which looks like this:
...and is about $3 or so from DigiKey, maybe less from elsewhere. Much better than $15 for a power tool replacement part, and doesn't require modifying for use. Whatever I end up using should maintain vaguely similar specs to this one. I'll try to find something that's fairly widely available (eBay!) if possible.
Next I need to find a 20/22.5 degree rotary switch for the safety selector, but so far I haven't found one for under $30 and usually they're about $150. I don't need an encoder, but that's not so easy to find. If I can't find a cheap rotary switch, I'll make a little PCB panel that contains an axle for the switch with a lever to a simple $0.30 SPDT slide switch.
I'd rather have something that everyone can find independently and install easily, but if I have to do it as an aftermarket thing for realism than I'll go that way. Of course, that doesn't prevent anyone from independently seeking their own solution, assuming they even want the safety selector to be moving (I want it to change the ammo counter display, it looks like there are notification options for "safety on/off", battery condition and scope status. Seems like there should be a "no ammo" icon, but I guess that's what the counter itself is for).
- Member DIN
- S980
Next I need to find a 20/22.5 degree rotary switch for the safety selector, but so far I haven't found one for under $30 and usually they're about $150. I don't need an encoder, but that's not so easy to find. If I can't find a cheap rotary switch, I'll make a little PCB panel that contains an axle for the switch with a lever to a simple $0.30 SPDT slide switch.
Having a cam act on a little slider switch has the potential to put a lot of force on the switch and its mounting. Using a cam acting on a lever action snap switch like the one below or better still, a roller version might be a better way to do it.
You can bend or cut the the lever easily to get better control over when and how crisply the switch actuates. The master power, shroud extension, laser sight and timer circuit, and trigger on my Spartan Laser are all controlled by four variations on this switch. They would be an excellent choice for both trigger and safety switches on your BR.
Redshirt
Attachments
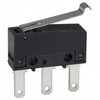
Having a cam act on a little slider switch has the potential to put a lot of force on the switch and its mounting. Using a cam acting on a lever action snap switch like the one below or better still, a roller version might be a better way to do it.
http://media.digikey.com/photos/Omron Elect Photos/SS-01GL13PT, SS-3GL13PT_sml.jpg
You can bend or cut the the lever easily to get better control over when and how crisply the switch actuates. The master power, shroud extension, laser sight and timer circuit, and trigger on my Spartan Laser are all controlled by four variations on this switch. They would be an excellent choice for both trigger and safety switches on your BR.
Redshirt
I didn't leave a whole lot of space for a big cam setup (20x29x25mm enclosing the pivot line), but that's a pretty good idea. I'll look into possibilities on that.
I've finished up the chamber now, other than the odd bit of Bondo squishing or filler primer and sanding here and there, which you'll probably incidentally see the results of in the next few updates anyway. I also added to the grip area, and made everything fit much more nicely and more appropriately to glue construction.
Got me some filler primer, hopefully will take some of the tedium of Bondo-finishing every surface away, as well as more convenient filling of some unfinished planes.


The space for the safety selector electronics:


This part still needs some filling in order to allow proper moulding:


Finally hit somewhere around the 80% mark!


Gonna start on the stock tomorrow. You can see from previous updates that I already got the top part done. Now I just need to build the magazine, which I already have the dimensions laid out on paper for, build a box around that, and lay the side scales over it. Then build the rear bumper to connect to the top plate, which together will form the access door to the stock for electronics. I'll add some kind of internal indents so that neodymium disc magnets can be glued in for quick access. So really, the hard part is over. Should be smooth sailing over the next few days from here. (Did I just jinx myself?)
Got me some filler primer, hopefully will take some of the tedium of Bondo-finishing every surface away, as well as more convenient filling of some unfinished planes.
The space for the safety selector electronics:
This part still needs some filling in order to allow proper moulding:
Finally hit somewhere around the 80% mark!
Gonna start on the stock tomorrow. You can see from previous updates that I already got the top part done. Now I just need to build the magazine, which I already have the dimensions laid out on paper for, build a box around that, and lay the side scales over it. Then build the rear bumper to connect to the top plate, which together will form the access door to the stock for electronics. I'll add some kind of internal indents so that neodymium disc magnets can be glued in for quick access. So really, the hard part is over. Should be smooth sailing over the next few days from here. (Did I just jinx myself?
)Put in my order for the switches, I've got three of each type. I'll look at and feel each one to see which matches the tactility and durability I'm aiming for. Stuck with my original slide switch plan for the safety, because the operating feel of a cam switch is wrong, but I'll be bearing in mind the strength of the switches and may add physical end stops to the lever so that the switch isn't taking the brunt of the force.

You guys'll see exactly where I'm going with these once I start actually constructing the mounting brackets and such, but it should be fairly self-explanatory.
I'm looking at 1/2"x1/8" disc magnets to hold the stock cover in place to allow electronics/battery access (not 100% sure which'll be going in the back there). They're cheap and I have a 1/2" drill bit already.
Currently working on the magazine, update should be tomorrow or Wednesday.
Dakka dakka pew pew! I actually don't think I'll be doing audio for it, though of course that doesn't preclude anyone else from rolling their own. And that last section'll look much better once I have paint on it and can see what needs more reworking. The grip area could use some filler primer too. It may not be considerable as "fully finished" until you guys have it put together and the seams filled over, though I've tried to match them up as tightly as possible.
I'm also trying to make sure it's also assemble-able without the electronics for people who just want a basic static prop or display piece, so I can't leave huge gaps for switches and stuff. Riding that line takes some extra figuring out time.
Magazine is taking all damn day, where I thought it'd just be a couple hours. It does have some very tricksy geometry. Much easier to make out of stamped steel than MDF. I'm still planning on having started on the mag well's dimensions tonight though, I still have a couple more hours of build time left today and I'm finally making some progress after putting the hammer down for the last couple hours.
I'm also trying to make sure it's also assemble-able without the electronics for people who just want a basic static prop or display piece, so I can't leave huge gaps for switches and stuff. Riding that line takes some extra figuring out time.
Magazine is taking all damn day, where I thought it'd just be a couple hours. It does have some very tricksy geometry. Much easier to make out of stamped steel than MDF.
I'm still planning on having started on the mag well's dimensions tonight though, I still have a couple more hours of build time left today and I'm finally making some progress after putting the hammer down for the last couple hours.Dakka dakka pew pew! I actually don't think I'll be doing audio for it, though of course that doesn't preclude anyone else from rolling their own.
Audio shouldn't be too hard - I can even supply you with the raw audio files to get it working. Having everything tied into an ammo counter might be a little more difficult, however.
Personally, if I were to take a cast of this from you, I'd be retro-fitting the magazine into a battery pack and finding somewhere in the main guts to hide a speaker.
That'd be handy to have, for sure. Partially I didn't bother thinking about it much because I wasn't sure where to acquire the files. Should've known our resident getter-of-anything could procure them.
The other part was simply that I felt like any voice coil small enough to possibly fit into the body of this thing would be far too small to produce a sound with any real grunt. A battle rifle that's kinda quiet and bassless seems a little pointless to me, though it could serve for syncing sound and VFX on video.Tying it into the ammo counter shouldn't actually be too hard, it's just a case of getting the timing between the start of each sound to sync up with the dropping count. That'll all be Arduino'd or something anyway, so no big deal there.
My initial thought was to put the battery in the magazine, but I need the ammo counter and scope to run continuously, so that doesn't work so well. Of course, the mag could hold the battery pack and maybe even the amp for the audio circuitry, since it only needs to sound off when the gun's loaded.
- Status
- Not open for further replies.