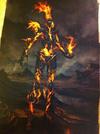
Skyrim Flame Atronach

Status
Not open for further replies.

Nephtis

New Member
Ok, I've worked on this since Christmas but I kept quiet since I wasn't sure I'd actually have the skill to take on this costume project.

However, by now I've managed to create something that is somewhat presentable though it's clearly still very early in this project and I'd like to show it to you - and maybe get a little input.

I had found the files for the horns and the shoulders on the net somewhere - unfortunately I had just saved them but not bookmarked the source so I do apologize - I have no idea who pulled those objs from the game. I'll give credit if someone speaks up!
However, they still needed unfolding - a task I had not done before myself.
That said... a shoutout to Zombiegrimm for unfolding the tons of Skyrim files. Man, doing this really taught me not to take things for granted and how much work you invest in them for the community!

Now on with my project: I built the horns and shoulders pepakura model, papermachéd them with my usual technique and then it was time to heat up the Worbla!

For this project I decided to make the best use of the texture of the material. While usually one spends a lot of time trying to get rid of the rough surface of Worbla for metal armor - this armor looked like it was made from solidified lava with parts still molten inbetween (I am really looking forward to painting this).
I did a few tests sculpting with the material and finally decided that the rough edges created by tearing half-heated Worbla gave the best effect if layered.

The first part I finished were the antlers
flame_10.jpg

If you are somewhat familiar with the creature you'll realize that they are part of a mask-like structure. For that I bought a white-mask as a base - added some paper maché for stability (and also because the material of the cheap masks doesn't deal well with the heat, I melted the first one and had to start over) then I molded Worbla over it - and attached the horns.
Figuring out where to place attachments wasn't that easy and it took 2 or 3 tries but I finally came up with a placement that worked. It keeps the mask safely in place and allows free movement.
I will need to figure out how to *hide* them evetually for costume purposes, but for now I am really happy with the result:
mask_t10.jpg


Motion test - it remains securely in place, I can breath and yes there is enough room for padding across the nose - a mask with horns this size will need that!

Next I moved on to the shoulders.
Again I used a pepakura base - but I realized early on that I needed to attach them more securely than straps, buckles and a D-ring would allow. On the other hand I like to be able to move freely so building collar-neck-shoulders as a joined piece as it looked in the reference wasn't an option either.

In the end I decided to compromise - I built a 2-part under-structure that lay comfortably across my shoulder and distributed the weight - and attached the massive part of the shoulders to that base. There is a slight issue with symmetry from the back - I stared and adjusted it several times from the front and when I was finally satisfied with the front view the back was slightly uneven - but that seems to be an issue I always have - I have no idea how some of you create perfectly symmetric armor.
This being a more organic approach to armor I can live with it but it still irks me.

The other issue I have is that I think I may have scaled them a little bit too wide but it's hard to tell on a dress form for the lack of arms at the side of the torso. Other than that I am quiet happy with the design and I hope this will work out. No neck structure part like in the reference though.
should10.jpg

As you can see I haven't finished sculpting the texture all over the piece yet.

And I am still unsure if I want the spine part attached to it or not.
It looks nice from the back, but in the side view I don't like the curve and size of it. Any input on this?
 

Attachments

  • mask_t10.jpg
    mask_t10.jpg
    95.7 KB · Views: 1,480
  • flame_10.jpg
    flame_10.jpg
    129.5 KB · Views: 429
  • should10.jpg
    should10.jpg
    227.7 KB · Views: 1,206
Last edited by a moderator:
Ahh, in my Skyrim playing days there were only two things I feared: Flame Atronachs and anything that had lightning....usually mages lol. Your build is coming along nicely, and if you allow me to put in my two cents. A good way to hid the straps might be to match it to the color of your hair if your not going have any other head pieces, or possibly tuck it under your hair. Also, I would say no for the spine piece cause from the side it looks like it protrudes out more than where normal spine placement would be.
 
Thanks for your input - I feel the same way on the sideview as you do.

It really seems to produde out too much - maybe a plate with a flatter structure would look less odd in the sideview and could still cover the seam between the two parts. Or maybe I forgo the spine part altogether and just continue sculpting the texture.

As for the head - I am not quiet sure yet how to handle it I am currently doing some research on different techniques.
So far there are different routes I could go:

1) Make it flame atronach armor and not bother with a flaming head - that would make hiding the straps easy by simply combing the hair over them and do some facial cracked-molten-rock face-paint. That would be easiest - I have everything on hand - and the most free-style choice. It will certainly be my backup plan anyway.

Flames:
2) Some kind of cap/wig that I can run the straps under. There are several options that create a flame effects - I found those approaches to the same character on the web that demonstrate it rather well:
This could probably be done with a (craft)foam base and paint - looks rather good but will be massive and difficult to store and transport. For effect however it IS stunning though it would probably be a bit much with the horns and would possibly take away from the horns being the most solid part of the headgear if they sit next to it. http://sp3.fotolog.com/photo/19/17/26/michael_knight/1207533156_f.jpg
The next one is Organza in different shades of orange and red - the fastes to make and the easiest to store/transport https://fbcdn-sphotos-g-a.akamaihd.net/hphotos-ak-ash3/1404443_651996118200256_255645047_o.jpg
Then you could use Kanekalon or some kind of plastik hair - I have used it to make my own wigs before and it is easy to work with and can be styled with heat and hairspray) - but it's also the look I am less fond of - it might work if I free-style some more and do a flame colored mohhawk rather than a full head... http://s192.photobucket.com/user/Great_WhiteSnark/media/comic-con%202008/IMG_2836Large.jpg.html or http://i639.photobucket.com/albums/uu116/Toxic_Dee/Mobile%20Uploads/image_zps4fc4835e.jpg

And finally I found this idea where lighting gels have been used - if I had any talent for LEDs I imagine that would be a good choice but I am not planning on adding any light to this atm... http://bellechere.tumblr.com/post/22086761435/guess-who-hint-shes-not-on-my-costume-roster

Combinations of the materials are also an option, like done here with organza and hair (I could even add a bit of organza to my own hair instead of a wig...) http://lalonding.tumblr.com/post/39966535532/flame-princess-wig-tutorial

Luckily, the flame effect is the part that can easily be replaced/upgraded - so for now I am working on the armor and I'll start making more precise plans once I finished that step. If any of you want to join me for brainstorming you are most welcome!
 
Firstly I have to say wow!
This is looking awesome so far, and is really making me want to start using worbla.

For the spine, are you able to move it closer to the back / or thin it down to try to reduce it sticking out?
Are you going to be adding more layers to the shoulder blades, if so would it make it blend in more?

As for the flames, if you wanted to use some lighting, you could try el wire.
I haven't got to using any yet, but from what I have researched it is easier to work with than leds...
Here is a link to a el wire site as an example:
http://www.adafruit.com/category/50

Anyway, I hope I helped a bit,
looking forward seeing this build progress :)
 
The Worbla does look pretty nice, though I think I would tackle this as a clay-and-cast project for cheaper infinite re-do-ability. But that's just me.

I happen to have a Staff of the Flame Atronach right now, so I summoned one and got some screenshots- while she was actually staying still- that hopefully will be useful. They seem to indicate that the horns are ok, but the face could do with some significant shrinkage and "cherubisation". It's extremely feminine. The shoulders seem fine, but the spine is definitely a redo as well. (Assuming you have any intention of redoing what you've already done, anyway. I'm just comparing)

2015-01-24_00004.jpg

2015-01-24_00005.jpg

2015-01-24_00006.jpg

2015-01-24_00007.jpg

2015-01-24_00008.jpg

2015-01-24_00010.jpg

(Yeah, I turned on all of my miscellaneous quest flags, currently trying to blow through them all since they were all stuff I got like 20-something levels ago.)
 
Thanks a lot for those screenshot - they will be helpful, it's really hard to get good back and sideviews - they always seem to sommersault when one tries to take a picture. Or in my case try to kill me since I never played a character who used a staff and could summon his own.
 
I'm an Ebony-armoured female Nord who specialises in Two-Handed, Archery and Sneaking, hahah. Magic staffs are mostly just for fun and quick levelling. Can't remember where I picked this one up, or I'd just direct you there to grab your own screenshots. There's a spell for it too which I think I know, but I don't remember where I got that spell tome either. Not very helpful. :p
 
Don't know if these will help.

IMG_3195_zps3e714d81.jpg

IMG_3196_zpseb2b26c2.jpg

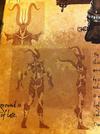
There from the elder scrolls online collectors artbook.
 

Attachments

  • IMG_3195_zps3e714d81.jpg
    IMG_3195_zps3e714d81.jpg
    119.3 KB · Views: 834
  • IMG_3196_zpseb2b26c2.jpg
    IMG_3196_zpseb2b26c2.jpg
    146.6 KB · Views: 390
Thank you a lot - There are some elements I like about the ESO variant - mainly the more rocky, assymetric design that looks more like part of the elemental's body rather than real armor -and others I don't like (those spikes/wings on the back ).

I'll stick mainly to the Skyrim variant - but I'll certainly look for inspiration all over since some parts need to be changed to make it more wearable.
 
I did a test with a different version for the spine - I will reduce the backpart of the armor a little in the interest of making it easier to wear/move in - so instead of covering the whole back and waist I'll just have a plate with the spine pattern (the front part needs to be shortened too anyway - or the tips of the chest armor will dig into your thighs if you sit down).

This time I kept the design really flat - and experimented with dyeing some Worbla's Deco Art (think friendly plastic pellets) with acrylic paint. It's a mess mixing it while it's hot but one it has cooled and you re-heat it the paint doesn't come off and it's clean to use.
The reasonI tried it for that is that paint can get chipped off if pieces rub against each other and the yellow Worbla is very obvious when you have dark armor - so I wanted to have something dark underneath in areas where that would potentially happen. (And I wanted to try this for some time anyway...)

Added a bit of texture that will allow some red/orange paint to settle in the cracks later on.

If it weren't for the fact that the armor would end up too heavy the Dyed Deco Art creates a really nice mineral effect if you mix tiny bit of bronze/gold pigments with the black! For smaller things and things that get a lot of wear I'll certainly keep that technique in mind!

test_d10.jpg
 

Attachments

  • test_d10.jpg
    test_d10.jpg
    115.1 KB · Views: 362
UPDATE
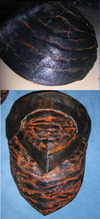
First color tests done:

The upper one is cracks filled with red and yellow, painted over with black.
The lower is orange in the cracks, with black on top and then some orange dry-brushing.

Personally, I like the second version better though it lacks highlights/a glow - and I will probably use a little less orange and keep the armor parts mostly black with just a little orange showing in the cracks.

color_10.jpg


Btw... the upper part is not part of the armor but build seperately to test sculpting texture & colors.

The part in the lower picture is a tasset based on the ebony armor (file: Zombiegrimm): I had a look at the original design of the thigh 'armor' and it's just asking for the wearer to bump into things and making it difficult to let your arms hang by your side with the way it protrudes from the body. Not to mention that it's not fixed to anything and I feel i's too large/heavy to velcro something like that to a unitard - so I decided to free-style it and use tassets that can be hung from the belt. The ones from the ebony armor are simple and easy to customize, won't get in the way too much and in combination with the belt look feminine enough to go with the design.

There are other freestyle choice I wil have to make - Vambraces instead of 3-fingered clubs... and I will need to integrate boots/shoes into this since I can't levitate ;p

For the body I am looking into a company who offers to print true to siza on 4-way stretch lycra. I have a pattern for a unitard and they claim to be able handle a print of that size. I'd probably design something that's more molten rock/lava than flame and with a undersuit like this the placement of design doesn't have to ber all that precise and more organic.
 

Attachments

  • color_10.jpg
    color_10.jpg
    233.8 KB · Views: 359
Worked on the lave/magma color of the armor (painting non-metal armor is a lot of fun and this time I chose a project with the intend to make use of the texture of Worbla instead of spending a lot of time smoothing it).

Armor parts:
armor_10.jpg


Mask:
mask_c10.jpg


The glowing cracks were rather simple to do.
Used the red in the cracks, then painted all the raised areas black as in my test.
Then I mixed a bright orange/yellow and added it in some of the cracks with a very fine brush. Made it really pop.
For the larger smooth ares like pools on the shoulders&chest/lips finally added an even lighter yellow to make them glow.

All that remains to be done is seal the paint. (Legs and arms are free-style since I am not going to do 3-fingered clunbs taht are longer than human arms)

Next step: Molten rock/magma unitard.... I have a pattern and found a place that prints your designs on 4-way stretch lycra - we'll see how that turns out.
Anyone here with experience sewing bodysuit with 4way-stretch material? Any useful suggestions?
 

Attachments

  • armor_10.jpg
    armor_10.jpg
    197.4 KB · Views: 338
  • mask_c10.jpg
    mask_c10.jpg
    159.3 KB · Views: 300
I started playing Skyrim for the first time just a few weeks ago, and when I first saw this build I thought it was definitely an ambitious project. You've done great, I love how you used the texture on the Worbla to your benefit, and the paint job is awesome. Keep up the great work!
 
The colors on the mask really made it look more feminine and changes to the spine are a lot more natural. I love seeing your pictures and this looks really fantastic!

Have you decided what to use for the under suit/wig? If you didn't want to go with lights, maybe some kind of small details in foil print fabric would work to make it slightly reflective.
 
Random list of thoughts!

1) I think everyone knows this, but it always bears repeating: when sewing stretch materials, make sure it's stretched out while you sew, or else when the fabric stretches, the thread goes pop. Obviously that only applies to areas that naturally stretch, so it's a good idea for the feet and crotch, but probably unnecessary for say, the side seams.

2) Paint job looks excellent, maybe try some metallic paint for parts that specifically glow- automotive pearlescent spray paint might work nicely and comes in orange. You can also buy reflective and pearl powders separately that you might be able to stipple into those glowing cracks.

3) Try some kind of dulling spray on the outside- when the "cracks" and "rocks" have a uniform specular highlight, the effect is obviously ruined (looking at you, breastplate!).

4) You could use heavy duty armature or piano wire and velcro to achieve a more genuinely "minimalist" effect with more consistent textures between the Worbla and the Lycra- the split breastplate, the floating arm and thigh pieces, that kind of stuff. You seem to have deliberately avoided going this route though, so take that with a grain of salt.

5) The faceplate looks better now, I don't know if you "fixed" it mechanically or if it's just the paint "makeup", but it worked.

6) Hope my screenshots helped. Looks fantastic, overall.

7) Looks like the head will be difficult, since it doesn't really have a cranium, it just dissolves into flame. Should be interesting to see.
 
Thanks for the positive feedback, glad you like the results so far. For all of you wondering: I didn't change anything on the faceplate, this is just make-up magic. ;p

Right now I am stuck at the sewing part - I got the printed lycra but I really hate sewing - I did some easy stuff in the past but never anything stretchy. Before, I commissioned sewing bodysuits - but my trusty sewing wizard has no openeings for the next few months - and I am kind of worried that my cheap machine might not be up to sewing lyra, plus I found different and contradicting information regarding the needles or yarn that you need to use or the machine settings .... feeling a bit paraylized right now.

On the up side I am making plans for a head piece - it's tricky and it probably be more of a mowhawk of flames (considering different materials still - and have added a new material to the potential candidates:
Apparently there is a transparent Thermoplast coming out - needs a higher temperature than Worbla to work with and not self-adhesive as far as I understand but I can see a lot of potential for glowing things.
I love that you can get a clear and a milky effects and that you can use foils to tint it... https://youtu.be/YhX5LGL832A or https://youtu.be/bHubQanKXe4


Now... RobTC
Thanks for your input - I looked at pearlescent paint after you mentioned it - there is a line for airbrushing, too - but for now I don't want any metallic or glitter effect on this armor.

You are right about matte and glossy areas though - I had thought about sealing everything with a semi-matte finish and then apply a matte one with a brush on top of the more rocky-areas.
Waiting for higher temperatures outside so I can do it in the garage.

Btw, you were right about me avoiding the whole floating armor parts thing - I've tried it in the past with attaching armor parts to body suits, gloves and whatever - if your armor part has some weight and you have stretchy material it will pull down and effect the fit of your body suit not to mention that it can get uncomfortable. And even light parts velcro-ed in place will evetually come off. It's just not practical. It works if all you plan to do is check the fit then pose for pictures and not much else. But I usually enjoy being a bit more active on a con day and I am willing to compromise accuracy for comfort any day. I am just not having fun having to check and adjust armor parts all day.
 
Last edited by a moderator:
Ok, another update.

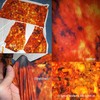
Since I am trying a new material/technique I thought I'd document this here: it's printed lycra based on a design I did digitally. As I said flame would be difficult so I decided to try magma as a base for the body. (hey I could also do ESO DK Magma armor using that ;p)

I decided to try out the print because I have worked with painted lycra before - it works and looks ok for 1-2 wears/washes but since the paint sits on top of the fibers it rubs off in areas where there is a lot of friction and with all those armor parts it would probably not look good for long. Cotton can be dyed but it tends to get baggy in areas like knees and has less stretch.

So printed lycra it is - and I am hoping that it's indeed more resistant to the colors coming off compared to painted lycra.

Thought I'd show you the material and how the detailed the print came out. So far it looks promising - the colors a neat and shiny which will contrast with the armor parts and the level of detail is satisfactory.
It stretches fairly well, gets a bit lighter but there is no true white showing. It may not be easy to place designs correctly that have to follow body contures but if it truely is more resistant to color coming off (remains to be seen) I think if you want a nice basecolor that is textured - or maybe a soft color gradient this could actually give you really nice results.
print_10.jpg

Btw - if you want to compare directly the original file rotated 180° is in the lower right corner of the printed square in the overview picture....)
 

Attachments

  • print_10.jpg
    print_10.jpg
    240.9 KB · Views: 289
Status
Not open for further replies.
Back
Top