First mjolnir powered armour Mk VI build

Status
Not open for further replies.
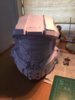
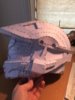
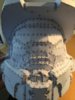
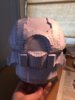
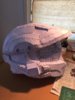
Pep for helmet is finished! I'm quite happy with it overall, just a couple rough spots. The neck hole was too small for my large head whereas the rest fit fine with room for padding so i had to make extra cuts to make it bigger and fill it in with card stock. I also cut the very bottom layer at it went in a good amount and trimmed the next layer up a bit as well which improved the fit.

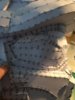
My cat jumped up when i was doing the visor misplaced i piece. Luckily i was able to recreate it, even though it isn't perfect it does the job, of course i later found it when it was too late to swap it back.


- - - Updated - - -

I also had a question, when do you guys cut out the visor? After resin or after pep?

Sorry about the double posted photos i don't know how get rid of the extra ones.
 

Attachments

  • IMG_4116.jpg
    IMG_4116.jpg
    2 MB · Views: 358
  • IMG_4117.jpg
    IMG_4117.jpg
    2 MB · Views: 276
  • IMG_4118.jpg
    IMG_4118.jpg
    1.7 MB · Views: 297
  • IMG_4119.jpg
    IMG_4119.jpg
    2 MB · Views: 267
  • IMG_4120.jpg
    IMG_4120.jpg
    2.3 MB · Views: 279
  • IMG_4121.jpg
    IMG_4121.jpg
    2 MB · Views: 273
  • IMG_4121.jpg
    IMG_4121.jpg
    2 MB · Views: 254
  • IMG_4120.jpg
    IMG_4120.jpg
    2.3 MB · Views: 273
  • IMG_4119.jpg
    IMG_4119.jpg
    2 MB · Views: 270
  • IMG_4118.jpg
    IMG_4118.jpg
    1.7 MB · Views: 252
  • IMG_4117.jpg
    IMG_4117.jpg
    2 MB · Views: 269
  • IMG_4116.jpg
    IMG_4116.jpg
    2 MB · Views: 269
Ive just tried to download the next file but it won't let me. Pepakura designer says can't load specific file type. can anyone help, i haven't changed files or anything and they all used to load up fine. Thanks
 
Thanks Noble 10
I found out that the files have changed to text documents so I used a different browser which seemed to fix that but when I opened the file it was blank.

Thanks for any help.
 
The file archive is currently having problems. So in the meantime I've uploaded here: LINK

PS. Looks great! can't wait to see the rest of it built!
 
Sorry that there hasn't been an update in a while, i had a stomach bug/ food poisoning. Work has now resumed and i hope to have some more updates soon!
 
Your helmet looks great. Good pepping. I am just getting back to the 405th from a long pause.
I pepped the helmet first to. it does help to start small and build up.
 
Alright, heres an update. so far i have pepped both forearms and both hands (and helmet). length of the forearms is good but the width/depth was too large, so i had a to cut parts out of the side parts for bring the size down, now it fits a lot better. I've have started the next stage on the helmet, but Im not sure whether the resin topcoat i used was too runny (not enough hardener) or something as it has made it very hard to stick the fibreglass to the inside and to get it to conform to the helmets shape. i was wondering how hard it is too sand down air bubbles and remake out of bondo, or how bad air bubbles really are? The helmet scratches my ears slightly on the way down so i will sand the edge down there to make the fit smoother.

IMG_5458_2.jpg


IMG_5471.jpg
I have bought my gold iridium visor that looks awesome and i can't wait to fit it. i don't have any photos yet of the part fibreglassed helmet but its getting pretty solid.
IMG_5474.jpg
 
I need some advice. I have pepped the chest piece of the torso so far, it is in separate pieces for the files i am using. But the chest piece looks too small, i have measured it up against myself, where i thought it may have been too small, but the looking over reference photos it looks like it may be the right size. its hard to tell without having pepped the other parts how it will sit on my body. I have also checked the scale with a different method and that came up with the same size.

So basically i has anyone else had this thought and what did you do?
 
Heres some photos. Since taking these photos i have sanded down the bondo shown and applied a coat to other areas, and a second coat to the top. I have also cut down the neck hole to make it bigger to make my big head fit in easier, its still a squeeze but i hope with sanding it won't be so scratchy.
IMG_5539.jpg IMG_5540.jpg IMG_5541.jpg
I have finished pepping the main part of the chest, i just have the thrusters and the two separate pieces to do.
IMG_5542.jpg IMG_5543.jpg IMG_5544.jpg IMG_5545.jpg
I'm still looking for answers to my earlier questions, anyone else who has made a gen 2 did your chest piece seem too small, where you able to make it bigger, or did it just sort itself out. Any help greatly appreciated.
 
Hmm...at this point, can't you just fit what you have over yourself and make judgment from there?

The way I would have gone about scaling this is, using the "measure distance between two points" tool to measure the inside opening in various areas to make sure it will hug the body as close as possible but still allow clearance in all directions.

So I would first measure your mid-ribcage and make sure the inside of the lower connecting arms are a little bigger, but not much (horizontally). I would also measure the outside edges right above the shoulders, and make sure they match up close to the center of you shoulder to shoulder joints (not outside clearance). Also measure inside depth and make sure there's enough clearance there. Use the reference images I provided to see how it's suppose to fit your body.

At this point, it may be best to just finish the chest piece you got and see how it fits, and decide on a new scale from there (if need be).

back to the progress. Looking really good! I can't wait to see this finished! I'm just happy to see my files get used.


Yeah i did that with the other pieces but because i scaled using a photo and measuring my self i just didn't think about it. But because I've finished it i can't fit it on to check the final fit. I was thinking however after i hardened it and split it then it will be easier to tell and i could always add straps or something to make it larger. If not then i made my younger brother a chest piece.
 
Ive taken the plunge and decided rebuild the chest. I've rescaled and checked every measurement i could. Here we go again
 
This build is looking awesome! The pep work you've done looks like some of the cleanest I've seen, and I can't wait for more! *subscribed*
 
Status
Not open for further replies.
Back
Top