First Foam Build

Status
Not open for further replies.
Hey all. I don't have a lot to show today, I was going to do a fair bit more on the build this afternoon after work, but Ive gotten home and Im feeling pretty beat, so I've only done the base coats of paint, still needs weathering and finishing, but I didnt want to rush things and especially when I wasn't really in the mood for it ether, Ill just end up doing something Ill regret later. Maybe when I get a day off soon Ill dedicate some more time. The base coats consists of 2 Camo green Plasti dip to One almost dusting like light coat of a color called wilderness green, its like a grey green moss type color. It looks a little light at the moment however the weathering and battle damage will sort that out.
IMAG2615_zpslricelo1.jpg
IMAG2616_zpssrlifiqo.jpg
IMAG2618_zpswopba5h9.jpg
 

Attachments

  • IMAG2615_zpslricelo1.jpg
    IMAG2615_zpslricelo1.jpg
    221.9 KB · Views: 135
  • IMAG2616_zpssrlifiqo.jpg
    IMAG2616_zpssrlifiqo.jpg
    212.9 KB · Views: 196
  • IMAG2618_zpswopba5h9.jpg
    IMAG2618_zpswopba5h9.jpg
    202 KB · Views: 129
Hey guys and gals, SOOOOOO !! the cod piece is done whoooooo !! Since my last post I did added a bit more detail on the rear of the belt and I also thought it needed something extra, so I added a light at the back in the center. Then painted it all up and gave it a clear coat to finish it off. here she is guys.
IMAG2640_zpsp46vxwdf.jpg


I also added battle damaging and scaring just like the chest piece and tried to keep it pretty consistent with the chest pattern.


IMAG2639_zpsndscqr89.jpg
IMAG2642_zpses3ssxiy.jpg
IMAG2647_zpszohpbqqr.jpg
IMAG2643_zps96tnord2.jpg
So for the light diffuser I used the same technique as the back of the chest piece, I get some clear hot glue and fill up a layer on some clear thin plastic, like the top of a clear takeaway food container, then once its cooled I cut out the desired shape and and place it neatly in a counterpart hole in the suit, making sure the flat food plastic is facing outwards, as in its the bit you see. Then using a heat gun lightly heat it up and as the glue melts again it slightly sets in place, its strong and doesn't seam to come out,but not to the point where if i need to take it out, that it will rip foam off, Its cheep, easy to replace and I think it yields pretty good results. All the wiring and electronics I was able to rig up and tuck away neatly in the back as well so I pretty happy with that.

IMAG2644_zpshjww3apb.jpg
IMAG2645_zpscdahwg6n.jpg
IMAG2646_zpsnjkt8nop.jpg
IMAG2658_zpsejwtj5bd.jpg
IMAG2660_zpsmemcvhuj.jpg
IMAG2651_zps8rbssxhr.jpg
IMAG2650_zpsbglintsr.jpg
IMAG2649_zps7jm1ywlg.jpg
IMAG2648_zps23baacc7.jpg

Not sure which piece ill move onto next, thinking the shoulders maybe the thighs. which piece would you guys like to see next up ?


IMAG2640_zpsp46vxwdf.jpg


IMAG2639_zpsndscqr89.jpg


IMAG2642_zpses3ssxiy.jpg


IMAG2647_zpszohpbqqr.jpg


IMAG2643_zps96tnord2.jpg


IMAG2644_zpshjww3apb.jpg


IMAG2645_zpscdahwg6n.jpg


IMAG2646_zpsnjkt8nop.jpg


IMAG2658_zpsejwtj5bd.jpg


IMAG2660_zpsmemcvhuj.jpg


IMAG2651_zps8rbssxhr.jpg


IMAG2650_zpsbglintsr.jpg


IMAG2649_zps7jm1ywlg.jpg


IMAG2648_zps23baacc7.jpg
 
Last edited by a moderator:
That is one nice cod peice man. Your building and painting skills are superb. I can't wait to see more progress shots.
 
Amazing project, unbelievable and really confidence-building. I'm planning to start a Destiny build this week, and this just convinced me to go the foam route. I have a couple of questions though.

What are you using for those thinner layers of foam? Also, what tools are you using to shape/shave the foam? Exact-O knives? Razor blades? Hot-glue to hold the layers together? To fill in the gaps are you using drywall paste? I know you said the "soft stuff", but I have no idea what that is. Can you mention a brand name or something so I can find a similar product here in the US?
 
Hey all thanks for the awesome comments. I can't wait to post up more pics. as far as what I've used and tools and things, I won't get a chance to go into the workshop for a few days, but I promise I'll post some pics and drop some brand names and things when I get a chance.
 
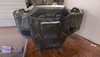
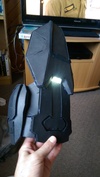
HELLO 405th, Sorry its taken me a few days to get this info up, shift work is a bit@#. Anywho as promised Ill show you the tools and materials I use.

Foam:

I use 3 layers/thicknesses of foam.

1) Standard EVA foam mats for the base.
51I1WHRGbL_zpsb0s4dwjx.jpg

2) I'm not sure if you can get these in the US of A but here in AUS, I get them from Kmart. They are food and water mats for pets, they are still EVA foam so they bond well with other materials and hold there shape when heated and cooled.
They are approximately 5mm thick ( 0.19685 of an inch, I pre googled this for my US friends in here :D). 12262014_1012_1_zpsvc095yyi.jpg

3) Now this is just standard craft foam in multiple colors, they come in a pack of about 200 or so here. I get them from Spotlight Australia. they are about 2/3mm thick. (0.0787402 of an Inch). assorted_craft_foam_sheets_1_zpsvdoudkuj.jpg


Tools:
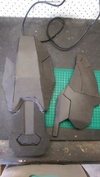
I'm just going to list these with a photo next to them.
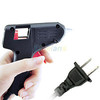
1) Hot glue gun ( I use a smaller type, as its easier to get into smaller tighter spots if needed.)
electric-tool-hot-melt-glue-gun-20-watts_zpsvas5wmqr.jpg

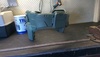
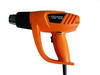
2) Cheep Heat gun ( I say cheep, just to show that this can be done on a low budget ) I believe I paid $15 Aus for mine.)
images-27_zpsrc1tnp5j.jpe
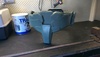
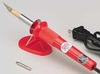
3) Hot Knife ( once again cheep, however I do step it up on the blades, otherwise in the long run it would end up costing me more in replacing them anyway.)
hcar0770_zpsulyrc4ob.jpg
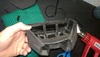
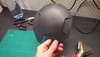
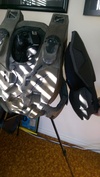
I also use whatever I can get my hands on for shaping, making particular details or just nuts and bolts type things to add more layers and details to the build. Anything lying around the house that suits my needs.

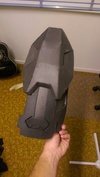
Finishing and Painting:

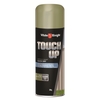
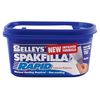
ok so to start this process I begin my filling in any visible holes and gaps with a drywall filler (brands and type is exactly the ones I use in pictures below.)
902096089_0_9999_v1_m56577569830811634_zpsfmjsi7pi.jpg
ebd7ad07-2100-4ffc-8b31-e6b5b07b6d88_zpskp9c3cuf.jpe
c210b06c-9fcb-4b5c-a17c-25780236e4ed_300_zpsw4w4nwmc.jpg
97b7dd71-f222-4bd6-825b-00fbb2fb699e_zpslxy8bsls.jpg

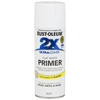
I then spray a coat of primer paint to highlight any further imperfections and fill accordingly, then a second coat of primer is applied.
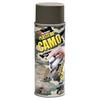
3rd is 2 coats or more if warranted, of the GREEN CAMO plasti dip rubber coating.
then 1 light coat of your choice of paint. Mine is called pale eucalypt, I think I said it was something different in an earlier post but this one is the right one.
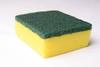
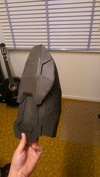
Then I heavily water down some black and brown acrylic paint, separately. Applying it with any old brush, this part doest have to be particularly neat, but I make sure im putting it only in the gaps and corners where dirt and grime would normally collect, I do a little bit at a time, them wipe it away with a common dish sponge, when I do this it wipes out onto the rest of the suit and creates that weathered and used look.
images-34_zpsltk5k6sh.jpe
IMAG2642_zpses3ssxiy.jpgThen with any old brush again, the crapy-er the better, spray it with some chrome paint and dry brush in some scratching and bit were the paint would wear away.
Now this is the part where I get a little antsy about but I really go over in my head for a while, thinking and pondering placement of damage and gashes. Then with my hot knife tool i start to make cuts and marks in the suit. Once Happy with the battle damage I give them a really quick spray with black paint, making sure not to get to much over spray on the surrounding areas, a little is ok because it gives it that tarnished burnt look. Then once that has dried I take some more black acrylic and fill in any spots I missed with the spray and then apply some more dry brushed chrome over the top again. IMAG2643_zps96tnord2.jpg
to finish I give it a coat of a clear matte sealer.

THEN TAAA DAAAAH !! it's done.

If you guys have any specific questions on how I do something exactly just ask and I post up more.
 

Attachments

  • 97b7dd71-f222-4bd6-825b-00fbb2fb699e_zpslxy8bsls.jpg
    97b7dd71-f222-4bd6-825b-00fbb2fb699e_zpslxy8bsls.jpg
    101.5 KB · Views: 133
  • c210b06c-9fcb-4b5c-a17c-25780236e4ed_300_zpsw4w4nwmc.jpg
    c210b06c-9fcb-4b5c-a17c-25780236e4ed_300_zpsw4w4nwmc.jpg
    9.1 KB · Views: 133
  • 51I1WHRGbL_zpsb0s4dwjx.jpg
    51I1WHRGbL_zpsb0s4dwjx.jpg
    39.5 KB · Views: 180
  • 12262014_1012_1_zpsvc095yyi.jpg
    12262014_1012_1_zpsvc095yyi.jpg
    97.6 KB · Views: 175
  • electric-tool-hot-melt-glue-gun-20-watts_zpsvas5wmqr.jpg
    electric-tool-hot-melt-glue-gun-20-watts_zpsvas5wmqr.jpg
    10.9 KB · Views: 136
  • images-27_zpsrc1tnp5j.jpe
    images-27_zpsrc1tnp5j.jpe
    6.4 KB · Views: 189
  • hcar0770_zpsulyrc4ob.jpg
    hcar0770_zpsulyrc4ob.jpg
    7.6 KB · Views: 185
  • 902096089_0_9999_v1_m56577569830811634_zpsfmjsi7pi.jpg
    902096089_0_9999_v1_m56577569830811634_zpsfmjsi7pi.jpg
    84.1 KB · Views: 123
  • ebd7ad07-2100-4ffc-8b31-e6b5b07b6d88_zpskp9c3cuf.jpe
    ebd7ad07-2100-4ffc-8b31-e6b5b07b6d88_zpskp9c3cuf.jpe
    128.5 KB · Views: 159
  • assorted_craft_foam_sheets_1_zpsvdoudkuj.jpg
    assorted_craft_foam_sheets_1_zpsvdoudkuj.jpg
    35.4 KB · Views: 224
  • images-34_zpsltk5k6sh.jpe
    images-34_zpsltk5k6sh.jpe
    4 KB · Views: 190
  • IMAG2642_zpses3ssxiy.jpg
    IMAG2642_zpses3ssxiy.jpg
    224 KB · Views: 165
  • IMAG2643_zps96tnord2.jpg
    IMAG2643_zps96tnord2.jpg
    251.3 KB · Views: 168
Hi again,
Didn't know if I would have much done today with this piece, A lot of its shape and construction was experimental, so took me a little longer. All I had were tons of reference images and I had pepakura viewer open, so I could use the 3D pep file as a reference point too. But its all from scratch and drawing up my own templates on card first then onto foam. I've only started one so far, because I wasn't sure how it was going to turn out , making sure i took notice of the steps i was taking to achieve each bit and putting my templates aside for the left shoulder, when it comes time to do that one. this is what I have so far on the right shoulder.
IMAG2664_zpswmxp5fh5.jpg
IMAG2666_zpsm8vxih2p.jpg
IMAG2665_zpssb08wzwq.jpg
IMAG2668_zps9orbuyqp.jpg
IMAG2673_zpszqvxqd6j.jpg
IMAG2674_zps6bmktf8p.jpg
IMAG2675_zps9ot8wvyq.jpg
IMAG2676_zpsexws659y.jpg
 

Attachments

  • IMAG2668_zps9orbuyqp.jpg
    IMAG2668_zps9orbuyqp.jpg
    219.8 KB · Views: 190
  • IMAG2666_zpsm8vxih2p.jpg
    IMAG2666_zpsm8vxih2p.jpg
    222.6 KB · Views: 171
  • IMAG2665_zpssb08wzwq.jpg
    IMAG2665_zpssb08wzwq.jpg
    249.6 KB · Views: 175
  • IMAG2664_zpswmxp5fh5.jpg
    IMAG2664_zpswmxp5fh5.jpg
    206.6 KB · Views: 197
  • IMAG2676_zpsexws659y.jpg
    IMAG2676_zpsexws659y.jpg
    126.2 KB · Views: 176
  • IMAG2674_zps6bmktf8p.jpg
    IMAG2674_zps6bmktf8p.jpg
    127.7 KB · Views: 165
  • IMAG2673_zpszqvxqd6j.jpg
    IMAG2673_zpszqvxqd6j.jpg
    140 KB · Views: 187
  • IMAG2675_zps9ot8wvyq.jpg
    IMAG2675_zps9ot8wvyq.jpg
    124.4 KB · Views: 180
That looks really amazing. Keep up the great job, cant wait to see how it turns out.
 
So ive decided that the quality and level of detail in the shoulder piece that Ive started was not to my liking, so I started a new set of shoulders here what I have so far. Little more research and planning put into these ones.
IMAG2707_zps9x5ixccb.jpg
IMAG2705_zps8q2xnzd1.jpg
IMAG2704_zpsmppbrrnv.jpg
IMAG2706_zpsrbyungv0.jpg
 

Attachments

  • IMAG2704_zpsmppbrrnv.jpg
    IMAG2704_zpsmppbrrnv.jpg
    187.1 KB · Views: 164
  • IMAG2707_zps9x5ixccb.jpg
    IMAG2707_zps9x5ixccb.jpg
    157.3 KB · Views: 188
  • IMAG2706_zpsrbyungv0.jpg
    IMAG2706_zpsrbyungv0.jpg
    187.2 KB · Views: 177
  • IMAG2705_zps8q2xnzd1.jpg
    IMAG2705_zps8q2xnzd1.jpg
    194.5 KB · Views: 167
Wow dude, just when i thought it couldn't get any better, you go and out do yourself. These are looking amazing.
 
You're really went above and beyond with this man. The amount of detail on the weathering and color is just awesome.
 
Damn. The paint and weathering. I'm glad I took the time to read all this. There's a lot of really good information here. Good job man. Damn.
 
Hey 405th, sorry I have been AFK for a while, Ive been very busy the last few months and over the Christmas period, I got Halo 5 over this period too and played it all the way through on easy just to get the feel of it, wasnt that impressed. Went off halo for a little while and started to fall away from its light and awesomeness. I then decided as with all the previous games, that I needed to complete this game in legendary of course. I started to gain a little more appreciation for it and my motivation for my suit project slowly crept back in. So First day back in the workshop today, and hoping to have some details and more posts coming up soon.
 
Well its about time you showed up!!
(I'm kidding:angel) great to have this build back on track and i cant wait to see more!!!
 
Ok guys and gals, after a putting this build off for a few months, I finally have something to show you. I believe one of my last post was about the shoulders and how I was constructing a Halo 4 version for this build however, since then I feel that it just wasn't working for me, so I started on a second set with a more halo 3 look and feel to it, looked ok but for some reason while constructing it I wasn't matching it up with the parts of the suit I had already finished and I ended up making it too big. Now that this project is back on track I started a third set with a little more thought and time in it. I'm yet to add finer details to it but I have the Left shoulder base down. I got myself Pepakura Designer instead of viewer and I modified some Pep templates to make my own foam ones as I could not find anything suitable. Once I have decided on and finished the smaller details and electronics, I will just repeat this piece in reverse for the right arm, then maybe move to the forearms and hand plates.


Excuse the quality of the pics, they were taken kinda hastily with my phone.
IMAG2809_zpsl4ya8ig1.jpg
IMAG2810_zpsyz4ysneh.jpg
IMAG2812_zpsbkv5x2m0.jpg
IMAG2826_zpsclzzbvyt.jpg
IMAG2827_zpsinej9utx.jpg
IMAG2829_zpsszcycyvl.jpg
IMAG2831_zpsmv9hogcm.jpgIMAG2832_zpsnluxwtwx.jpg


Attachments

  • IMAG2809_zpsl4ya8ig1.jpg
    IMAG2809_zpsl4ya8ig1.jpg
    197.2 KB · Views: 123
  • IMAG2810_zpsyz4ysneh.jpg
    IMAG2810_zpsyz4ysneh.jpg
    176.2 KB · Views: 109
  • IMAG2812_zpsbkv5x2m0.jpg
    IMAG2812_zpsbkv5x2m0.jpg
    181.8 KB · Views: 121
  • IMAG2826_zpsclzzbvyt.jpg
    IMAG2826_zpsclzzbvyt.jpg
    102.6 KB · Views: 107
  • IMAG2827_zpsinej9utx.jpg
    IMAG2827_zpsinej9utx.jpg
    116.4 KB · Views: 129
  • IMAG2829_zpsszcycyvl.jpg
    IMAG2829_zpsszcycyvl.jpg
    112 KB · Views: 111
  • IMAG2831_zpsmv9hogcm.jpg
    IMAG2831_zpsmv9hogcm.jpg
    207.5 KB · Views: 108
  • IMAG2832_zpsnluxwtwx.jpg
    IMAG2832_zpsnluxwtwx.jpg
    166.3 KB · Views: 119
Hey Hey 405th.
So just a small update on the progress of the shoulders, I have one completed, well construction anyway and am about to glue wash it, which is a process I think I forgot to mention in my earlier post with all the materials and my methods in it. It's not a lengthy task however for those who are unfamiliar with it I will post a detailed description of it in my next Update. So I've added all the smaller details needed, there might be more that I add later as I go but for now I'm pretty happy with the way it's looking. I've also done the wiring and battery work for the lighting and made the Hot glue lens diffuser for it too. Another process I can document later If you wish. I'm tossing up now whether to paint it or make the opposing shoulder then paint together, I'm not worried about inconsistencies with paint at this point as I have my process nailed now. Any way as always lemmy know what ya think so far guys.

PS: some of the gaps are a little larger then Id like, but im not worried, that can all be fix just before paint, as well as fixing and surface glue marks. :)
IMAG2856_zpsnnjrsdyh.jpgIMAG2855_zps0ilhza2y.jpg IMAG2854_zps0hsambgv.jpg IMAG2852_zpsetrkibin.jpg IMAG2849_zpslxwpngij.jpg IMAG2850_zpsrxhhop3z.jpg IMAG2864_zpsd4q26rbu.jpg IMAG2867_zpshkfguquc.jpg IMAG2868_zpslleta8ne.jpg IMAG2870_zpsmdcn6ubh.jpg IMAG2873_zpsmnbgfurs.jpg
IMAG2879_zpsvn75qf7y.jpg


I will most likely put a cover over the battery and light assembly too.
 

Attachments

  • IMAG2856_zpsnnjrsdyh.jpg
    IMAG2856_zpsnnjrsdyh.jpg
    198.2 KB · Views: 110
  • IMAG2855_zps0ilhza2y.jpg
    IMAG2855_zps0ilhza2y.jpg
    201.5 KB · Views: 98
  • IMAG2852_zpsetrkibin.jpg
    IMAG2852_zpsetrkibin.jpg
    224.9 KB · Views: 108
  • IMAG2854_zps0hsambgv.jpg
    IMAG2854_zps0hsambgv.jpg
    232 KB · Views: 104
  • IMAG2850_zpsrxhhop3z.jpg
    IMAG2850_zpsrxhhop3z.jpg
    349.2 KB · Views: 120
  • IMAG2867_zpshkfguquc.jpg
    IMAG2867_zpshkfguquc.jpg
    225.5 KB · Views: 111
  • IMAG2864_zpsd4q26rbu.jpg
    IMAG2864_zpsd4q26rbu.jpg
    200.7 KB · Views: 91
  • IMAG2868_zpslleta8ne.jpg
    IMAG2868_zpslleta8ne.jpg
    213.8 KB · Views: 104
  • IMAG2849_zpslxwpngij.jpg
    IMAG2849_zpslxwpngij.jpg
    345.4 KB · Views: 102
  • IMAG2879_zpsvn75qf7y.jpg
    IMAG2879_zpsvn75qf7y.jpg
    304.2 KB · Views: 99
  • IMAG2873_zpsmnbgfurs.jpg
    IMAG2873_zpsmnbgfurs.jpg
    244.4 KB · Views: 98
  • IMAG2870_zpsmdcn6ubh.jpg
    IMAG2870_zpsmdcn6ubh.jpg
    216.9 KB · Views: 87
Status
Not open for further replies.
Back
Top