One of the best things i learned in blender is selecting the vertex button(down at the bottom you have a dot, and edge and face) and then i select a vertex and click g twice. clicking it once lets you move about freely unless you specify which axis you want, but double clicking g while having a vertex selected allows you to move the vertex along the edges that it is connected to like it is on rails( also works on edge select). i usually dont select more than two as more than that the vertexes get hard to control. every where i have looked or every video i have seen has never explained this so i hope this helps. and good luck on your builds and models.
You are using an out of date browser. It may not display this or other websites correctly.
You should upgrade or use an alternative browser.
You should upgrade or use an alternative browser.
TonyBoy's Halo 4 Air Assault Armor Project
- Thread starter StayGoldenTonyBoy
- Start date
- Status
- Not open for further replies.
StayGoldenTonyBoy
New Member
One of the best things i learned in blender is selecting the vertex button(down at the bottom you have a dot, and edge and face) and then i select a vertex and click g twice. clicking it once lets you move about freely unless you specify which axis you want, but double clicking g while having a vertex selected allows you to move the vertex along the edges that it is connected to like it is on rails( also works on edge select). i usually dont select more than two as more than that the vertexes get hard to control. every where i have looked or every video i have seen has never explained this so i hope this helps. and good luck on your builds and models.
Thank you so much! I knew there had to be a function like that. The shoulder armor will definitely be finished before the end of the week now.
StayGoldenTonyBoy
New Member
Heeey, so it seems that I may have bitten off more than I can chew with this shoulder piece. The faces on the important parts are all skewed and crooked, making this a teensy bit more time consuming. Being some what of a perfectionist, I am making sure that the lines are as straight as possible. However, I have thought about and edited the model so that I can use magnets to keep the main part attached to the brace! I'm making this shoulder piece as separate pieces mainly because I know they will break in the future. So instead of having to make an entire new shoulder, I only have to make one part. Yay for interchangeable parts #EliWhitney lol.
The color areas will be connected to each other via magnets, which I am thinking of using either guerrilla glue or some other strong/durable adhesive. I want to avoid things that heat up when they dry because when magnets are heated up, their magnetic field becomes distorted and changed. This can cause the magnet to lose its strength.
.png")
This is the part that goes over the bicep. I had to detach it from the brace completely so I can make it as a separate part, just like the main part of the shoulder. Of course there are huge details missing in the original model compared to reference images, so I am taking the liberty of adding those details; one of them being the "button". It's sort of pushed into the armor and then out, as you can see in the reference picture. This would be very hard to make while folding and gluing, so I made a separate piece that can be easily hardened and placed inside the armor piece without too much hassle.
.png")
.png")
.png")
That's it for now everybody. I'll keep working on this and make an update after Easter and hopefully I'll have made a bit more progress on this shoulder piece.
The color areas will be connected to each other via magnets, which I am thinking of using either guerrilla glue or some other strong/durable adhesive. I want to avoid things that heat up when they dry because when magnets are heated up, their magnetic field becomes distorted and changed. This can cause the magnet to lose its strength.
This is the part that goes over the bicep. I had to detach it from the brace completely so I can make it as a separate part, just like the main part of the shoulder. Of course there are huge details missing in the original model compared to reference images, so I am taking the liberty of adding those details; one of them being the "button". It's sort of pushed into the armor and then out, as you can see in the reference picture. This would be very hard to make while folding and gluing, so I made a separate piece that can be easily hardened and placed inside the armor piece without too much hassle.
That's it for now everybody. I'll keep working on this and make an update after Easter and hopefully I'll have made a bit more progress on this shoulder piece.
FoxtrotZero
Jr Member
I like the way you think ahead as you're modeling. It's entertaining to watch your thought process, and I bet that it'll really pay dividends in the future. Looking great, can't wait to see more.
demonkiller77
New Member
damn man you have done some really amazing work!
StayGoldenTonyBoy
New Member
I like the way you think ahead as you're modeling. It's entertaining to watch your thought process, and I bet that it'll really pay dividends in the future. Looking great, can't wait to see more.
Thanks, I would like to make molds of these if they come out good enough, but that's another project I'll have to think about ;P.
damn man you have done some really amazing work!
Thank you very much
 After I'm done making all of my armor, I plan to release these files so others can use them too.
Update Time!
So now that Easter celebrations and family visits come to a close, I made a bit more progress on the shoulder armor. I've made the executive decision to completely delete the band that goes around the arm. In the reference images the band is flat and smooth, so I figured I could substitute it with an elastic fabric and connect the small bits to it with button snaps. Easy and cost efficient, just how I like it. I also took a look at the ODST legs and I was surprised that a whole bunch of the vertices were doubled and not even connected! So I checked every vertex and connected any loose ends. Now comes the arduous task of going into pepakura, scaling the pieces to the correct size, unfolding it, and moving the pieces around. All this has to be done and FINALLY I'll be able to bring my hard work to life.
Picture time!
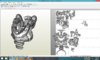
So here is the piece that goes on the back side of the arm, or the tricep. The first picture is what it looked like before I even touched it. Just a little warped right? Well, after a couple of hours of face deleting, vertex alignments, and extrusions, I got it to the picture on the right. There's tiny tiny details on this small piece, but I left them out as they can be easily added while sanding down bondo layers.
.png")
.png")
The main part of the shoulder wasn't touched all that much. All I did was make the faces flat that go down to the "wings". If there were to be warping here, the entire model would be warped once built out of paper; and we cannot have that.
.png")
.png")
....Oh, and I picked up a job and I am supposed to be working full time hours starting Friday, so progress might slow considerably :/ On the other hand, I'll finally be able to start saving enough money to get myself a car and possibly start going to cons and what not. So yay for that
. I hope to hear from you guys, and I can't wait to finish unfolding all these models. It's going to be so exciting! Until next time, peace :3
Last edited by a moderator:
StayGoldenTonyBoy
New Member
Hey everyone! I finally got a couple days off of work so I'm going to do as much unfolding as I can. So I managed to get the entire front part of the chest piece unfolded nicely, and got the abdomen and center back parts nicely organized. I only have one problem. After doing all this work I ran into a problem.... The a couple pieces of the shoulder bit aren't even connected to the main model, like those pieces and the rest of the model are separate entities.
What I think is wrong is that the faces of those couple pieces are facing the opposite direction compared to the rest of the model. If I remember correctly, there is a "Flip selected faces" command in blender, but if I do that I'll have to re-unfold the entire chest piece again... Not something I'm looking forward to.
.png")
In the meantime, I guess I'll go ahead and try and unfold the ODST Legs. I will show what progress I make tomorrow as I am excited to be posting again after a little break. If anyone has any comments, criticisms, and/or suggestions don't hesitate to let me know. I am a sponge for information and learning and I enjoy reading your responses Until Tomorrow, take care and have an awesome rest of your day :3
What I think is wrong is that the faces of those couple pieces are facing the opposite direction compared to the rest of the model. If I remember correctly, there is a "Flip selected faces" command in blender, but if I do that I'll have to re-unfold the entire chest piece again... Not something I'm looking forward to.
In the meantime, I guess I'll go ahead and try and unfold the ODST Legs. I will show what progress I make tomorrow as I am excited to be posting again after a little break. If anyone has any comments, criticisms, and/or suggestions don't hesitate to let me know. I am a sponge for information and learning and I enjoy reading your responses
Until Tomorrow, take care and have an awesome rest of your day :3Attachments
fullmetal56
Jr Member
Doing an amazing job!
StayGoldenTonyBoy
New Member
Doing an amazing job!
Thank you fullmetal56, you are doing an amazing job on your projects as well ;3
As promised, I made huge progress on the ODST legs. I scaled them to my size, marked the unfold lines, unfolded, and organized the pieces. The next piece I want to unfold is the Air Assault shoulder armor that I had edited previously. Since I have work tomorrow and wont get a break until next Sunday, progress will be slow again. But don't fret, since the shoulder armor isn't too big, it shouldn't take too long to unfold. Maybe three or four days. Anyway, here are some pictures for yall.
I only have the one leg there because there is a function in Pepakura Designer that allows you to flip the faces of all the pieces. The way you do this is by clicking the "Others" tab at the top and selecting "Mirror Inversion". After that, all the pieces will be reversed.
.png")
Last Minute Update!
I sat down after dinner and decided to go ham on this shoulder.
.png")
Now that this one is done and out of the way, I will retire to my bed and go to sleep. I guess the only pieces left to do are the arms and the chest piece. I think I'll do the chest piece last so that means arms will be on the metaphorical workbench. Aight, off to bed. Tootles!
Last edited by a moderator:
StayGoldenTonyBoy
New Member
Double Post Activated
Good morning everyone, I have finally brought one of my edited models to life! I managed to finish putting together the shoulder armor. I have to say that I am pleased with how easy it was to pep out, excluding the exceptionally small pieces.
I have the pieces on the front layered in a way that will make the bondo stage easier. I also changed my mind about using magnets for attaching the armor to myself. I decided that it would be too strenuous to fit my fingers into the tiny opening at the bottom to place the magnets correctly; so I switched using magnets for button snaps like the ones you would find on rain coats and name tags. They are also cheaper than magnets, so that is also a plus :thumbsup
Oh, I left a hole/port at the bottom main shoulder piece so that I can rondo the inside.

I have also changed my mind on the forearms. The Contoured arms were annoying me with their minuscule indentations, so I decided to go with the GV-09 Locking arms instead. Since I don't get home from work until about 8pm, it is usually too late in the night to do any resin work as animals enjoy visiting the house at night.... And I don't need a coyote knocking any wet pieces to the ground and ruining them. That being said, I'll have to wait for my days off of work to do that stuff. Anyways, that's it for this update and hopefully you all are enjoying seeing the progress so far. Until next time, take care and feel free to leave comments/critisisms.
Good morning everyone, I have finally brought one of my edited models to life! I managed to finish putting together the shoulder armor. I have to say that I am pleased with how easy it was to pep out, excluding the exceptionally small pieces.
I have the pieces on the front layered in a way that will make the bondo stage easier. I also changed my mind about using magnets for attaching the armor to myself. I decided that it would be too strenuous to fit my fingers into the tiny opening at the bottom to place the magnets correctly; so I switched using magnets for button snaps like the ones you would find on rain coats and name tags. They are also cheaper than magnets, so that is also a plus :thumbsup
Oh, I left a hole/port at the bottom main shoulder piece so that I can rondo the inside.
I have also changed my mind on the forearms. The Contoured arms were annoying me with their minuscule indentations, so I decided to go with the GV-09 Locking arms instead. Since I don't get home from work until about 8pm, it is usually too late in the night to do any resin work as animals enjoy visiting the house at night.... And I don't need a coyote knocking any wet pieces to the ground and ruining them. That being said, I'll have to wait for my days off of work to do that stuff. Anyways, that's it for this update and hopefully you all are enjoying seeing the progress so far. Until next time, take care and feel free to leave comments/critisisms.
that looks amazing dude!
StayGoldenTonyBoy
New Member
that looks amazing dude!
Wow, Fantastic job so far! I'm planning on using at least the air assault helmet for my build and it's awesome to see it done so well
Thank you very much :3 I plan to make my edited models available to the public once I'm done.... and able to figure out how to go about doing that.
MissFish , If you want the base file that I edited for the Air Assault helmet, I have a link leading to the archive in the fifth post on the first page of this thread. Also if you have any questions, feel free to ask
Last edited by a moderator:
Thank you very much :3 I plan to make my edited models available to the public once I'm done.... and able to figure out how to go about doing that.
Upload privileges are locked to Full Members - you'll need to have had an active account for ninety days and made over fifty posts before you'll be entered into the Full Members group. Once you've met the conditions to be promoted, your privileges will unlock automatically and you'll be able to upload your files to the relevant places.
Better get posting, Spartan.
StayGoldenTonyBoy
New Member
Thank you for such a quick reply @.@ After this post, only 18 more posts to go
Thank you! I did grab that helmet file as I saw the post and I started scaling it. Hopefully I have some time to procure some decent cardstock this weekend and I can start folding this bad boy xDThank you very much :3 I plan to make my edited models available to the public once I'm done.... and able to figure out how to go about doing that.
MissFish , If you want the base file that I edited for the Air Assault helmet, I have a link leading to the archive in the fifth post on the first page of this thread. Also if you have any questions, feel free to ask
Uscstaylor
New Member
Keep up the great job man!
StayGoldenTonyBoy
New Member
Keep up the great job man!
Thank you sir, I wish you best of luck on your recon and recruit build. Remember to take your time, because a first experience can influence you in a substantial way.
Thank you! I did grab that helmet file as I saw the post and I started scaling it. Hopefully I have some time to procure some decent cardstock this weekend and I can start folding this bad boy xD
Awesome! If there's any tips I can give you, its to be careful with the back of the helmet where the knob/circle thingy is and the parts under it. There is a very thin piece of paper between the two areas, and if you pull it too hard the area will rip quite a bit..... I did that 3 times in a row before I edited the model XD . Besides that, start from the top of the helmet and finish at the chin. Omit/Ignore the flat piece on the bottom because you will need as much room as you can get to work with the fiberglass. If you have any questions, feel free to send me a message. I'm always willing to help out :3
NOW, for the awaited Leg Update
Its been another week and I was able to complete the legs... Well half of it, but still I'm excited.

The butt-plate and boots look pretty good but I'll have to modify them as I can barely get the parts to fit around my shoe's heel and toes. The knee is simple enough that I can rondo the inside, bondo the outside to be a bit more crisp, and add button snaps to the back when its done. The thigh and shin will definitely need to receive some TLC, but I'm actually surprised how well the little strips held up and didn't stretch. Also there's the added bonus that the thigh fits very snugly to my leg so no modification there. As for the calf, I can't get my foot through the bottom hole but that's due to to a lack of maneuverability. If worst comes to worst, I'll cut off the front "plate" and have it attach with those trident clips/buckles that you commonly see on school bags.
Before I conclude the update, I have one small favor to ask the community.... Is it possible that anyone has the VISN skin for the Air Assault chest and could hook me up with some screen shots of it? I've cowered all over Google's, Bing's, Ask's, and Mozillia's image data bases and couldn't find any decent side or back screen shots of the skin. The reason I request the VISN skin is because the VERG skin is pretty much straight up U's smacked onto the armor. If someone could be so gracious as to supply me with a couple screen shots of the VISN skin, I'd be so thankful!
Now I must bid myself adieu. Thank you everyone for viewing my build so far; it really motivates me to keep going and improving. Until next week when i have the other half of the legs done, take care and stay awesome
Last edited by a moderator:
Thank you for such a quick reply @.@ After this post, only 18 more posts to go
Spread some knowledge and give others encouragement!
Loving your work so far btw!
Totally subscribed!
Before I conclude the update, I have one small favor to ask the community.... Is it possible that anyone has the VISN skin for the Air Assault chest and could hook me up with some screen shots of it? I've cowered all over Google's, Bing's, Ask's, and Mozillia's image data bases and couldn't find any decent side or back screen shots of the skin. The reason I request the VISN skin is because the VERG skin is pretty much straight up U's smacked onto the armor. If someone could be so gracious as to supply me with a couple screen shots of the VISN skin, I'd be so thankful!
I'll do my best. What are your preferred colours?
- Status
- Not open for further replies.
Similar threads
- Replies
- 3
- Views
- 361
Similar threads
- Replies
- 3
- Views
- 361