TonyBoy's Halo 4 Air Assault Armor Project

Status
Not open for further replies.

StayGoldenTonyBoy

New Member
After three years of lurking around, a handful of posts, and tons if research and practice, I think that its time that I actually officially put myself out here in this awesome community.

I have been trying to build Halo 4's Air Assault chest and helmet permutations as well as "playing" around with Blender (a free 3d modeling softwear) to modify some models and make them easier to pep/foam out. I am not exceptionally skilled in 3d modeling however, but I know enough to make small changes and little pepping shortcuts. Eventually, the plan is that I have a full suit to wear to my first convention, whether it be at Comic-Con, a parade, a costume party at school, or if I'm lucky enough to be in a short live action film.

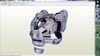
This is my personal suit I plan to build: Screenshot (3).png Screenshot (5).png Screenshot (6).png Screenshot (7).png


I've had plenty of practice building the Air Assault helmet, seeing that I will be building the 5th iteration of it. I will give credit where credit is due. The original model of the air assault helmet is modeled by statyc94 which was unfolded by Crimson. I took the model and made very small detail changes so that the pepping stage and the later Bondo stages to be a wee bit easier. I'm unsure of permissions pertaining to making my edited model available, so for now I'll have to keep the physical file to myself. Otherwise, you guys will perhaps see the changes I made to the model in the pictures I post ;)


This is the 3rd helmet and the only fully completed piece I made, although I kind of lost patience and rushed the painting and the dremel work. So I'll call it a teaser and use it as a "Before and After" of how far I have come from where I started.
finished1.jpg

Comments, criticisms, and questions are very much welcomed here. I hope to hear and learn a lot from you guys in the future. Until the next update, take care. :D
 
Thank you, I would have put up more pictures of it but I gave it to my friend as a gift. He enjoys it, and that makes me happy. :3

So, I got about half of the helmet done now and I plan to have it fully pepped out in two more days. After that I would go to the hardening stage, but seeing it's constantly around or under 20 degrees fahrenheit I'm afraid the fiberglass resin won't cure correctly.

Progress picture Time: So I manipulated the model file in a way so that there is much less warping in the paper due to pulling forces in different directions. Such places would be behind the "ear" piece and the the piece that runs along the whole bottom of the helmet. This time around it seems I have hit a sweet spot, so no troubles yet, yaaaaay.

A.jpg Aa.jpg


That's it for now, but I think i may get a good chunk done by the end of the night so look forward to more in the future. Thank you for stopping by and take care :D
 
Your work looks very impressive - very clean, you're certainly taking your time, which is a good thing.

My only critique would be that I'd try to build from the top rather than the bottom. It's always easier to finish up at the mouth, jaw or nape of the neck areas than try to get things sealed at the top.

Thank you very much :D I have plenty of time on my hands since the temperature won't be going over 30 degrees for a while here in NJ. I usually start my helmets from the top, but I this time around I pieced it together in chunks. I'll definitely keep to the top down construction for sure.

I finished the helmet a day early since it was just way too cold to chop wood in 12" of snow. I think it turned out pretty well. The only part of this helmet I still have a hard time with is around the "screw cap" that all the helmets have in the back. The thin strip beneath it always gets pulled and stretched so i think I'll edit the model for future iterations. Besides that, I think it looks pretty decent and with no additional warping.

Picture Time: IMG_20150221_204629.jpg IMG_20150221_204710.jpg IMG_20150221_204833.jpg

I forgot to put the visor in the picture, but it didn't change really. I'm keeping it separate since I'll be using it as the mold for when I vacuum form the visor from PTG or some other equivalent material. Oh, and as a bonus, here's a picture of one of my old practice pieces. It makes for a great lamp shade :3

IMG_20150221_204932.jpg


Another Update


So I spent the majority of my free time today modeling the top part of the shoulders.

The raw model is on the left, and my edited model is on the right. Screenshot (9).png Screenshot (10).png

I don't know how I feel about it. I think it looks worse than it did before, but eh, I look forward to any feed back on it. Until next time, I'll be working on the this massive hulk of a project.
Screenshot (11).png

Oh, and before I forget, all the original models that I have edited can all be found in the file archive here. The helmet modeled by Statyk can be found here

IMG_20150221_204629.jpg


IMG_20150221_204710.jpg


IMG_20150221_204833.jpg


IMG_20150221_204932.jpg


Screenshot (9).png


Screenshot (10).png


Screenshot (11).png
 
Last edited by a moderator:
That helmet looks awesome. That is beyond clean. Great job

Thank you Sir! Hopefully the other pieces come out just as clean :3

"Excluding" the helmet?

Pretty sure the armour pack for the Air Assault set contains the helmet as well. I just checked.

Ah, apologies. I edited the post so many times I had lost track of details. Thank you for catching me. The post will be edited post haste.
 
Ah, apologies. I edited the post so many times I had lost track of details. Thank you for catching me. The post will be edited post haste.

Ah, cool. No worries, just caught me off-guard and I worried for a moment that I'd missed something. Thanks for the assurance.
 
Z
Thank you Sir! Hopefully the other pieces come out just as clean :3


Ah, apologies. I edited the post so many times I had lost track of details. Thank you for catching me. The post will be edited post haste.

I'm pretty sure the other pieces will come out just as good as the helmet. May I have one of those oatmeal cream pies?
 
Z

I'm pretty sure the other pieces will come out just as good as the helmet. May I have one of those oatmeal cream pies?

Sure, if you don't mind them going stale in the mail XD

Well, its been almost two weeks and I haven't made too much progress on the chest. I wish I could do this faster but I'm not exactly a master of blender by any means, so you'll be seeing a lot of blender pictures for a while.

I've done some smoothing on the front rectangular bit and inside arcs. Pretty much everything that is highlighted in orange is what I've adjusted so far. Since I've built Crimson's version of the Air Assault before (sorry no pics of that one :/) I'm comfortable leaving the "thruster pods" as they are. There was a hook like extrusion on the back of the model and I would think it would be uncomfortable to have that poking into my back, so I completely cut it out and tried to make a smooth curve to the bottom of the brace.

Screenshot (14).png Screenshot (17).png

The back plate that goes between the "thruster pods" had some face flattening and polygon management. So far my biggest worry with this piece is how I'm supposed to connect it to the rest of the chest piece. The outside edge didn't really connect to the rest of the model in the first place so I'm going to either come up with a way to connect it after building it, or have a stroke of genius, lol. Screenshot (18).png

So I guess that's it for now. I'll post an update in another couple days and hopefully I will have made some progress. Until then, I'll catch you guys later. :D
 
Good morning everyone! Sorry for my unannounced hiatus, I had went down to visit and help out my grandparents renovate their home. Lets just say I'm nose blind to paint now lol.

So, I finally got the back part of the chest piece all done up and I think it looks pretty good in the model.
Screenshot (24).png

Also, while browsing around the site (reading other threads about modeling, builds, and what-not) I stumbled across a post that could really shave off time in editing these raw models. I think Chernobyl was the one that said that there is a command in Blender that Converts Triangles into Quads. Let me tell ya, this practically had my jaw drop to the floor. Anyway, enough of me gawking over this, the command for this is Alt+J while in EDIT Mode.

Here are some pictures of the ODST legs I plan to build.

Before Tris-Quads
Screenshot (25).png

After Tris-Quads
Screenshot (26).png

I barely have to touch the model which makes me suuuuuuuuuuper happy that I don't have to join all those faces together by hand. As for the chest piece, it will still be a challenge and a half so I will continue work on that. Until next time guys and gals :p
 
Also, while browsing around the site (reading other threads about modeling, builds, and what-not) I stumbled across a post that could really shave off time in editing these raw models. I think Chernobyl was the one that said that there is a command in Blender that Converts Triangles into Quads. Let me tell ya, this practically had my jaw drop to the floor.

I barely have to touch the model which makes me suuuuuuuuuuper happy that I don't have to join all those faces together by hand:p

She did. I expect that your first-born will be in the mail at some point, then?

But seriously - I'm glad I could be of use and assist you in some way. If you need any other assistance, please don't hesitate to ask me!
 
Welcome back. This is looking good, and you've got another subscription.

I never liked the GEN2 armours as much (I kinda fell out of playing Halo with the rise of Halo 4, mostly because I've moved away from console gaming, but that's a rant for another time) but that doesn't change the technical impressiveness of the work you're doing. Your pepakura work is really, really clean, and I suspect you have a better understanding of the way paper folds than I do, because it seems you're successfully modifying your models into shapes that translate well into pepakura.

How difficult would you say Blender is to learn? I've got a student's background in various engineering autocad programs, but I'm learning the hard way that those are pretty much unacceptable for the sort of freeform modeling that you do with blender or 3ds max. I'd like to get into blender, I hear the resources are abundant, it'd just be good to know what I'm jumping into ahead of time.
 
She did. I expect that your first-born will be in the mail at some point, then?

But seriously - I'm glad I could be of use and assist you in some way. If you need any other assistance, please don't hesitate to ask me!

I'll be sure to keep in touch if I should ever need anything. You've already done so much for the site, and the raw Halo4 files you've made available is a huge gift in itself to the whole community. If I ever meet you in person, I'll be sure to shake your hand :3

Welcome back. This is looking good, and you've got another subscription.

I never liked the GEN2 armours as much (I kinda fell out of playing Halo with the rise of Halo 4, mostly because I've moved away from console gaming, but that's a rant for another time) but that doesn't change the technical impressiveness of the work you're doing. Your pepakura work is really, really clean, and I suspect you have a better understanding of the way paper folds than I do, because it seems you're successfully modifying your models into shapes that translate well into pepakura.

How difficult would you say Blender is to learn? I've got a student's background in various engineering autocad programs, but I'm learning the hard way that those are pretty much unacceptable for the sort of freeform modeling that you do with blender or 3ds max. I'd like to get into blender, I hear the resources are abundant, it'd just be good to know what I'm jumping into ahead of time.

Thank you! I really try hard when editing the model to imagine where fold lines will occur and how one piece will pull on the others. I'll just put it out there that I'm not exactly the best person to turn to for advise for Blender. I've never taken classes in high school or collage about 3d modeling, so I've practically self taught myself and done some research online. However, if you want to ask someone who is much more versed than I am in Blender, I highly suggest getting in contact with Crimmson. He's done many many more model clean ups than I probably ever will, so he will more than likely have most of the answers you are looking for. I really would like to help you out too, but I feel I lack the knowledge to direct you down the right path.
 
Very interesting.

One thing you could consider is those bars on the thigh armor you've indicated in Dark Grey, some sort of velcro or MOLLE/Malice strip for pouches/gear. The Rookie has some mag pouches on his model.
 
Very interesting.

One thing you could consider is those bars on the thigh armor you've indicated in Dark Grey, some sort of velcro or MOLLE/Malice strip for pouches/gear. The Rookie has some mag pouches on his model.

Hmmm, nice idea, I'll definitely keep that in mind while building the legs. :3


So, I've sat down tonight and went turbo H.A.M. and managed to get almost everything done! I even added in the little cavity on the front, as well as making the thrusters attachable! The only part that I need to do is the shoulder piece which is a pain in the butt for some reason.

This is the front indentation. In the raw file, it is a flat face, so I made an extrusion (I think?) and then scaled it down before extruding it into the model to make the indentation.
Screenshot (27).png

This part here is where the front connects to the back brace. I have a plan for this in mind already. The idea to keep this connected is by getting a pair of seat buckles and clips and adhering them to the inside. This way, I will be assured that the bottom will not move at all, and all it will take to take it off is to unbuckle the braces.
Screenshot (28).png

This here is where the thruster will connect. The way it connects is like a "Tab A -> Slot B" kind of situation. The "tab" part is slightly tapered so that the thruster can snugly fit itself, and since the "tab" and "slot" are triangular, fitting into each other shouldn't be a problem at all.... It's a good thing I aced geometry in middle school XD. Oh, I also took the liberty and poked around the thruster and made a couple spots that were supposed to be round..... well, round lol.
Screenshot (29).png
Screenshot (31).png


NOW, I will be trying to figure out this part for the next day or two. This part being the shoulder piece.
Screenshot (32).pngair assault reference.jpg

The picture to the right is the main reference picture I am using for this piece as it gives the best view of how the piece is supposed to look. As you can see, the highlighted piece is what needs to be modified so that it has a small ridge underneath and a larger sloping edge running along the top. The problem i'm running into is that the darker part of the shoulder in the shoulder (the top part of the side) seems to be flat, but if I make it flat, it seriously messes up the overall shape from the front all the way to the back to where it doesn't look like what it needs to be. Again, I'll have to toy around with this for a couple days and see if I can make it work some how.
 
GOOD NEWS, I finally sorted out that shoulder piece! Also, I am 80% done with model editing! The ODST legs are clean enough without me touching them, the same goes with arms, the I don't have to touch the chest anymore, and the helmet awaits its round of glassing. I'm still not happy with the shoulders, so I'll tweak around with them for the rest of the week. After that you guys and gals probably won't see anymore blender pictures :D

So here is the shoulder. It's not perfect but I can definitely work with it. I know that there are some other details that are supposed to be there, which can be seen in the reference picture posted above ^^^^. I have plans in the future to fix that, but I want to build my armor before taking on any more 3d modeling challenges.

Screenshot (33).png

I started unfolding the chest piece already so I won't have to do it later. I have this scaled to my body size, which is kind of scrawny; so when/if I make this file available, you will have to keep in mind you will need to resize and re-organize the pieces.

Screenshot (34).png


Thank you so much for stopping by and viewing everyone! I enjoy your feed back, criticisms, and ideas, so feel free to speak up and I'll respond to everyone when I can. Until next time everybody :3

Screenshot (33).png


Screenshot (34).png
 
Last edited by a moderator:
i dont know if you have built any of your models yet, but let me tell you it very satisfying and you know the models ins and outs. you know exactly how to put it together, since you modeled it. Glad to see that you are progressing greatly in your modeling. it really isnt that hard to pick up, is it? as far as reference goes, open up blender load the air assault chest and go to settings and click on the textures button and select the specify texture image and find the texture for the air assualt(i am assuming that you have the model pack provided by Arcanine which is awesome by the way) you can see all the reference you need in a 360 view or do it in blender. i dont know how to add textures in blender. i have tried and failed. bad wrong.


h4%20air%20assualt.jpg
yeah!!!

and you can toggle the edge on and off in the 3d menu tab and select the show edges. just in case you didnt know all this. hope it helps.

edit: i feel dumb as i realized you have done this in your first post, either way great to see some else learning this
 

Attachments

  • h4%20air%20assualt.jpg
    h4%20air%20assualt.jpg
    84.2 KB · Views: 146
i dont know if you have built any of your models yet, but let me tell you it very satisfying and you know the models ins and outs. you know exactly how to put it together, since you modeled it. Glad to see that you are progressing greatly in your modeling. it really isnt that hard to pick up, is it?

I have to say, using blending is getting a little bit easier to use as I continue to use it. It's become less of a love-hate relationship and more of a rewarding experience. Knowing the flaws in a model really does help in the long run, as you can proactively think of solutions for the piece in question. Which in my case is that shoulder lol.
 
Status
Not open for further replies.
Back
Top