F:NV Ranger Helmet with 3D Printed Parts

Status
Not open for further replies.

FoxtrotZero

Jr Member
So, a few of you have probably seen me tyrading about 3D printers lately. A few of you might also know my first real cosplay project was a (failed) attempt at an NCR Veteran Ranger. Previously, I'd attempted the vest, but never had a solution for the mask and helmet. All that's about to change.

The concept is to build the base of the mask and helmet in typical pepakura fashion - cardstock, resin, fiberglass, bondo, repetitive motion injuries, you know the drill. Before, my attempts were thwarted (aside from the fact that I was entirely new) by the relatively high-detail pieces of the snout, speaker, and filter. That's where the 3D printer comes in. With some autocad magic, I can recreate the parts in high-detail and have them 3D printed, for free, at my University's library, so long as the part takes less than 3 hours.

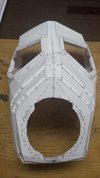
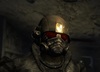
This is the pepakura model I have, which aside from being the base of the mask, I'll be using to get a sense of dimensions when I model my parts. Actual details are based on a combination of screenshots, concept art, fan art, and real-life builds. It might not be 100% authentic, but by the time I'm done, I hope it'll be 100% badass.

ucUQLYg.png

Jipex3n.png


This build will be going a bit slowly. I'm limited to one print per week, and I have several parts that need to be printed. I'd like to start on Pepakura this week (I go on Spring Break tomorrow) but the fact is I'm ridiculously behind in my Calculus class, and I'm going to be spending a lot of time studying, so we'll see if I can get anything done. That said, the fact that I've started a build thread means I've actually got something to show you.

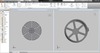
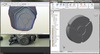
Here we have the original model I made for the Filter. I did it in Autodesk Inventor, because I have fond memories of its interface, and I haven't used it in a while (my university uses Creo Parametric and SolidWorks). I'm... starting to realize why it isn't an industry standard. However, it works well enough. "Works well enough" is actually the spirit of this entire project, as I kind of made it up as I went, and as far as "good CAD practice" goes, this model probably scores a zero. You can also see some of my reference material.

HZyRiyo.png


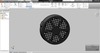
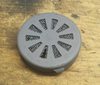
Well I sent it in, and today it was printed. I got to see it get started before my physics lab, and swung by to pick it up after I got out, before catching my train home. It's a little difficult to see, because they recently switched to a pitch-black filament, but it came out pretty well. Above all else, I'm surprised by how sturdy the thing is, having a typical thickness of 2mm. The whole thing is lightly textured, printed with a 0.2mm resolution, and particularly since it was printed upside-down to save on filler material.

ErQwbCah.jpg


I've taken to trying to sand it down some. I was suprised that all of the features on the outside rim didn't require any support material at all. The mesh material in the indentations (it's supposed to be a square pattern of 1.5mm circles spaced 0.5mm apart) didn't come out so hot. I designed it assuming I'd be able to make use of a 0.1mm resolution, but that would take way, way too long. It's worth noting that the mesh looks particularly bad from this angle because there's still a bunch of support material (like I said, that side was printed face-down) in there that I haven't bothered snipping out yet.

It's also worth noting that I intend to deviate from the standard NCR Veteran Ranger outfit. I'd like to make it more reminiscent of the Advanced Riot Gear from the Lonesome Road DLC, pictured below, but it has a completely different speaker and filter setup that I don't have source material for and I'm not really willing to attempt. Since there's already so many variants of the armour included with the DLC, I was going to do a bit of a hybridized appearance, where I effectively have the regular mask, with double filters and the bridged eyepiece (I'll probably also attempt to model the detail differences in the helmet).

44020-2-1316733347.jpg


Since I'm on the topic of things I intend to change, I'm planning on completely remaking the filter piece. I'm going to make the edge sharper and less rounded, with a larger bulge near the cutout, much like in the picture below. I'll also be upping the hole pattern to 3mm in a diagonal pattern with 1.5mm between, and using six larger perforated sections (instead of the current ten) so they're appropriately visible. To be even more technical about my plans, I'm going to make the perforation 2mm thick and the surface layer 1mm (as opposed to the current configuration, which is vice versa) to give more of that stamped metal appearance.

fallout_ncr_ranger_by_helljumpergrif-d35jjjg.jpg


The next part I print, however, is probably going to be the speaker piece on the front of the mask. I'm not the first person to do this. If I remember correctly, Kommisar (whose build is legend on the RPF, from what I can tell) had a friend rapid prototype (read: 3D print) this piece since he couldn't quite make it himself. I've pretty near emulated the appearance, as such, and with any luck the small squares (which have the same spacing as the holes, but the pleasant quality of needing to look square) won't come out like crap. I guess we'll see. I'd hate to discover this doesn't work, either, as I feel there's less room to compromise here.

Kn4OkjB.png


That center piece exists in the original material, I really don't know why it was excluded in the pepakura file. I'm also in the process of modeling the antenna, but that's a little trickier, particularly since I don't know exactly how I'm going to mount it (if you look at the pepakura assembly above, it goes through this strange indentation in the flashlight box. I've literally never seen this anywhere else, and it's extremely strange, so I'm going to have to figure out my own mount that comes out at a different angle without interfering with any of that stuff).

Since this is my OP and I feel entitled to rant about my intentions: If I ever finish this project (and I'm fairly certain I will - depsite the fact that I should be working on my ODST build, I started this because it's simpler, shorter-term, something I've intended to figure out for much longer, and gives me an excuse to involve that 3D printer) I'll probably consider tackling the vest again. If I do so, I'll probably make it out of two layers of really thin foam (something like 3/16, depends on what I can get my hands on - no more of that 1/2in EVA crap) - one layer to be a base, and another one to give the appearance of the separate plates. This should make the vest thin and flexible enough to move in, as well as not give me the problem where the chestplates want to turn me into a dark gardevoir cosplay every time I stretch my arms out.

Remember when I said I'm deviating from the Veteran Ranger norm? Instead of flat black, I'd like to give the vest the Desert Ranger camoflage scheme (which is a three-tone desert camoflage) and from there I'll find things to add, like belt pouches and kneepads. I'd like to have some weaponry - a 5.56mm pistol (that's the GRA base version - in the game without DLC, it exists only as "That Gun") and maybe a Gauss Rifle (I love the gauss rifle so much, but the proportions on the thing seem so ridiculously awkward I don't know if that's practical without trying to handwave a lot of modifications).

Anyway, if you read all that, you must really be interested. This project is probably going to be slow-going for the time being, so don't expect a lot of updates, but I'm going to try to keep on it and keep you guys informed (particularly any time I get a chance to post a picture, text posts are kinda bland).
 

Attachments

  • ucUQLYg.png
    ucUQLYg.png
    36.7 KB · Views: 2,447
  • Jipex3n.png
    Jipex3n.png
    33 KB · Views: 4,799
  • HZyRiyo.png
    HZyRiyo.png
    524.3 KB · Views: 627
  • ErQwbCah.jpg
    ErQwbCah.jpg
    126.8 KB · Views: 681
  • 44020-2-1316733347.jpg
    44020-2-1316733347.jpg
    96.5 KB · Views: 1,707
  • fallout_ncr_ranger_by_helljumpergrif-d35jjjg.jpg
    fallout_ncr_ranger_by_helljumpergrif-d35jjjg.jpg
    236.4 KB · Views: 692
  • Kn4OkjB.png
    Kn4OkjB.png
    598.7 KB · Views: 719
I'd say instead of all the hand-wringing over how well the mesh will come out... Just buy actual metal mesh and cut it to size. 1) It'll be far easier, 2) It'll look far more realistic, 3) It'll be a part that you can put together yourself, like the visor (I'm assuming this is a one-off, so mixed materials don't matter), 4) You can focus on the modelling of actual "parts" rather than the limitations of the 3D printer. Ebay is your friend here.

I also assume you're bearing in mind print orientation, which is pretty important in a project with lots of circles like this, I hear.

Those dents in the helmet look like they'd be incredibly easy to press in with a hot implement, which is cool.

I only relatively recently got my hands on Combat Armor, Reinforced Mark 2, I'm looking forward to seeing some of these bad boys running around soon.
 
I'd say instead of all the hand-wringing over how well the mesh will come out... Just buy actual metal mesh and cut it to size. 1) It'll be far easier, 2) It'll look far more realistic, 3) It'll be a part that you can put together yourself, like the visor (I'm assuming this is a one-off, so mixed materials don't matter), 4) You can focus on the modelling of actual "parts" rather than the limitations of the 3D printer. Ebay is your friend here.

I also assume you're bearing in mind print orientation, which is pretty important in a project with lots of circles like this, I hear.

Those dents in the helmet look like they'd be incredibly easy to press in with a hot implement, which is cool.

It's funny you should mention that. I was attempting to clean a bunch of the support material out of the mesh of the printed part today, but really wasn't getting anywhere. The stuff I wanted to keep was no stronger than the stuff I wanted to remove. So that's an unfortunate quality. For the new print of the filter I'm thinking about making the circular punched part a seperate piece that slots nicely into the main part (thanks to a couple of reinforcement struts that I'd want to keep the 1mm stuff sturdy). The up side is that I'd have a build without any support material required. The downside is I need a whole separate raft to print that, so it might be too much material to attempt in one print (I might, theoretically, be able to get two 7.5x2mm perforated disks in three hours, though, which would be good).

Now that you mention it, using some actual metal mesh would be a pretty good idea. I think the squares would print a lot better, but I'm still going to run into the support material problem on all the sides. I'll look into getting some, or perhaps just seeing if I have some laying around the house.

I haven't really been thinking much about the helmet, but yeah, I probably could do some stuff there.

I only relatively recently got my hands on Combat Armor, Reinforced Mark 2, I'm looking forward to seeing some of these bad boys running around soon.
Do you mean you acquired a physical suit of the armour? If so, I NEED to see that. Or are you referring to in game? I once played a game where I forbade myself from wearing any sort of power armour (which is too powerful, too easy to get, and still too weak compared to what it canoncially should be. It was literally built to replace tank divisions. I suppose that's kinda like how Halo Plasma Rifles don't blow meter-wide craters into concrete walls like they do in the books). I really enjoyed it, actually, and I ended up spending a lot of the game with Combat Armour, Reinforced Mark 2. Until I got into one of the DLCs (Lonesome Road has the Riot Gear, Advanced Riot Gear, and Elite Riot gear, and Honest Hearts has the Desert Ranger armour - all of which are separate from the NCR's LAPD gear).

I'll probably be double posting with pics of the new filter design later today.
 
It's funny you should mention that. I was attempting to clean a bunch of the support material out of the mesh of the printed part today, but really wasn't getting anywhere. The stuff I wanted to keep was no stronger than the stuff I wanted to remove. So that's an unfortunate quality. For the new print of the filter I'm thinking about making the circular punched part a seperate piece that slots nicely into the main part (thanks to a couple of reinforcement struts that I'd want to keep the 1mm stuff sturdy). The up side is that I'd have a build without any support material required. The downside is I need a whole separate raft to print that, so it might be too much material to attempt in one print (I might, theoretically, be able to get two 7.5x2mm perforated disks in three hours, though, which would be good).

Now that you mention it, using some actual metal mesh would be a pretty good idea. I think the squares would print a lot better, but I'm still going to run into the support material problem on all the sides. I'll look into getting some, or perhaps just seeing if I have some laying around the house.

Mesh is always a tricky one, but as long as you have a good method of cutting it out, smoothing the edges, and pressing it flat, it's going to be night and day easier than trying to 3D print the same thing. You can also get squares, circles, whatever. For example, I'm pretty sure I just solved your problem for about a dollar and a couple days waiting on USPS: http://www.ebay.com/itm/Custom-Perf...gauge-Price-per-32-square-inches/130699198700 -
since it's actually filtration sheet, it's the real deal. Plus, then you have a target material appearance for smoothing and painting the 3D printing. And it's probably strong enough that it can be your base to glue the 3D parts onto.

Just a case of knowing what to look for. If they custom perforate it, they may be able to custom cut it too? Or maybe you know someone with a plasma cutter or fiber laser cutter (maybe the uni has one, you can always ask around, maybe beg a little :p). Just need a circle and a strip though, it wouldn't be hard to do by hand if you were careful.

Do you mean you acquired a physical suit of the armour? If so, I NEED to see that. Or are you referring to in game? I once played a game where I forbade myself from wearing any sort of power armour (which is too powerful, too easy to get, and still too weak compared to what it canoncially should be. It was literally built to replace tank divisions. I suppose that's kinda like how Halo Plasma Rifles don't blow meter-wide craters into concrete walls like they do in the books). I really enjoyed it, actually, and I ended up spending a lot of the game with Combat Armour, Reinforced Mark 2. Until I got into one of the DLCs (Lonesome Road has the Riot Gear, Advanced Riot Gear, and Elite Riot gear, and Honest Hearts has the Desert Ranger armour - all of which are separate from the NCR's LAPD gear).

Ha, I wish. It's pretty nice aesthetically, I actually prefer its appearance to the LAPD riot gear. That plus the Vet gas mask helmet would be awesome. Possibly a relatively straightforward foam build, too.

Yeah, canon vs game balancing is always a tricky one. Like, they could make it realistic, but then it would be almost unplayable since it'd be one-shot kill on virtually everyone with any more than a .22 plinker. Might be an interesting gametype option though, like Halo's Legendary. But instead of just adjusting damage and health, actually redo the effects too. Since I have the pulse gun, people in power armor don't really concern me. :p

I have no DLC for either Skyrim nor Fallout, but I only relatively recently discovered this action-RPG genre and made sense of it. The first time I played Mass Effect, 2008 maybe, I was trying to play it like Halo and that went predictably badly. At some point when I get more time I might try some expansions, especially if there's stuff I can build- ARPGs seem much more enduring and loved as a whole than other genres, and given that I've just done Bioshock-Skyrim-Mass Effect-Fallout:NV it's not hard to see why. You get the action to keep things interesting, but you also get story and characters to care about and it's not one long gun-fest- which after a certain age seems to get boring, I dunno about anyone else.
 
So I redesigned the filter. It's a sharper appearance, with that rimmed edge instead of a round, and six larger windows instead of the ten small ones. These are aspects i like, and I think it gives the whole part a bit more of a stamped metal bit. I intentionally enlarged that tab next to the slot on the outside, but there's simply no way I know if to make the geometry the way I actually want it. It would be doable if I were trying to make it pop out of a flat surface, but the fact that the entire thing is on the outside of the circle makes the geometry ****y and any sort of rounding effort gives me a bunch of complaints about tangency and unresolvable profiles. I also accidentally enlarged the texture of the ridges in the slot, but that's pretty insignificant.

ITipIDQ.png


The trick is, now it's two seperate pieces - the main housing, and the mesh. This will allow the mesh to print much cleaner, without any support material. I also enlarged the holes (up to 3mm from 1.5mm). You start to lose a sense of scale when you can zoom in and out arbitrarily and, because the fidelity of an Autocad document is infinite (being mathematically determined), you don't have anything to show you that you're zooming in to a minute detail (like you would if you zoomed in enough on even a really massive image). This is why the 1.5mm holes seemed like a good idea at the time, but now I'm liking the appearance of the larger holes - partially influenced by the way the filter on Kommisar's build looks, but also just because they feel correct for something you want to move air through.

The (now 1mm thick) walls are supported by braces of an additional 2mm thickness, which the mesh is designed to slot into. I really should pare their thickness down just a bit, so I don't have to do a bunch of sanding to get them to fit. If you look closely, you may notice one third of the mesh has an ever so slightly smaller radius, so that the part will be able to fit even with the indented section caused by the ribbed slot feature. The downside of this arrangement is I doubt I can't print both parts of the filter in one go (two parts means two rafts, which is a significant amount of added material and build time). I might be able to print two meshes in one go, though, which would be good, because I need a mirror-opposite filter that wouldn't require any changes to the mesh).

9gzQbKh.png


(In case you couldn't see it, it was the top third. Its only a 1mm difference.)

In other news, I was at the beach all day yesterday, and burned the everloving crap out of my feet, including about six inches up my shins. I'm doing everything I can to mitigate it but, at this point, even standing up is a chore. I've been incredibly easy-burning my entire life, you'd think I'd learn this lesson by now. At least it wasn't my entire back and shoulders this time.

Mesh is always a tricky one, but as long as you have a good method of cutting it out, smoothing the edges, and pressing it flat, it's going to be night and day easier than trying to 3D print the same thing. You can also get squares, circles, whatever. For example, I'm pretty sure I just solved your problem for about a dollar and a couple days waiting on USPS: http://www.ebay.com/itm/Custom-Perf...gauge-Price-per-32-square-inches/130699198700 -
since it's actually filtration sheet, it's the real deal. Plus, then you have a target material appearance for smoothing and painting the 3D printing. And it's probably strong enough that it can be your base to glue the 3D parts onto.

Just a case of knowing what to look for. If they custom perforate it, they may be able to custom cut it too? Or maybe you know someone with a plasma cutter or fiber laser cutter (maybe the uni has one, you can always ask around, maybe beg a little :p). Just need a circle and a strip though, it wouldn't be hard to do by hand if you were careful.

Man, that's pretty sweet. I kind like the look of the big holes now, plus I'm kind of betting on the thickness of that part. However, if I had something similar to this in a square pattern (I'm thinking something like a screen door would have) it would be perfet for the speaker housing, and I'm convinced that you're right in that it would give me an easier time and a better final product. I'll check to see if there's anything laying around the garage (read: ask my grandfather if he acquired anything vaguely similar in the past 30 years) and, if not, do some research on where I can get a cheep square of it.

I don't know anybody with a plasma or laser cutter (well, some friends of mine who went to a different high school used to have access to one through their engineering club, but, I doubt that's an option for my use). I do think it would be easy enough to cut to shape and size using some hand tools like some metal snips or a small saw. The big-ass desk vice I would use for such a project is currently disassembled on my workbench (I tore it down as part of an engineering project, and need to get around to measuring all the parts so I can model them and then reassemble it). As for having them pre-cut, I doubt they would do that, and besides, I do have to put some actual work into this project at some point.

My biggest concern, I suppose, is how to make the joining between the front and the side not look terrible in the three places its exposed. Any ideas?

Ha, I wish. It's pretty nice aesthetically, I actually prefer its appearance to the LAPD riot gear. That plus the Vet gas mask helmet would be awesome. Possibly a relatively straightforward foam build, too.

Heh. I spent a good part of the game in a getup like that. I also spent time wearing full Combat Armour with the rebreather you get from Volare!, which had a bit of a scary look to it. Rebreather + power armour makes you look like some sort of Wolfenstein Supersoldat.

Yeah, canon vs game balancing is always a tricky one. Like, they could make it realistic, but then it would be almost unplayable since it'd be one-shot kill on virtually everyone with any more than a .22 plinker. Might be an interesting gametype option though, like Halo's Legendary. But instead of just adjusting damage and health, actually redo the effects too. Since I have the pulse gun, people in power armor don't really concern me. :p

You should play Metro 2033 and Metro: Last Light, if you haven't. They're absolutely great games in their own right, but if you play in Ranger mode, things get a lot more fun. You no longer have any HUD (which was fairly minimalist to begin with), and everyone drops really quickly, including you. But everyone is still firing 7.62mm round and 12ga shells, so it only takes a couple of hits to do you in. You can't just run and gun around like you can in Halo and CoD.

I have no DLC for either Skyrim nor Fallout, but I only relatively recently discovered this action-RPG genre and made sense of it. The first time I played Mass Effect, 2008 maybe, I was trying to play it like Halo and that went predictably badly. At some point when I get more time I might try some expansions, especially if there's stuff I can build- ARPGs seem much more enduring and loved as a whole than other genres, and given that I've just done Bioshock-Skyrim-Mass Effect-Fallout:NV it's not hard to see why. You get the action to keep things interesting, but you also get story and characters to care about and it's not one long gun-fest- which after a certain age seems to get boring, I dunno about anyone else.

I love the Mass Effect series more than any other, at this point, and I wish it were a little bit more cosplayable. I've got kind of a thing for the nameless, faceless, and badass, and Mass Effect is almost entirely driven by personas. I tried getting into Bioshock lately (I played Bioshock: Infinite and loved it very much) but the gunplay was incredibly difficult for me. Every enemy moved incredibly erratically, I was constantly low on health or ammunition, and the Big Daddys took almost everything I had to knock out (and that's only one, there's like three in a level).
 

Attachments

  • 9gzQbKh.png
    9gzQbKh.png
    98 KB · Views: 506
  • ITipIDQ.png
    ITipIDQ.png
    194.8 KB · Views: 586
So I redesigned the filter. It's a sharper appearance, with that rimmed edge instead of a round, and six larger windows instead of the ten small ones. These are aspects i like, and I think it gives the whole part a bit more of a stamped metal bit. I intentionally enlarged that tab next to the slot on the outside, but there's simply no way I know if to make the geometry the way I actually want it. It would be doable if I were trying to make it pop out of a flat surface, but the fact that the entire thing is on the outside of the circle makes the geometry ****y and any sort of rounding effort gives me a bunch of complaints about tangency and unresolvable profiles. I also accidentally enlarged the texture of the ridges in the slot, but that's pretty insignificant.

The trick is, now it's two seperate pieces - the main housing, and the mesh. This will allow the mesh to print much cleaner, without any support material. I also enlarged the holes (up to 3mm from 1.5mm). You start to lose a sense of scale when you can zoom in and out arbitrarily and, because the fidelity of an Autocad document is infinite (being mathematically determined), you don't have anything to show you that you're zooming in to a minute detail (like you would if you zoomed in enough on even a really massive image). This is why the 1.5mm holes seemed like a good idea at the time, but now I'm liking the appearance of the larger holes - partially influenced by the way the filter on Kommisar's build looks, but also just because they feel correct for something you want to move air through.

The (now 1mm thick) walls are supported by braces of an additional 2mm thickness, which the mesh is designed to slot into. I really should pare their thickness down just a bit, so I don't have to do a bunch of sanding to get them to fit. If you look closely, you may notice one third of the mesh has an ever so slightly smaller radius, so that the part will be able to fit even with the indented section caused by the ribbed slot feature. The downside of this arrangement is I doubt I can't print both parts of the filter in one go (two parts means two rafts, which is a significant amount of added material and build time). I might be able to print two meshes in one go, though, which would be good, because I need a mirror-opposite filter that wouldn't require any changes to the mesh).

(In case you couldn't see it, it was the top third. Its only a 1mm difference.)

Seems like you've made distinct progress, it's looking good. And it's all good practice for the harder parts later.

In other news, I was at the beach all day yesterday, and burned the everloving crap out of my feet, including about six inches up my shins. I'm doing everything I can to mitigate it but, at this point, even standing up is a chore. I've been incredibly easy-burning my entire life, you'd think I'd learn this lesson by now. At least it wasn't my entire back and shoulders this time.

Ouch! Good job 3D modelling only requires sitting down. :p

Man, that's pretty sweet. I kind like the look of the big holes now, plus I'm kind of betting on the thickness of that part. However, if I had something similar to this in a square pattern (I'm thinking something like a screen door would have) it would be perfet for the speaker housing, and I'm convinced that you're right in that it would give me an easier time and a better final product. I'll check to see if there's anything laying around the garage (read: ask my grandfather if he acquired anything vaguely similar in the past 30 years) and, if not, do some research on where I can get a cheep square of it.

Yep. Sounds like a plan. There are many different sizes of mesh and perforated sheet available to buy, if you did want to go that route. eBay metal merchants have been my friend for a decade. :D (I was never a normal kid...) It'll sure as hell be cheaper than screening, unless you have a Habitat ReStore nearby, you might be able to find it for a dollar or two there.

I don't know anybody with a plasma or laser cutter (well, some friends of mine who went to a different high school used to have access to one through their engineering club, but, I doubt that's an option for my use). I do think it would be easy enough to cut to shape and size using some hand tools like some metal snips or a small saw. The big-ass desk vice I would use for such a project is currently disassembled on my workbench (I tore it down as part of an engineering project, and need to get around to measuring all the parts so I can model them and then reassemble it). As for having them pre-cut, I doubt they would do that, and besides, I do have to put some actual work into this project at some point.

Yeah, I agree. Only way to get more confident with your hands is by using them a LOT. And as we all know, ain't gonna be no CNC abilities for a while the nuclear zombie apocalypse. :D

My biggest concern, I suppose, is how to make the joining between the front and the side not look terrible in the three places its exposed. Any ideas?

The front window to the side and the tab? I'm not sure which specific parts you mean here. I'd probably print it all as separately as possible. You only get those sharp edges when separate objects come together (or if you mill it...). You're going to need some filling and sanding regardless, so I guess it'll come together during the finishing work (which you may need to do prior to actually gluing it all together in order to retain the sharpness).

Heh. I spent a good part of the game in a getup like that. I also spent time wearing full Combat Armour with the rebreather you get from Volare!, which had a bit of a scary look to it. Rebreather + power armour makes you look like some sort of Wolfenstein Supersoldat.

Ha, yeah, I just hadn't come across a rebreather before and didn't want to get mine damaged by combat. If there's a trick to being able to fix stuff using random scrap, I haven't come across it yet. Other than making a weapon repair kit.

You should play Metro 2033 and Metro: Last Light, if you haven't. They're absolutely great games in their own right, but if you play in Ranger mode, things get a lot more fun. You no longer have any HUD (which was fairly minimalist to begin with), and everyone drops really quickly, including you. But everyone is still firing 7.62mm round and 12ga shells, so it only takes a couple of hits to do you in. You can't just run and gun around like you can in Halo and CoD.

I have 2033, I just haven't played it yet. Right now I'm only really playing games for prop research, and I dunno if anyone cosplays Metro yet. That series looks awesome though, so people should.

I love the Mass Effect series more than any other, at this point, and I wish it were a little bit more cosplayable. I've got kind of a thing for the nameless, faceless, and badass, and Mass Effect is almost entirely driven by personas. I tried getting into Bioshock lately (I played Bioshock: Infinite and loved it very much) but the gunplay was incredibly difficult for me. Every enemy moved incredibly erratically, I was constantly low on health or ammunition, and the Big Daddys took almost everything I had to knock out (and that's only one, there's like three in a level).

Mass Effect is pretty easy to cosplay in terms of difficulty of making the stuff. ME weapons are on my to-build list, for sure. It is hard to find anyone like an ODST or Ranger, though, it's true. Closest you get is bounty hunters and generic Alliance soldiers. There's so much customisation to do though, I don't get why everyone just makes the standard low-level N7 stuff, though maybe in ME2 or 3 you don't get as much of a choice, I have no idea. Like Halo Reach+, I guess I'll never play ME3, since I don't use Origin (except for a couple of Humble Bundle games and another couple forced on me after the fact from Steam). Though I hear not finishing three isn't such a bad thing. :p

Maybe you have the difficulty set too high? The spider splicers can be a bitch unless you engage from distance or spray and pray with a souped-up shotgun, but other than that it should be relatively ok. I'm just playing for the immersive experience and story (vs, say, passively watching TV), and for prop research. I no longer consider myself a gamer, so difficulty accomplishments are irrelevant.
 
Ha, yeah, I just hadn't come across a rebreather before and didn't want to get mine damaged by combat. If there's a trick to being able to fix stuff using random scrap, I haven't come across it yet. Other than making a weapon repair kit.

It's the only one you get, so yeah. That particular item has the unique distinction of not needing to be repaired. There are places you can take your equipment - Hoover Dam and the Mojave Outpost come to mind - where you can have your equipment repaired and maintained - for the right price. This is particularly useful for things with rare or no spare parts (like the YCS/186).

Mass Effect is pretty easy to cosplay in terms of difficulty of making the stuff. ME weapons are on my to-build list, for sure. It is hard to find anyone like an ODST or Ranger, though, it's true. Closest you get is bounty hunters and generic Alliance soldiers. There's so much customisation to do though, I don't get why everyone just makes the standard low-level N7 stuff, though maybe in ME2 or 3 you don't get as much of a choice, I have no idea. Like Halo Reach+, I guess I'll never play ME3, since I don't use Origin (except for a couple of Humble Bundle games and another couple forced on me after the fact from Steam). Though I hear not finishing three isn't such a bad thing. :p

Yeah, well there's also people like Eclipse, Blue Suns, and Blood Pack mercs. Well, not Blood Pack, they're all Krogan and Vorcha. And no, they seriously ramped down the customization system in the later games, where instead of getting choices between different sets of armour and incrimentally better weapons, you got to swap out parts of armour piecemail and pick from several significantly different weapons (with incrimental upgrading, rather than the ammo/weapon/armor mods). I think the storytelling throughout the whole series is well worth it, though, so it might be worthwhile to put up with Origin, or sail the high seas should your allegiances tend that way.
 
Right, sorry for the double post, but I have *gasp* actual progress to talk about.

Yesterday I opened up the pep file for the mask. I continuously found myself messing with it more and more until I'd pretty much resigned myself to completely re-unfolding it. The original folding had a lot of small pieces with no seeming rhyme or reason, so I think the original unfolder might have just let pepakura do it with minimal human input. I tried to turn it into logical sections with a split down the middle of the mask, which left me with large pieces with lots of folding to be done, but a lot less cutting and gluing. I also scaled it, which I'll have more input on later.

YojDlgKh.png


So then I found myself out in my garage getting actual work done. I was surprised with how quickly things went and I credit the time I spent reunfolding the mask for that - the fact that I'm not dealing with a metric ton of tiny parts, specifically. My pep work isn't particularly clean, or fast - I've got big hands, and when I'm letting glue dry, I tend to start browsing reddit or get into a conversation on facebook - so this is doubly impressive. This is also a look into my current work environment. I found this bottle of glue laying around (it's leftover from an engineering project kit I had my senior year of high school) and the applicator tips are spectacular. I'll have to see if I can find more of it, so I don't have to go back to dipping q-tips in a bottle of elmers. I also... misplaced my previous cutting razor, but these ones are working out alright. The metal one on the left is sharp, for cutting. Red handle on the right is pretty dull, for scoring. Works out pretty well.

cjebYlah.jpg


So the problem with this mask is that I scaled it like I would scale a full size helmet. The mask is not a full size helmet. It might be a bit larger than I intended it to be. Test fitting what I have so far, though, it doesn't seem like it will be problematic - hell it could only get so much smaller before I risk not being able to fit my cheekbones in. Things should be okay, but I might have to trim the top and bottom edges a bit. The "tail" part, which covers the side of the head, and wraps around the top and back (underneath the helmet) would be a problem if I intended to use those big awkward loops. Instead I intend to dremel some slots to put straps through, but that might mean I'll have to find some padding to keep the mask lightly pressed against the bridge of my nose, and my cheekbones (and I'm debating how comfortable that will be).

The upside is, I'm guaranteed to have enough space for my beard and some electronics. The downside is, I scaled the thing to something like 140%, and didn't realize the effect this would have on the other parts. My testbed filter is 7.5cm in diameter, and the speaker on the front was supposed to be the same, but that's clearly not going to be an option. At least I figured this out before I printed any of the parts I intend to use on the final build.

Should only take about another night or two before I have the pepakura portion of the mask itself completed. I'm going to have to start looking into things like material for the eyepieces (I have some thin red tranparent plastic but I'm concerned it'll allow people to actually see me), whether or not its worthwhile to build the helmet from scratch (or look for some sort of pre-existing object to modify), and thinking about some of the electronics I'd like to add. RobTC, I started looking around my garage for some of that metal mesh, but the only thing I found so far was a bit too flexible for my purposes.
 

Attachments

  • YojDlgKh.png
    YojDlgKh.png
    95 KB · Views: 3,017
  • cjebYlah.jpg
    cjebYlah.jpg
    93.6 KB · Views: 501
Last edited by a moderator:
Oh dear, triple post. I'm not sure if there's technically a rule about this, but I haven't been warned yet. Besides, I've got progress I'd like to share, and it's not like I can expect a whole lot of activity in the "non-Halo" section. Anyway.

The mask is finished! Sort of. Technically. Not really. I've finished the bulk of the papercraft work. I still have to add the cheeks before I can call it properly complete, and I need to add the support parts (the eyepieces and a bunch of internal struts) before I can resin it. This isn't the same one I showed earlier. I had to have a friend point out to me how comically large that one was (the snout part alone covered almost my entire face and I was in denial), so I had to rescale and start from scratch. The scale on this one is more like 1.1 (250mm vertical, as opposed to 285mm). This means that I won't have to rebuild the filter piece I just modeled.

ZXjIDnAl.jpg

No, your vision isn't screwing with you, it's a bit distorted and I'm not sure why. It started doing that when I put the right eyepiece in. I'm hoping that the addition of the struts will cause it to straighten out. I'm also slightly concerned that its being forced to expand a bit around my temples, so I'll have to make sure I have it as wide as I need it to be before I do anything to make it rigid. Oh boy. I'm getting to the point where I need to consider how its going to interact with the part that covers the rest of my head, so I may consider building that and trying to work on it as one solid piece.

N4h5RyPl.jpg

I've been practicing sanding this test piece and decided to give it a go with primer. This is a pretty terrible picture, and it didn't catch any of the detail I really wanted to show, but I learned that with enough sanding, I can definitely get the material smooth enough, both for my own taste and for the paint to take. This is good, because I was worried that I might end up taking down too much of the material (if you look closely, there's a couple places on the top that chipped away to reveal the hollow infill. I blame this on my belt sander, which I've discovered has a whopping 0 grit belt on it now, so I'm going to stick to tedious amounts of hand sanding).

I'm starting to wonder if I should redesign this piece (again!) so that the perforated insert and the sunken, ridged piece inside the slot are one part. This might make assembly a little harder (well, hypothetically impossible, but I'm betting on the plastic being able to flex a millimeter or so) but it would mean I have one piece I can paint black and another I can paint silver - with no need to worry about taping things off. Might increase the amount of support material I have to deal with, but that shouldn't be a huge problem.

zHuoUKKh.png

I don't know why I keep subjecting myself to Autodesk. Anyway, this is the new speaker housing that I've redesigned, without an included mesh, and just today sent off to be printed. With any luck I'll have it back before the week's out. Since I'm going to get an actual metal mesh to put in there, I added a small ring connecting the three main segments. Aside from preserving their relative position, it'll let me hide the joint between the mesh on the side and on the front (as I doubt I'll be able to make it look nice). I was surprised that no support material is needed there, but I'm not one to argue with a good thing. I have a mesh material I could use, but it flexes a bit too much for my taste given that that center piece has to be attached on top, so I'll have to do some digging around on the internet.

I'm intending to put something in here that will distort my voice. Amplification would be nice, too, but I don't need to be heard across rooms, I mostly just want the voice to sound like its coming through a speaker. I haven't decided exactly how I'm going to do this, but I do have a pretty good sized portable battery that puts out 5V through USB (either at 1A or 2.1A). I have a speaker (well, a disembodied headphone) that would fit in there, but I don't know how well that would work, and I'd need some sort of microphone and amplification circuit (my previous tinkering with things I have on hand have resulted in failure). Someone also suggested I could put a small fan in there, (I have got some ~80mm fans from old computers I could probably fit in there), which would distort my voice a bit (given that I'd be speaking directly into it) and have the added effect of sucking out hot air, but I'm not sure how pronounced of an effect that would be. Any recommendations would be appreciated.
 

Attachments

  • zHuoUKKh.png
    zHuoUKKh.png
    59.9 KB · Views: 558
  • N4h5RyPl.jpg
    N4h5RyPl.jpg
    61.2 KB · Views: 493
  • ZXjIDnAl.jpg
    ZXjIDnAl.jpg
    38.2 KB · Views: 646
Oh dear, triple post. I'm not sure if there's technically a rule about this, but I haven't been warned yet. Besides, I've got progress I'd like to share, and it's not like I can expect a whole lot of activity in the "non-Halo" section. Anyway.

I wouldn't worry about it, as the OP. I never thought about it. As long as the views keep rising, people are reading. They may just not have input (3D design and CNC are still relatively novel in the grand scheme of things).

The mask is finished! Sort of. Technically. Not really. I've finished the bulk of the papercraft work. I still have to add the cheeks before I can call it properly complete, and I need to add the support parts (the eyepieces and a bunch of internal struts) before I can resin it. This isn't the same one I showed earlier. I had to have a friend point out to me how comically large that one was (the snout part alone covered almost my entire face and I was in denial), so I had to rescale and start from scratch. The scale on this one is more like 1.1 (250mm vertical, as opposed to 285mm). This means that I won't have to rebuild the filter piece I just modeled.

No, your vision isn't screwing with you, it's a bit distorted and I'm not sure why. It started doing that when I put the right eyepiece in. I'm hoping that the addition of the struts will cause it to straighten out. I'm also slightly concerned that its being forced to expand a bit around my temples, so I'll have to make sure I have it as wide as I need it to be before I do anything to make it rigid. Oh boy. I'm getting to the point where I need to consider how its going to interact with the part that covers the rest of my head, so I may consider building that and trying to work on it as one solid piece.

Pep seems like the most important place to know when to stick and when to twist. I guess if the struts and resin don't fix it, you'll have to rebuild. Maybe add specific reinforcements as you go? I pay super close attention to mating lines, since they love to warp- in paper or any other material

I've been practicing sanding this test piece and decided to give it a go with primer. This is a pretty terrible picture, and it didn't catch any of the detail I really wanted to show, but I learned that with enough sanding, I can definitely get the material smooth enough, both for my own taste and for the paint to take. This is good, because I was worried that I might end up taking down too much of the material (if you look closely, there's a couple places on the top that chipped away to reveal the hollow infill. I blame this on my belt sander, which I've discovered has a whopping 0 grit belt on it now, so I'm going to stick to tedious amounts of hand sanding).

Weird, I thought the scale started at 36 grit for general purpose sheet abrasives. Anyway, you should probably grab some 60 and 180 grit belts, it'll be worth it in the long run (though they do run remarkably high, it's weird).

I'm starting to wonder if I should redesign this piece (again!) so that the perforated insert and the sunken, ridged piece inside the slot are one part. This might make assembly a little harder (well, hypothetically impossible, but I'm betting on the plastic being able to flex a millimeter or so) but it would mean I have one piece I can paint black and another I can paint silver - with no need to worry about taping things off. Might increase the amount of support material I have to deal with, but that shouldn't be a huge problem.

Can't say. Since it's interior, you can cheat the dimensions if necessary, it only needs to be correct where it's externally visible. Though I'd still say grabbing a piece of mesh off eBay for a couple dollars would be the way to go there, and a 4x8 piece can probably be used for both the filter and the speaker.

I don't know why I keep subjecting myself to Autodesk. Anyway, this is the new speaker housing that I've redesigned, without an included mesh, and just today sent off to be printed. With any luck I'll have it back before the week's out. Since I'm going to get an actual metal mesh to put in there, I added a small ring connecting the three main segments. Aside from preserving their relative position, it'll let me hide the joint between the mesh on the side and on the front (as I doubt I'll be able to make it look nice). I was surprised that no support material is needed there, but I'm not one to argue with a good thing. I have a mesh material I could use, but it flexes a bit too much for my taste given that that center piece has to be attached on top, so I'll have to do some digging around on the internet.

I'm intending to put something in here that will distort my voice. Amplification would be nice, too, but I don't need to be heard across rooms, I mostly just want the voice to sound like its coming through a speaker. I haven't decided exactly how I'm going to do this, but I do have a pretty good sized portable battery that puts out 5V through USB (either at 1A or 2.1A). I have a speaker (well, a disembodied headphone) that would fit in there, but I don't know how well that would work, and I'd need some sort of microphone and amplification circuit (my previous tinkering with things I have on hand have resulted in failure). Someone also suggested I could put a small fan in there, (I have got some ~80mm fans from old computers I could probably fit in there), which would distort my voice a bit (given that I'd be speaking directly into it) and have the added effect of sucking out hot air, but I'm not sure how pronounced of an effect that would be. Any recommendations would be appreciated.

It's possible to do good-old-fashioned analogue signal processing. Distortion (as in, overdrive) is simply a preamp outputting a signal that's too high for the power amp, and therefore the peaks get cut off and it ends up as choppy squares. I imagine a capacitor based circuit will form a high-pass filter, trimming any bass off, and then finally you could add a white noise generator (not sure... an op-amp set to a crazy high gain with a constant voltage input? Might need to sneak into a lab with a 'scope) for a little bit of radio staticky goodness. Not necessarily in that order, but yeah. I think it could be done entirely with standard electronic components in a super small footprint.

I'd chop off the mounting holes and stick the fan in the air filter canister. If it's mesh anyway, it may as well function. I didn't notice in-game that they sounded any different to the other NCR rangers, so I'm inclined to think the "speaker" is actually just an air-out valve, as is the norm on respirators. But it's fun to add the badass voice modulation.
 
I wouldn't worry about it, as the OP. I never thought about it. As long as the views keep rising, people are reading. They may just not have input (3D design and CNC are still relatively novel in the grand scheme of things).

Good point. Haven't thought about it that way. Wouldn't say I'm worrying about having people's attention, just about being that guy talking to himself. Anyway, I appreciate your continued input.

Pep seems like the most important place to know when to stick and when to twist. I guess if the struts and resin don't fix it, you'll have to rebuild. Maybe add specific reinforcements as you go? I pay super close attention to mating lines, since they love to warp- in paper or any other material

I really hope not. Really, really hope not. If I have to do that, I'll definitely have to reconsider the order in which I assemble the mask, as I think that's what's caused this problem. I actually haven't noticed it being as distorted as it is in this picture, it just wants to curl in a bit in its resting state. I think the struts will fix it.

Weird, I thought the scale started at 36 grit for general purpose sheet abrasives. Anyway, you should probably grab some 60 and 180 grit belts, it'll be worth it in the long run (though they do run remarkably high, it's weird).

I'm not sure if you picked up, but I was joking about the belt being old and worn enough to be pretty much smooth. I think I'd like to stick to hand sanding, since it gives more control, and I'm not going to have a whole lot of things I can put on the belt sander. I have got a lot of sheets of 60, 180, and 600, so that's a start.

Can't say. Since it's interior, you can cheat the dimensions if necessary, it only needs to be correct where it's externally visible. Though I'd still say grabbing a piece of mesh off eBay for a couple dollars would be the way to go there, and a 4x8 piece can probably be used for both the filter and the speaker.

The more time goes by, the more I want to get some metal mesh for this, and i just might. Might. It's worth noting, I want the speaker and the filter to have different kinds of mesh (square and circular, respectively). It's cheap enough that I might just do that. Thanks to you I've got a source for the circular mesh, just need to do some digging for the square stuff.

It's possible to do good-old-fashioned analogue signal processing. Distortion (as in, overdrive) is simply a preamp outputting a signal that's too high for the power amp, and therefore the peaks get cut off and it ends up as choppy squares. I imagine a capacitor based circuit will form a high-pass filter, trimming any bass off, and then finally you could add a white noise generator (not sure... an op-amp set to a crazy high gain with a constant voltage input? Might need to sneak into a lab with a 'scope) for a little bit of radio staticky goodness. Not necessarily in that order, but yeah. I think it could be done entirely with standard electronic components in a super small footprint.

Analog is probably the way to go, but I don't know much of anything about it. I have a friend who definItely could help, but I don't know how much he will, so it might be down to old fashioned experimentation and research. My previous attempt to do this involved hacking an amplifier out of some old desktop speakers, but that only worked with a significant pre-gain (e.g. my phone).

I'd chop off the mounting holes and stick the fan in the air filter canister. If it's mesh anyway, it may as well function. I didn't notice in-game that they sounded any different to the other NCR rangers, so I'm inclined to think the "speaker" is actually just an air-out valve, as is the norm on respirators. But it's fun to add the badass voice modulation.

I could do that, though I might have to enlarge the filter, as it currently has an external diameter of 75mm. I'll look into it more. I like the idea but I always assumed I'd be using that space for electronics. I might not have to since I've got that whole housing in the side of the mask with nothing actually planned to be in it save for a flashlight.

The fact that Rangers don't sound different is the same reason people in nuclear powered walking tanks don't sound different: technical oversight or limitation. Everyone with a helmet gets the same muffled filter applied. If you look closely at the front of the mask, even in game, you'll notice it has details enumerating various levels of volume, the loudest at 110dB. The exact method of volume control is, of course, missing, but the models aren't exactly high detail.
 
Good point. Haven't thought about it that way. Wouldn't say I'm worrying about having people's attention, just about being that guy talking to himself. Anyway, I appreciate your continued input.

Yeah, I'm just saying as long as you have people's attention, by definition you're not talking to yourself. Not that I ever worry about talking to myself anyway. :D

I really hope not. Really, really hope not. If I have to do that, I'll definitely have to reconsider the order in which I assemble the mask, as I think that's what's caused this problem. I actually haven't noticed it being as distorted as it is in this picture, it just wants to curl in a bit in its resting state. I think the struts will fix it.

Hopefully, yeah. Depending on the level of finish you're going for, it's usually better to finish as much as possible in as many pieces as possible prior to assembly. I just did that for the BR85 scope and it's definitely made life easier.

I'm not sure if you picked up, but I was joking about the belt being old and worn enough to be pretty much smooth. I think I'd like to stick to hand sanding, since it gives more control, and I'm not going to have a whole lot of things I can put on the belt sander. I have got a lot of sheets of 60, 180, and 600, so that's a start.

Ha, nope, straight over the head. If I'd followed the logic train I might have gotten there, but never mind. Hahaha.

For hand sanding, make sure you have a variety of sanding blocks. I have a proper screw-together plastic one from Lowes, but I also have an inch cube one from 3/4" MDF that I use most of the time, and a thin strip I made from a sawn down sheet of 1/2" MDF (bandsaws are glorious and amazing) for details. It's about 2mm thick, maybe 9-10mm wide, maybe 35mm long and I sanded a bevel into one end. That's handy for a variety of details and internal angles. Sometimes you just have to rely on the paper itself and fold it in half to get into somewhere. Depends on the level of finish you're after, I suppose.

The more time goes by, the more I want to get some metal mesh for this, and i just might. Might. It's worth noting, I want the speaker and the filter to have different kinds of mesh (square and circular, respectively). It's cheap enough that I might just do that. Thanks to you I've got a source for the circular mesh, just need to do some digging for the square stuff.

Yeah, the perforated sheet was super easy to find. Mesh is also super easy to find as long as you want the woven-wire type and not some kind of square-perforation grille sheet thing. Easiest way to get fine stainless mesh would just be to pop into Dollar Tree and grab some kind of shallow sieve or splash screen. If you need something more structural, then it'll be back to eBay.

Analog is probably the way to go, but I don't know much of anything about it. I have a friend who definItely could help, but I don't know how much he will, so it might be down to old fashioned experimentation and research. My previous attempt to do this involved hacking an amplifier out of some old desktop speakers, but that only worked with a significant pre-gain (e.g. my phone).

Basic analogue electronics is pretty straightforward. If you got into an engineering course, you already have the intelligence and research skills to get it done yourself.

I could do that, though I might have to enlarge the filter, as it currently has an external diameter of 75mm. I'll look into it more. I like the idea but I always assumed I'd be using that space for electronics. I might not have to since I've got that whole housing in the side of the mask with nothing actually planned to be in it save for a flashlight.

Yeah, there's definitely room in this helmet. Sucking air from the front of your head seems like the best option, but I dunno. Maybe instead of one big 80mm fan, a couple of 60mm fans, one at the front and one at the back? Depends how long you intend to be wearing it, I guess.

The fact that Rangers don't sound different is the same reason people in nuclear powered walking tanks don't sound different: technical oversight or limitation. Everyone with a helmet gets the same muffled filter applied. If you look closely at the front of the mask, even in game, you'll notice it has details enumerating various levels of volume, the loudest at 110dB. The exact method of volume control is, of course, missing, but the models aren't exactly high detail.

Fair point. Sounds like there should be a linear pot on the side of the speaker housing then. Having markings somewhere the user can't see them seems odd, but it is a highly stylised game.
 
Also I just had to pass through Ranger Station Delta, so I got a bunch of detail shots since some things looked different on this guy, for some reason.

2015-04-09_00002.jpg

2015-04-09_00003.jpg

2015-04-09_00004.jpg

2015-04-09_00005.jpg

2015-04-09_00006.jpg

2015-04-09_00007.jpg

2015-04-09_00008.jpg

2015-04-09_00009.jpg

2015-04-09_00010.jpg

2015-04-09_00011.jpg

Some intriguing details there. I'm wondering what the backpack is given that the mask doesn't have the air hose coming out of the right hand side of it. It also looks like both meshes are woven-wire style, not perforated sheet, though I guess that's a stylisation choice. Lots of little details on that electronics box, too.
 
Oh man, those are some spectacular reference shots. Some of these are going to be really helpful in the future. The resources available online are actually significantly lacking. Any combination of searches might net you a couple renders, a couple in-game screenshots, and the same recurring photos of concept art, Kommisar's original build (aside from doing a really good job, Kommisar has the best documented and most popular build thread I've seen for NCR ranger cosplays) and a few other builds.

Some intriguing details there. I'm wondering what the backpack is given that the mask doesn't have the air hose coming out of the right hand side of it. It also looks like both meshes are woven-wire style, not perforated sheet, though I guess that's a stylisation choice. Lots of little details on that electronics box, too.

Things tend to vary a bit between renders, builds, and interpretations. Which is cool, since things aren't always consistent in game (as I pointed out above with the Advanced Riot Gear). The consensus seems to be that the thing on the back is an air tank, which I admit doesn't make much sense. It doesn't make much sense that the Rangers would need to carry it. It doesn't make sense that the Rangers would carry it and not hook it up (the box art even has the hose going to the mask, but none of the in-game armours do). And it doesn't make much sense that you'd have both an air supply and an air filter (I mean, one or the other makes sense, since things were getting really, really out of hand before the Great War, and the LAPD was probably out in full force every night, trying not to breathe in the tear gas).

The other thing that varies a lot is the electronics suite on the right side of the helmet. The best ones, of course, are cleverly thrown together scrap materials. I intend to model them up and have them printed, since they're not exactly complex. I've also got the nice quality of not having to be 3000% accurate since I've already admitted that my helmet isn't supposed to be the exact same model as any of the other ones in the game.

I did a little more looking past the link you sent me. It would appear I can get perforated steel (circles in a 60 degree offset pattern) in almost any size, which is good. I think I'll end up getting some of that for the filter. I have to do some digging and see what I have in the way of small fans (like I said, I know I have some from some old computers, but I don't know if they're 80 or 60 or what) and then I can redesign the filter accordingly (hopefully I won't have to change the size, but I need to remove the printable mesh part and I'm going to consider making the slot inset removable for separate painting).

I can also get varying size woven steel mesh pretty cheaply, which I don't mind the appearance of enough for it to be a big deal, but I'm still a little concerned about trying to glue the center piece of the speaker onto that. I suppose worst case scenario I could punch some holes or something in it, and print (or make, but I have to admit I'm in love with the printer and its ability to give me exactly-prescribed dimensions) a small brace piece to sit behind the mesh and poke through only enough to support the center ring. So many options. When I get the speaker housing part I'll finalize my decisions and commit to purchasing what I need.

I didn't think about it at the time, but one of those materials is also going to be useful for the earpieces. I'm not sure which looks better or which is more true to the original. I also need to seriously consider whether its worth my time to try to bondo out that helmet or try to find a good one online for a decent price (I'm having no good luck with that, as my search terms thus far either yield antiques, or really accurate replicas, all of which are pricy and not what I'm looking for). I've heard of that being done, but we'll see if anything comes of it.
 
why didn't you just rip the 3D file off the game? just takes a few basic modding tools, and a 3D program. it's what I did with my DR helmet. it will be 100 percent authentic and badass. but be warned that the game designers never actually intended you to try and put the stupid thing on, so there's some places you may have to alter due to some Bethesda employee laziness.
 
Hi guys,

I know this is a bit of reviving and old post, but I was wondering if there are 3D printable files available for this model to download please?

Thanks in advance,
 
Status
Not open for further replies.
Back
Top